Pushing Notifications in Android Using FCM
Ever wondered how to integrate Push Notifications in your android app ??? then you are at the right place.
In this blog, we will take you through step by step implementation of Push Notifications in your app using Firebase but before that,
What is Firebase?
Firebase is a platform for your devices to develop awesome apps using collections of services provided by firebase.
To integrate the Push Notification in our app, we need to use the Firebase Cloud Messaging Service of Firebase.
Now, Lets integrate the Service in our app,
Step 1:
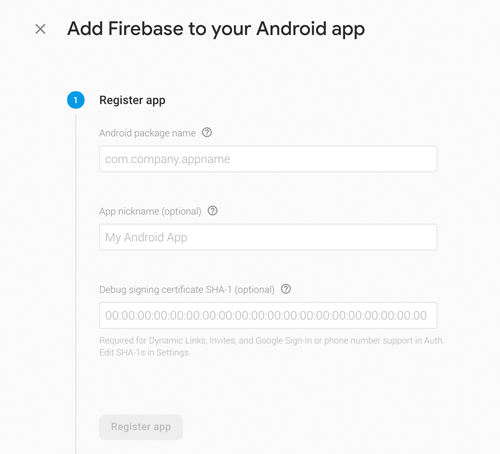
First we need to setup out app to firebase console,
- First we need to create a project from console.firebase.google.com by providing the Project Name and the Location
- Then we need to add out app, by sharing the app's package name (for eg: com.mindorks.app) , app's nick name, and a SHA1 key.
- To generate the SHA key we need to use ,
keytool -list -v \
-alias androiddebugkey -keystore ~/.android/debug.keystore
and for Release SHA1 ,
keytool -exportcert -list -v \
-alias <your-key-name> -keystore <path-to-production-keystore>
* Once the Setup is done , we will get a google-serivces.json file ,
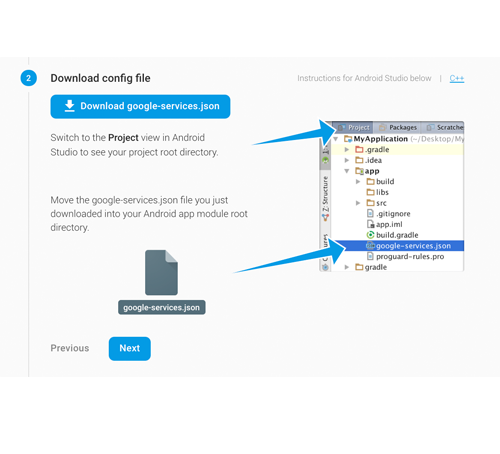
- We need to add the file in our project under app package.
- Once the json file is added we need to add the Firebase dependencies,
In the project's build.gradle,
buildscript {
  dependencies {
    // Add this line
    classpath 'com.google.gms:google-services:4.2.0'
  }
}
and in app's build.gradle,
dependencies {
  // Add this line
  implementation 'com.google.firebase:firebase-core:16.0.9'
}
and at the bottom of the app's build.gradle add,
apply plugin: 'com.google.gms.google-services'Now the setup of project is completely done and let's start with Firebase cloud Notification.
Step 2:
Let's add the FCM dependency by adding the following in app level build.gradle ,
implementation 'com.google.firebase:firebase-messaging:18.0.0'Step 3:
We need to create a service which extends FirebaseMessagingService
class MyFirebaseMessagingService : FirebaseMessagingService() and add it to the Andorid Manifest file using,
<service
    android:name=".MyFirebaseMessagingService"
    android:exported="false">
    <intent-filter>
        <action android:name="com.google.firebase.MESSAGING_EVENT" />
    </intent-filter>
</service>
FirebaseMessagingService is responsible for handling the messaging through Firebase Cloud Messaging
Step 4:
To communicate with the App of an user, the Firebase needs a specific identity of the user. This is handled by the Firebase Token which is unique for every user. To generate the token we need to call,
FirebaseInstanceId.getInstance().instanceId
        .addOnCompleteListener(OnCompleteListener { task ->
            if (!task.isSuccessful) {
                Log.w(TAG, "getInstanceId failed", task.exception)
                return@OnCompleteListener
            }

            // Get new Instance ID token
            val token = task.result?.token

            // Log and toast
            val msg = getString(R.string.msg_token_fmt, token)
            Log.d(TAG, msg)
            Toast.makeText(baseContext, msg, Toast.LENGTH_SHORT).show()
        })
Here the token are volatile.The registration token changes when:
- The app deletes Instance ID
- The app is restored on a new device
- The user uninstalls/reinstall the app
- The user clears app data.
We need to geneate a new token ,
class MyFirebaseMessagingService : FirebaseMessagingService() {
    override fun onMessageReceived(remoteMessage: RemoteMessage?) {
        Log.d(TAG, "From: ${remoteMessage?.from}")
        // Check if message contains a notification payload.
        remoteMessage?.notification?.let {
            Log.d(TAG, "Message Notification Body: ${it.body}")
            //Message Services handle notification

        }
    }
    override fun onNewToken(token: String) {
        //handle token
    }
}
When the new token is generated we need to update the token wherever we store the token. We need to store the token in our backend service by using some API for better communication between app and our backend services.
In OnMessageReceived , we handle the Data Payload which we receive from our backend server/Firebase console. We can use Notification Manager class to show it as notification for the app or we can use it however we want.
Step 5:
To Show the message as Notifiation we add in onMessageReceived(),
class MyFirebaseMessagingService : FirebaseMessagingService() {
    override fun onMessageReceived(remoteMessage: RemoteMessage?) {
        Log.d(TAG, "From: ${remoteMessage?.from}")
        // Check if message contains a notification payload.
        remoteMessage?.notification?.let {
            Log.d(TAG, "Message Notification Body: ${it.body}")
            //Message Services handle notification
            val notification = NotificationCompat.Builder(this)
                    .setContentTitle(remoteMessage.from)
                    .setContentText(it.body)
                    .setSmallIcon(icon)
                    .build()
            val manager = NotificationManagerCompat.from(applicationContext)
            manager.notify(/*notification id*/0, notification)

        }
    }

    override fun onNewToken(token: String) {
        //handle token
    }
}
Thats it !! you have successfully integrated the FCM for your push notifications.
To Test the notification in your app, goto console.firebase.google.com -> your project and open the notification console. You will see the following screen,
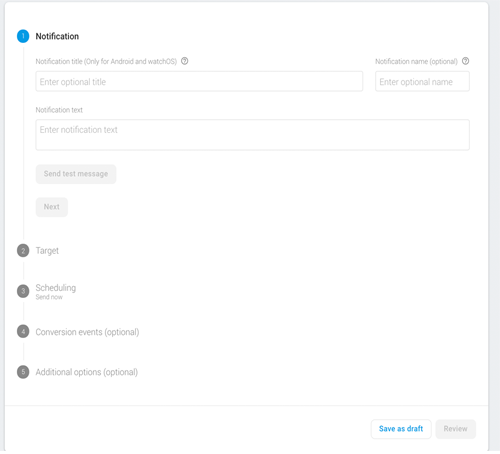
Thats pretty much how you can integrate and test your app with Push Notifications in Android.
Miscellaneous :
- If you want to send notification to a section of users where users have same common interest lets say ' cricket ', we can use Firebase's topic feature. To let user subscribe to a topic we use,
FirebaseMessaging.getInstance().subscribeToTopic("cricket")
        .addOnCompleteListener { task ->
            var msg = getString(R.string.msg_subscribed)
            if (!task.isSuccessful) {
                msg = getString(R.string.msg_subscribe_failed)
            }
            Log.d(TAG, msg)
            Toast.makeText(baseContext, msg, Toast.LENGTH_SHORT).show()
        }
This will subscribe you to cricket topic and whenever a message is sent for cricket topic, all users who subscribed to it will receive the message.
That's it from this blog, keep learning :)
Team MindOrks