Using Exoplayer to play Video and Audio in Android like a Pro
Before starting, hold on a while and think of some application that includes Audio or Video in any form. Did you get the name of an app? In fact, think of apps that don’t have audio or video present in it. Did you find one? This shows that how important is media to apps.
Playing music and video in your android app is a must-have task because music and video are one of the most effective ways of fast communication between the user of the app and the provider or the developer of the app. There are many video applications that we use in our daily life such as YouTube, Netflix, Amazon Prime Video, etc. And as an Android Developer, you can also make an Android app like YouTube or Netflix.
Media can be played from the Internet or from your local device. Even, you can download and store the media in your local device or phone and there are various ways of adding audio and video in an Android app. Some of these are MediaPlayer and ExoPlayer . In this blog, we will learn one of them i.e. the ExoPlayer . We will learn about ExoPlayer and we will see how to use ExoPlayer in our Android app.
The following is the timeline for this blog:
- Recap MediaPlayer
- What is ExoPlayer?
- MediaPlayer vs Exoplayer
- How to use ExoPlayer in Activity/Fragment?
- Playback States
- ExoPlayer example
- Handling Orientation change
- Conclusion
So, let’s get started.
MediaPlayer
To integrate audio, video, and images in your apps easily, the Android multimedia framework provides you with the support of MediaPlayer. The MediaPlayer class is used to play media in android devices. It supports almost all types of media format present in Android. Using MediaPlayer in our app is very easy. But the main drawback of the MediaPlayer is that it supports very little customization i.e. if you want to customize your MediaPlayer as per your own needs, then you will find it difficult to do so. So, if you want to customize your media player then you should use ExoPlayer.
What is ExoPlayer?
Is ExoPlayer new to you? Wait, have you watched any YouTube video today? Yes? So, you have already used ExoPlayer. The YouTube app and many more Google’s video streaming apps use the ExoPlayer to stream and play videos.
ExoPlayer is a media player library that provides a way to play media with lots of customization in your android app. It’s an alternative of Android's MediaPlayer library used to play videos and audios.
Some of the advantages of ExoPlayer are:
- It supports dynamic adaptive streaming over HTTP(DASH).
- It includes smooth streaming and encryption of the played video. Both DASH and SmoothStreaming are not there in MediaPlayer.
- But the best advantage of using ExoPlayer is its customization property. You can customize your video player according to your needs. For example, if you want to add just the play button, then add that feature only.
- It provides the support of playlist and you can also clip or merge or loop your media.
So, there are many other features in the ExoPlayer that you can use as per your needs. ExoPlayer is reliable because it is directly handled by Google’s Android team. So, you will find each and every support for the ExoPlayer on the Developers website of Google.
MediaPlayer vs ExoPlayer
Before moving to the implementation of ExoPlayer, let's have a quick comparison between MediaPlayer and ExoPlayer:
- MediaPlayer is there from Android API level 1. But ExoPlayer was introduced in Android API level 16 i.e. the Android Jelly Bean. So, you can't use ExoPlayer for API less than 16. But this is not a matter to worry about. Almost 100% (99.2%, to be more precise) of Android devices present on the Play Store have API level 16 or more, so you can say that almost all Android devices present on Play Store, supports ExoPlayer.
- The video played in the MediaPlayer does not support the smooth streaming. Also, there was no support for adaptive playbacks like DASH and HSL.
- Caching is not there in MediaPlayer but it is in ExoPlayer i.e. the feature of loading the video in advance is not present in MediaPlayer.
- MediaPlayer is less customizable as compared to the ExoPlayer. While playing an audio/video with MediaPlayer, you don't know what exactly is happening in the background but in case of the ExoPlayer, you get to know everything happening there.
To have a deep understanding of where the MediaPlayer and ExoPlayer works, see the below image:
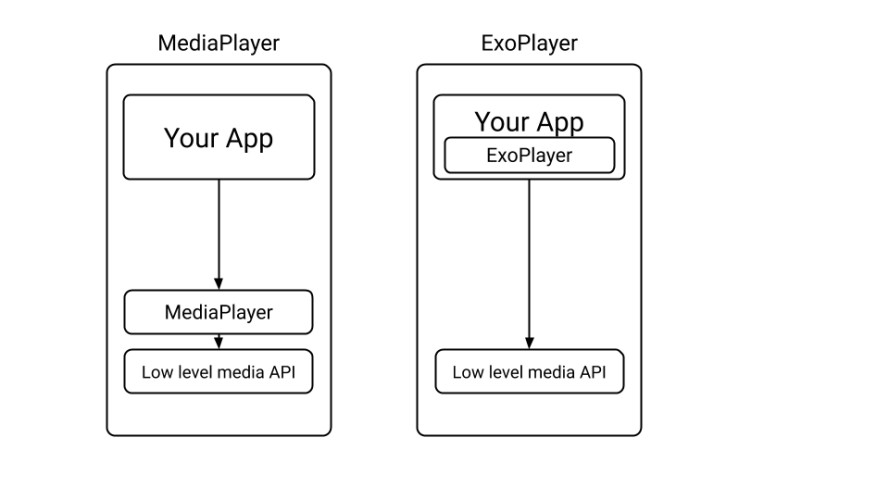
Here you can find that the MediaPlayer is implemented inside the Operating System of Android and due to this you will find it difficult to customize the MediaPlayer according to your needs. But in the case of ExoPlayer, the implementation is done inside our App. So, you can easily customize the ExoPlayer in your app.
But there are a few disadvantages of using ExoPlayer also. For example, if you want to play audio only, then you should go with MediaPlayer because ExoPlayer consumes more battery than MediaPlayer.
Also, since the ExoPlayer is present in our application, so it will increase the APK size by a few hundred kilobytes. But anytime you can shrink the ExoPlayer used in your app(Learn more about ExoPlayer Shrinking from here ).
How to use ExoPlayer in Activity/Fragment?
Using ExoPlayer is quite easy. You need to follow four steps and you are good to go.
- Add dependency of ExoPlayer in your application.
- Add ExoPlayer in your layout file.
-
In your Java/Kotlin file make a function to initialize the player. This function will initialise the ExoPlayer in the player view and it will play the media when the player is ready.
You can call this function from
onStartoronResume. -
Finally, you need to make a function to release the player. This method will be used to get the Playback position, find the states of play and pause used in the ExoPlayer and also to release the player and set the player to null when we are closing the activity or fragment.
You can call this function from
onPauseandonStop.
So, we will be using these four steps to play the media in our application. But before that let's understand the Playback States of any media player.
Playback States
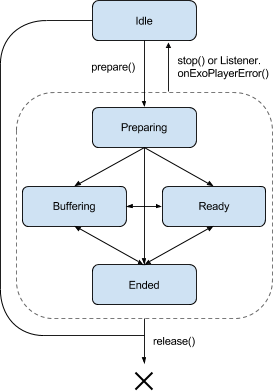
In any player used for media playing, there are 4 states present in that player. These states are Idle , Buffering , Ready and Ended state. A simple view of these states are:
Picture courtesy: Exoplayer
-
Idle
(
Player.STATE_IDLE -
Buffering
(
Player.STATE.BUFFERING -
Ready
(
Player.STATE_READY -
Ended
(
Player.STATE_END
To use these states, you can override the
onPlayerStateChanged()
function and here in this function you are provided with the
playbackState
of the player and you can this
playbackState
variable to perform various actions like when the state is
BUFFERING
, then you can show some progress bar.
So, now we are done with the theory part of the ExoPlayer. Now, let’s move on to the implementation of the ExoPlayer in our Android App.
ExoPlayer example
In our example, we will be having only one Activity i.e. the MainActivity and inside that activity, there will be an ExoPlayer.
Step1: Add dependency of ExoPlayer in your application
In your app-level
build.gradle
file, add the dependency of ExoPlayer and sync it:
implementation "com.google.android.exoplayer:exoplayer:$exoplayer_version"
Here, you can replace the
$exoplayer_version
with the current version of ExoPlayer.(Find the current version of ExoPlayer from
here
)
NOTE:
Make sure that Google and JCenter repositories are included in your
build.gradle
.
Step2: Add ExoPlayer in your layout file
Let's add ExoPlayer in our layout file. The following is the code of
activity_main.xml
file:
<?xml version="1.0" encoding="utf-8"?>
<androidx.constraintlayout.widget.ConstraintLayout xmlns:android="http://schemas.android.com/apk/res/android"
    xmlns:app="http://schemas.android.com/apk/res-auto"
    android:layout_width="match_parent"
    android:layout_height="match_parent">

    <com.google.android.exoplayer2.ui.PlayerView
        android:id="@+id/exoplayerView"
        android:layout_width="0dp"
        android:layout_height="wrap_content"
        app:layout_constraintEnd_toEndOf="parent"
        app:layout_constraintStart_toStartOf="parent"
        app:layout_constraintTop_toTopOf="parent">

        <ProgressBar
            android:id="@+id/progressBar"
            android:layout_width="wrap_content"
            android:layout_height="wrap_content"
            android:layout_gravity="center"
            android:visibility="invisible" />

    </com.google.android.exoplayer2.ui.PlayerView>

    <!-- Other UI elements according to need-->

</androidx.constraintlayout.widget.ConstraintLayout>
So, here, we are having one ExoPlayer view and one ProgressBar. The ProgressBar will be displayed when the state of the video is
BUFFERING
.
For ExoPlayer we are using
PlayerView
here, which can be used to play both audio and video. Also, it displays the subtitles of the video and it has many other features also. You can use the
PlayerControlView
also.
Step3/Step4: Adding code for ExoPlayer(initializing and releasing ExoPlayer)
Let's write the code for the ExoPlayer. The following is the code of the
MainActivity.kt
file:
class MainActivity : AppCompatActivity(), Player.EventListener {

    private lateinit var simpleExoplayer: SimpleExoPlayer
    private var playbackPosition: Long = 0
    private val mp4Url = "https://html5demos.com/assets/dizzy.mp4"
    private val dashUrl = "https://storage.googleapis.com/wvmedia/clear/vp9/tears/tears_uhd.mpd"
    private val urlList = listOf(mp4Url to "default", dashUrl to "dash")

    private val dataSourceFactory: DataSource.Factory by lazy {
        DefaultDataSourceFactory(this, "exoplayer-sample")
    }

    override fun onCreate(savedInstanceState: Bundle?) {
        super.onCreate(savedInstanceState)
        setContentView(R.layout.activity_main)
    }

    override fun onStart() {
        super.onStart()
        initializePlayer()
    }

    override fun onStop() {
        super.onStop()
        releasePlayer()
    }

    private fun initializePlayer() {
        simpleExoplayer = SimpleExoPlayer.Builder(this).build()
        val randomUrl = urlList.random()
        preparePlayer(randomUrl.first, randomUrl.second)
        exoplayerView.player = simpleExoplayer
        simpleExoplayer.seekTo(playbackPosition)
        simpleExoplayer.playWhenReady = true
        simpleExoplayer.addListener(this)
    }

    private fun buildMediaSource(uri: Uri, type: String): MediaSource {
        return if (type == "dash") {
            DashMediaSource.Factory(dataSourceFactory)
                .createMediaSource(uri)
        } else {
            ProgressiveMediaSource.Factory(dataSourceFactory)
                .createMediaSource(uri)
        }
    }

    private fun preparePlayer(videoUrl: String, type: String) {
        val uri = Uri.parse(videoUrl)
        val mediaSource = buildMediaSource(uri, type)
        simpleExoplayer.prepare(mediaSource)
    }

    private fun releasePlayer() {
        playbackPosition = simpleExoplayer.currentPosition
        simpleExoplayer.release()
    }

    override fun onPlayerError(error: ExoPlaybackException) {
        // handle error
    }

    override fun onPlayerStateChanged(playWhenReady: Boolean, playbackState: Int) {
        if (playbackState == Player.STATE_BUFFERING)
            progressBar.visibility = View.VISIBLE
        else if (playbackState == Player.STATE_READY || playbackState == Player.STATE_ENDED)
            progressBar.visibility = View.INVISIBLE
    }

}
Let's understand the code:
-
Firstly, we created the variables i.e. the
simpleExoPlayervariable(it is the ExoPlayer variable), theplaybackPositionvariable(used for the position of the media that is being played), themp4Urland thedashUrlvariable(some random URL of some video), theurlListvariable(to store the list of URLs that we just created) and thedataSourceFactory(to store the source of Media). -
Then we override all the functions like
onCreate(),onStart(),onStop(),onPlayerStateChanged() -
After that, we created the
initializePlayer()function that is used to create the instance of ExoPlayer by usingSimpleExoPlayer.Builder(). You can also useExoPlayer.Builder(). Another thing that is done inside this function is, we are getting a random URL from oururlListand we are preparing the player to play that URL by calling thepreparePlayer()function. -
In the
preparePlayer()function, we are getting the media source and we are preparing the player by calling theprepare()function and passing themediaSourceto it. -
To release the player, we have
releasePlayer()function. This function is using therelease()method of ExoPlayer to release the player. -
In the
onPlayerStateChanged()function, we are handling the progress bar i.e. if the state of the player isBUFFERING, then the progress bar is visible and when the state isREADYorENDED, then it is invisible. -
Also, we have
onPlayerError()function to handle the error in the player. -
And finally, we are calling the
initializePlayer()function fromonStart()andreleasePlayer()function fromonStop().
Now, you can run the app and play the video.
Handling orientation change
Till now, we are done with the coding part of the ExoPlayer. But there is one drawback. Try to change the orientation of the device while playing the video. You will find that after changing the orientation, the video will start playing from the initial state because the activity is recreated here. So, we must handle this situation because our video must play from the same place where it was in the other orientation.
So, to remove this problem, use the below code in your
AndroiManifest.xml
file:
<activity android:name=".MainActivity"
    android:configChanges="keyboard|keyboardHidden|orientation|screenSize|screenLayout|smallestScreenSize|uiMode">
</activity>
That's all. You are done with a functional ExoPlayer. Customize the player by adding some more features to your ExoPlayer app. You can go to the ExoPlayer website and learn more about the ExoPlayer.
Conclusion
So, we have covered a lot about ExoPlayer in this blog. But this is not all about ExoPlayer, there are a lot of other features of ExoPlayer. Actually, if you can’t do something with the MediaPlayer, then there is a high chance that you will find that feature in the ExoPlayer library.
Instead of so many features, before using ExoPlayer, you must think of the features that your app requires i.e. if you are making a simple music player app then go with the MediaPlayer otherwise use ExoPlayer.
So, explore more about ExoPlayer from here .
Keep Learning :)
Team MindOrks