What are intents in Android?

If you are an Android Developer, then you must have used Intents in your applications. I think all of you have used Intents for launching an Activity from the existing Activity. But is that the only thing that can be done using Intents? The answer is NO. Apart from launching an Activity, Intents are also used for a number of tasks. If you are a Newbie in Android, don’t worry this blog has a lot of things for you to learn. In this blog, we will learn What are Intents in Android? So, without wasting any time, let’s get started. Following is the timeline for the blog:
- What are Intents?
- Intent Types
- Use cases of Intent
- Information present in Intent
- Examples of Intent
- Conclusion
What are Intents?
Following is the definition of Intents as per the Android Official documentation:
An Intent is a messaging object you can use to request an action from another app component .
Let’s look upon the informal way of defining Intents. You can think of Intents as a messaging service that is used to communicate between various components of the Android application such as Activity.
You can request some Activity of your app to start some other Activity with the help of Intents. For example, in the LoginAcitvity of every application, we enter our username and password and if the credentials are correct then we move on to some HomeActivity. So, this can be done using intents.
So, in simple words, Intents are used to communicate between various App components.
Intent Types
There are two types of Intents:
- Explicit Intents: Explicit Intents are used when you want to communicate with those app components whose address is with you i.e. you know the package name or fully-qualified address of those components. This is generally used when you want to have communication between your own app components because you know the address of that app component. But if you don't know the address of the desired app component then you have to use Implicit Intents
- Implicit Intents: When you want to communicate with some app component whose address is not with you then you can use Implicit Intents there. For example, if you want to use the camera app, then you don't know the package name or class name of the camera app. So, all you can do is just specify the action i.e. you want to use the camera and implicit intent will suggest you some applications that can let you use the camera app.
Following is an example of the flow of actions by using the Intents:
Picture source: Android Developer Website
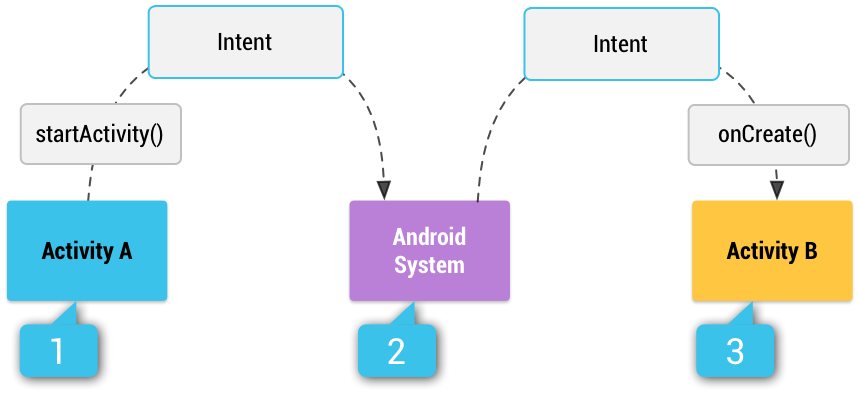
In the above figure, Activity A wants to communicate with some app component. So, if you use explicit intent then you need to pass the fully-qualified address of Activity B. So, the Android System will directly open the Activity B for you.
But if you are using Implicit Intent, then the Activity A need to specify the action that it wants to perform and then the Android System will search for all the available options that can perform the desired action and will open it. This filtering process is done by comparing the action of the Activity A with the content present in the
intent-filter
declared in the
AndroidManifest.xml
file of all the apps present in the mobile device.
Intent Filters are expressions that are used to specify the type of components or actions that can be received by an application and this Intent Filter is declared in the
AndroiManifest.xml
file.
Use cases of Intents
We know that Intents are used to have communication between various components of the Android Application. These communications can be done in various ways but in general, there are three use cases of the Intents:
1. Starting an Activity
You can use the Intents to start a particular activity by using Intents. For example, if you are having two activities namely LoginActivity and MainActivity then, you can start the MainActivity by clicking the login button present on the LoginActivity . By using the startActivity() , you can start the desired Activity using the Intents.
2. Starting a Service
You can think of service as a component that will perform a particular task in the background. So, you can use Intents to start a service also. For API level 21 or higher, you can use JobScheduler to start a service. For API level lower than 21, you can use the Service class to achieve the same.
3. Delivering a broadcast
A broadcast is a message that is received by the application from the system. A very common example of a broadcast can be Device Charging message. So, you can use a broadcast to send some kind of message to the applications present in the device. This is done by passing an Intent to sendBroadcast() or to sendOrderedBroadcast() .
Information present in Intent
So, we have seen that an Activity or an action can be called by using Explicit Intents or by using some Implicit Intents. But the question that arises here is that how the Android System come to know that a particular Activity or Action is to be called? This is done by reading the information that is present in the Intent. The Android System reads the information present in the Intent and based on this information, the Android System decides which Activity is to be launched. So, some of the basic information that an Intent contains are:
- Action: An action is a string that specifies the action to be performed by a particular Activity. For example, you can use the ACTION_VIEW with startActivity() when your application contains some information like images that can be shown to the user. Another action that can be performed is ACTION_SEND , which is used to share some data with another application like in Email applications.
- Data: While creating an Intent, you can pass the data and the type of data on which the action is to be performed by the Android System with the help of Intents. The URI object is used to reference the data that will be used to perform some action on it. For example, if you want to edit some data then you have to pass the URI of the data in your ACTION_EDIT action.
- Category: Category is used in case of Explicit Intents where you need to specify the type of application that will be used to perform a particular action. For example, if you want to send some data then only data sending applications should be made available for choice to the users. You can specify a category with the help of addCategory() . Any number of categories can be added to the Intent.
- Component Name: The component name is the name of the component that is to be started. You can set the component name by using setComponent() or setClass() or with the Intent Constructor.
- Extras: You can add extra data to an Intent in the form of key-value pairs and this extra information can be passed from one Activity to the other. putExtra() is used to add some extra data to the Intents and this method accepts two parameters i.e. the key and its corresponding value.
Example of Explicit Intent
By using Explicit Intent you can launch a component by providing the fully-qualified address of the component i.e. you want to launch a particular component only. To use Explicit Intent, you have to make an Intent object.
// Executed in an Activity, so 'this' is the Context
// The fileUrl is a string URL, such as "http://www.example.com/image.png"
val downloadIntent = Intent(this, DownloadService::class.java)
downloadIntent.data = Uri.parse(fileUrl)
startService(downloadIntent)
Here, in the above example, we can see that the Intent constructor is used to create an Intent and in the constructor, we have passed the current context and the desired component to be launched. Here, the DownloadService is explicitly called.
Example of Implicit Intent
If you want the Android System to choose from the applications present in the mobile device to perform a particular task then we use Implicit Intent. For example, if you want to send images then the Android System will provide will options of Gmail, Instagram, Fb, WhatsApp, etc. Here, you have to pass the action type and with the help of this action type, the system will call the desired application.
// Create the text message with a string
val sendIntent = Intent().apply {
    action = Intent.ACTION_SEND
    putExtra(Intent.EXTRA_TEXT, textMessage)
    type = "text/plain"
}

// Verify that the intent will resolve to an activity
if (sendIntent.resolveActivity(packageManager) != null) {
    startActivity(sendIntent)
}
In the above example, when the startActivity() is called then the system will scan for the applications that can send the text messages and will provide the user a list of applications that can do the same.
Register an Activity as browser
If you want to open a webpage whenever a particular Intent is called, then you have to register the activity called using Intent as a browser. Following is the example for the same:
<activity android:name=".BrowserActivitiy"
          android:label="@string/app_name">
  <intent-filter>
     <action android:name="android.intent.action.VIEW" />
     <category android:name="android.intent.category.DEFAULT" />
     <data android:scheme="http"/>
  </intent-filter>
</activity>
Data transfer to the target component
We have seen that we can pass some data from one Activity or from one component to the other component by using Intents. We can add extra data with the help of putExtra() function. Here is an example of using the putExtra() function:
val intent = Intent(this, ActivityTwo::class.java)
intent.putExtra("Value1", "Value 1 here")
intent.putExtra("Value2", "Value 2 here")
The first parameter passed in the putExtra() is the key and the second parameter is its value.
In order to collect the data at the target component side, the targeted component can use the getIntent().getExtras() function to retrieve the extra data present in the Intent.
val data = intent.extras
if (data == null) {
    return
}
val value1 = data.getString(Intent.EXTRA_TEXT)
if (value1 != null) {
    // do something with the data
}
Here, EXTRA_TEXT is the key to the data that is passed with the Intent.
Forcing an App Chooser
If you are using an Implicit Intent i.e. your Android System is deciding which applications can perform a particular task then you can implement the app chooser in your application. For example, if you want to send some message to someone then the user will be provided with a number of text messaging applications present in the device and user can either choose one application and at the same time, the user can select the option of Default application to use the same application every time when that Intent will be called. If you want to display the App Chooser every time the user calls the Intent, then you can force the app chooser by using createChooser() and pass it to the startActivity() .
val sendIntent = Intent(Intent.ACTION_SEND)
...
// Always use string resources for UI text.
// This says something like "Share this photo with"
val title: String = resources.getString(R.string.chooser_title)
// Create intent to show the chooser dialog
val chooser: Intent = Intent.createChooser(sendIntent, title)
// Verify the original intent will resolve to at least one activity
if (sendIntent.resolveActivity(packageManager) != null) {
startActivity(chooser)
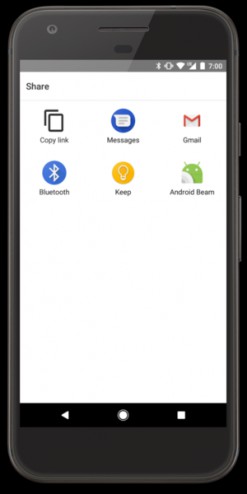
}Following is the output of the same:
Image source: Android Developer’s website
Conclusion
In this blog, we learned about Intents in Android. After reading this blog, I think you will be able to call activity with the help of Intents. Also, we learned about Implicit and Explicit Intents and at the end of the blog, we saw how to add app chooser dialogue to our application on starting an Intent. I hope you all enjoyed the blog. See you soon in the next blog. Till then Keep Learning :)
You can find more Android blogs at MindOrks .
Happy Learning :)
Team MindOrks!