Using SVG Vector Drawables in Android
Icons are awesome. It conveys the message in a very simple and fast way. It is a good practice to have icons in your application because just by looking at the icons the user gets a rough idea about its purpose. More the pictorial representation, more efficiently you can convey your message.
You can use images also. But the main problem with images is the size. You need to have copies of the same image for different mobile sizes i.e. for mdpi, hdpi, xhdpi, xxhdi, and so on. This will increase your app size.
So, in order to avoid this situation, we can use vector drawables in our app. Vector Drawables are nothing but an XML file where we write the code for our icons and this is the reason why we don't need to put different icons for different mobiles sizes while using vector drawables.
In order to add this functionality in a mobile application, Android Studio includes a tool called the Vector Asset Studio that is used to add some predefined material icons along with your own Scalable Vector Graphic (SVG) and Adobe Photoshop Document (PSD) as vector files in your android application. But this is not supported in Android 4.4 (API level 20) and lower.
So, in this blog, we will learn how to use SVG Vector Drawables in Android. So, let’s get started.
Adding Support Library
In order to use Vector Drawable in your application, you must add the below line to support
vectorDrawables
. Add the below code in your app-level
build.gradle
file:
//For Gradle Plugin 2.0+
 android {
   defaultConfig {
     vectorDrawables.useSupportLibrary = true
    }
 }


//For Gradle Plugin 1.5 or below
android {
  defaultConfig {
    // Stops the Gradle plugin’s automatic rasterization of vectors
    generatedDensities = []
  }
  // Flag notifies aapt to keep the attribute IDs around
  aaptOptions {
    additionalParameters "--no-version-vectors"
  }
}
Playing with Vector Asset Studio
To start Vector Asset Studio in your application, follow the below steps:
Step 1: In your android studio project, locate your res directory
Step 2: Then move to drawable folder.
Step 3: After that right-click on the drawable folder and then click on New > Vector Asset . Below screen will be shown:
In the window available to us, there are two options to include vector files in our app:
- Select Asset type as Clip Art — to use Material icons in our project
- Select Asset type as Local file(SVG, PSD) — to use your own SVG and PSD file stored in your local system
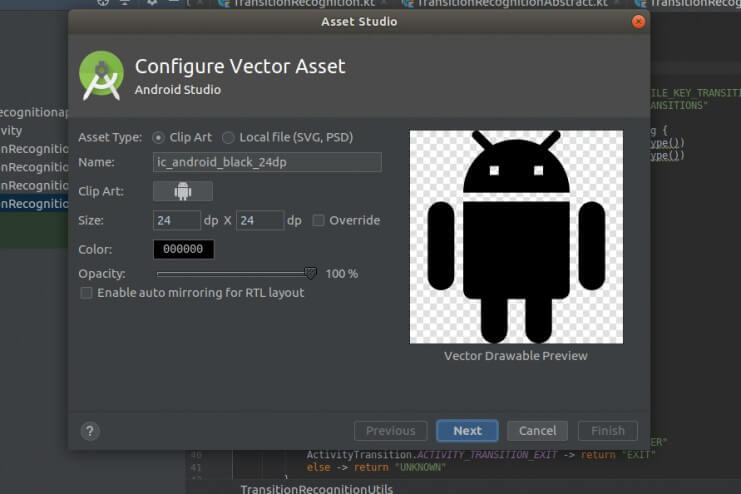
Apart from choosing Asset type, other options that are present in the Asset Studio window are:
- Name: Here you can type the name of the vector file and by this name, you will access the vector file in the project. The file name can contain lowercase characters, underscores, and digits only.
- Clip Art: You can select any of the vector assets from the available choices by clicking on the Clip Art.
Note: The Clip Art option is available only when your Asset Type is Clip Art, otherwise instead of Clip Art, an option for Path will be there.
- Path: This option is present when your Asset Type is Local File(SVG, PSD). Here you can choose the path to your SVG and PSD file.
- Size: This option tells you about the current size of your asset file. By default, it is 24dp * 24dp.
- Override: If you don’t want the default size of the asset file, then you can select this option to have your own dimensions for the file.
- Color: This option is only available when your Asset Type is Clip Art. Here you can select the color that you want to fill in the vector asset.
- Opacity: You can set the opacity of your Vector Asset by sliding the opacity bar.
- Enable auto mirroring for RTL layout: In general, the layout that we make are from Left to Right (LTR) but there are certain cases where you have to make an application using the Right to Left(RTL) layout. For example, in many countries, people write from Right to Left(RTL). So, in those situations, you have to mirror your image. In order to do so, you can check this option i.e. the “Enable auto mirroring for RTL layout” option.
So, these were the options that were available in the Asset Studio. Now, let’s use the Asset Type feature to import the material icon and our local SVG and PSD icon.
Using Material Icon
There are a number of predefined material icons present in the Asset Studio. You can use them in your application. To do so, just click on the Clip Art option and select the icon that you want to use.
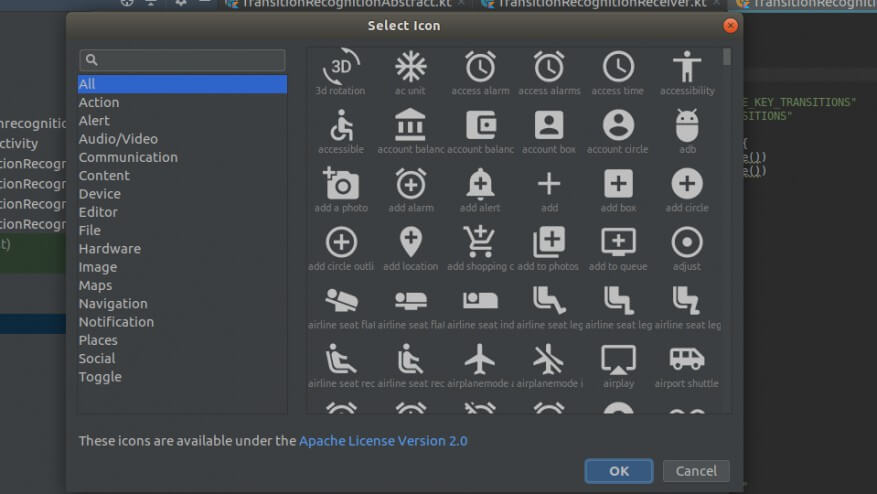
After selecting the icon, click on Ok > Next > Finish .
Now your icon will be added to your res/drawable folder.
Using SVG/PSD Icon
If you want to use some icons that are not present in the list of predefined icons, then you can add your own icon by selecting the Asset Type as Local File(SVG, PSD) and then select the path of your file by clicking on Path.
After that click on Next > Finish .
Now your icon will be added to your res/drawable folder.
Using Vector Drawable in your project
After adding the Vector Drawable in your project, you can use the Vector Drawable in any of the icon-related widgets such as ImageView or ImageButton .
For example, you can add a layout of your choice and add an ImageView like this:
<ImageView
    android:layout_height="wrap_content"
    android:layout_width="wrap_content"
    android:src="@drawable/ic_tick" />
Here,
ic_tick
is the name of the file of Vector Asset present in the
res/drawable
folder. This is as simple as adding an image file in the
ImageView
.
The best part about Vector Asset is that you can change it’s color in the XML also, by adding the below line:
android:tint="@color/primary"This will change the color to the primary color.
If you want to refer to some vector drawable in your code i.e. in you Kotlin code, then you can do this in the same manner as used to access the files present in the res/drawable folder:
val drawable = resources.getDrawable(R.drawable.ic_image, theme)Editing XML code of Vector Asset
Whenever you add some Vector Asset in your project then a corresponding XML file is created in the res/drawable folder and this file contains all the properties of the asset file that you have created i.e. all the XML code for your vector image will be present in this file and you can modify this file according to your need.
Following is an example of XML code of Vector Asset created by Asset Studio:
<vector xmlns:android="http://schemas.android.com/apk/res/android"
        android:width="24dp"
        android:height="24dp"
        android:viewportWidth="24.0"
        android:viewportHeight="24.0">
    <path
        android:fillColor="#FF000000"
        android:pathData="M6,18c0,0.55 0.45,1 1,1h1v3.5c0,0.83 0.67,1.5 1.5,1.5s1.5,-0.67 1.5,-1.5L11,19h2v3.5c0,0.83 0.67,1.5 1.5,1.5s1.5,-0.67 1.5,-1.5L16,19h1c0.55,0 1,-0.45 1,-1L18,8L6,8v10zM3.5,8C2.67,8 2,8.67 2,9.5v7c0,0.83 0.67,1.5 1.5,1.5S5,17.33 5,16.5v-7C5,8.67 4.33,8 3.5,8zM20.5,8c-0.83,0 -1.5,0.67 -1.5,1.5v7c0,0.83 0.67,1.5 1.5,1.5s1.5,-0.67 1.5,-1.5v-7c0,-0.83 -0.67,-1.5 -1.5,-1.5zM15.53,2.16l1.3,-1.3c0.2,-0.2 0.2,-0.51 0,-0.71 -0.2,-0.2 -0.51,-0.2 -0.71,0l-1.48,1.48C13.85,1.23 12.95,1 12,1c-0.96,0 -1.86,0.23 -2.66,0.63L7.85,0.15c-0.2,-0.2 -0.51,-0.2 -0.71,0 -0.2,0.2 -0.2,0.51 0,0.71l1.31,1.31C6.97,3.26 6,5.01 6,7h12c0,-1.99 -0.97,-3.75 -2.47,-4.84zM10,5L9,5L9,4h1v1zM15,5h-1L14,4h1v1z"/>
</vector>
You can change the width , height, viewportWidth, viewportHeight, fillColor , etc in the XML file. In-fact, for Android 5.0 and higher, Vector Asset Studio supports all the elements of the Drawable and VectorDrawable . So, you can use all those elements in your XML file that was generated by the Asset Studio.
Conclusion
In this blog, we learned how to use the same image or icon with different sizes of devices without losing the quality of the image. We can do so by using the SVG Vector Drawable in our project. We saw how to add the Vector Assets in our application. In the last, we saw how to change the properties of Vector Asset by altering the XML file generated by the Vector Asset Studio. That’s it for this blog.
Keep Learning :)
Team MindOrks!