Using Shimmer Effect Placeholder in Android

You might have noticed the shimmer effect in Facebook’s mobile app while the data is loading from the network. Shimmer library was created by Facebook to display an animation when data is loading to make the UI more interesting and beautiful, instead of using the traditional ProgressBar. Facebook, later on, released an open-source library called Shimmer which we can use it to implement the Shimmer Effect Placeholder.
Shimmer for Android is implemented as a layout, which means that you can simply nest any view inside a ShimmerFrameLayout.
The following is an example of Shimmer effect in an Android application:
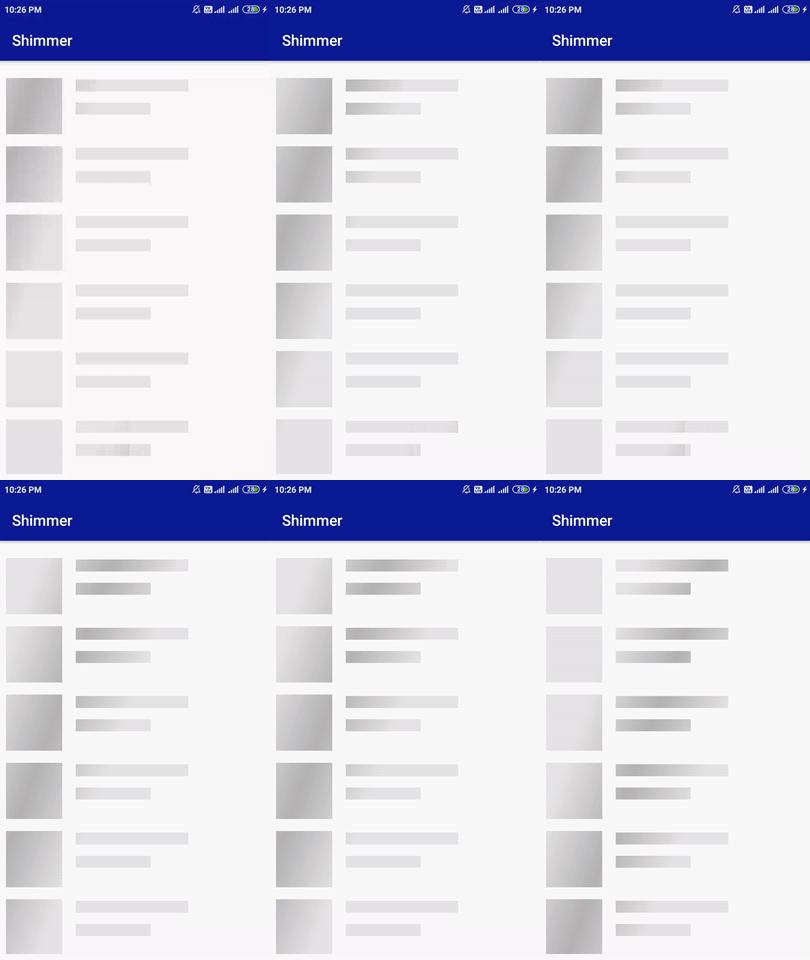
In this blog, we will demonstrate how to use Shimmer in your Android application. We will be fetching the data from the API using the Fast-Android-Networking and then displaying the data in the RecyclerView. So let’s get started!
Steps to implement Shimmer in Android App
Here, we are going to set up the Android Project.
Create a Project
- Start a new Android Studio Project
- Select Empty Activity and Next
- Name: Android-Shimmer-Example
- Package name: com.mindorks.example.shimmer
- Language: Kotlin
- Finish
- Your starting project is ready now
Add dependencies
Add the following dependencies in your app level build.gradle and sync.
implementation 'com.facebook.shimmer:shimmer:0.1.0@aar'
implementation "androidx.recyclerview:recyclerview:1.1.0"
implementation 'com.amitshekhar.android:android-networking:1.0.2'
implementation 'com.github.bumptech.glide:glide:4.11.0'
The first line is Facebook's shimmer dependency. We added a bunch of other dependencies, these are for Fast-Android-Networking , RecyclerView, and Glide which will be used in our project.
Now, Add item_layout.xml in the layout folder and add the following code:
<?xml version="1.0" encoding="utf-8"?>
<androidx.constraintlayout.widget.ConstraintLayout xmlns:android="http://schemas.android.com/apk/res/android"
    xmlns:app="http://schemas.android.com/apk/res-auto"
    xmlns:tools="http://schemas.android.com/tools"
    android:id="@+id/container"
    android:layout_width="match_parent"
    android:layout_height="60dp">

    <ImageView
        android:id="@+id/imageViewAvatar"
        android:layout_width="60dp"
        android:layout_height="0dp"
        android:padding="4dp"
        app:layout_constraintBottom_toBottomOf="parent"
        app:layout_constraintStart_toStartOf="parent"
        app:layout_constraintTop_toTopOf="parent" />

    <androidx.appcompat.widget.AppCompatTextView
        android:id="@+id/textViewUserName"
        style="@style/TextAppearance.AppCompat.Large"
        android:layout_width="0dp"
        android:layout_height="wrap_content"
        android:layout_marginStart="8dp"
        android:layout_marginTop="4dp"
        app:layout_constraintEnd_toEndOf="parent"
        app:layout_constraintStart_toEndOf="@+id/imageViewAvatar"
        app:layout_constraintTop_toTopOf="parent"
        tools:text="MindOrks" />

    <androidx.appcompat.widget.AppCompatTextView
        android:id="@+id/textViewUserEmail"
        android:layout_width="0dp"
        android:layout_height="wrap_content"
        app:layout_constraintEnd_toEndOf="parent"
        app:layout_constraintStart_toStartOf="@+id/textViewUserName"
        app:layout_constraintTop_toBottomOf="@+id/textViewUserName"
        tools:text="MindOrks" />

</androidx.constraintlayout.widget.ConstraintLayout>
Now, Add shimmer_placeholder_layout.xml in the layout folder and add the following code:
<?xml version="1.0" encoding="utf-8"?>
<androidx.constraintlayout.widget.ConstraintLayout xmlns:android="http://schemas.android.com/apk/res/android"
    xmlns:app="http://schemas.android.com/apk/res-auto"
    xmlns:tools="http://schemas.android.com/tools"
    android:id="@+id/container"
    android:layout_width="match_parent"
    android:layout_height="60dp">

    <ImageView
        android:id="@+id/imageViewAvatar"
        android:layout_width="60dp"
        android:layout_height="0dp"
        android:background="@color/colorGrey"
        android:padding="4dp"
        app:layout_constraintBottom_toBottomOf="parent"
        app:layout_constraintStart_toStartOf="parent"
        app:layout_constraintTop_toTopOf="parent" />

    <androidx.appcompat.widget.AppCompatTextView
        android:id="@+id/textViewUserName"
        style="@style/TextAppearance.AppCompat.Large"
        android:layout_width="0dp"
        android:layout_height="wrap_content"
        android:layout_marginStart="8dp"
        android:layout_marginTop="4dp"
        android:background="@color/colorGrey"
        app:layout_constraintEnd_toEndOf="parent"
        app:layout_constraintStart_toEndOf="@+id/imageViewAvatar"
        app:layout_constraintTop_toTopOf="parent"
        tools:text="MindOrks" />

    <androidx.appcompat.widget.AppCompatTextView
        android:id="@+id/textViewUserEmail"
        android:layout_width="0dp"
        android:layout_height="wrap_content"
        android:background="@color/colorGrey"
        app:layout_constraintEnd_toEndOf="parent"
        app:layout_constraintStart_toStartOf="@+id/textViewUserName"
        app:layout_constraintTop_toBottomOf="@+id/textViewUserName"
        tools:text="MindOrks" />

</androidx.constraintlayout.widget.ConstraintLayout>
Above in the XML, an important thing to note is that the background colour should be grey or any non-white colour since the shimmering effect won't be visible if the background is white.
Do not forget to add the color in the colors.xml like below:
<color name="colorGrey">#dddddd</color>Now, Open the activity_main.xml file and add the below code:
<?xml version="1.0" encoding="utf-8"?>
<androidx.constraintlayout.widget.ConstraintLayout xmlns:android="http://schemas.android.com/apk/res/android"
    xmlns:tools="http://schemas.android.com/tools"
    android:layout_width="match_parent"
    android:layout_height="match_parent"
    tools:context=".MainActivity">

    <com.facebook.shimmer.ShimmerFrameLayout
        android:id="@+id/shimmerFrameLayout"
        android:layout_width="match_parent"
        android:layout_height="match_parent"
        android:layout_gravity="center"
        android:orientation="vertical">

        <!-- Adding 15 rows of placeholders -->
        <LinearLayout
            android:layout_width="match_parent"
            android:layout_height="wrap_content"
            android:orientation="vertical">

            <include layout="@layout/shimmer_placeholder_layout" />

            <include layout="@layout/shimmer_placeholder_layout" />

            <include layout="@layout/shimmer_placeholder_layout" />

            <include layout="@layout/shimmer_placeholder_layout" />

            <include layout="@layout/shimmer_placeholder_layout" />

            <include layout="@layout/shimmer_placeholder_layout" />

            <include layout="@layout/shimmer_placeholder_layout" />

            <include layout="@layout/shimmer_placeholder_layout" />

            <include layout="@layout/shimmer_placeholder_layout" />

            <include layout="@layout/shimmer_placeholder_layout" />

            <include layout="@layout/shimmer_placeholder_layout" />

            <include layout="@layout/shimmer_placeholder_layout" />

            <include layout="@layout/shimmer_placeholder_layout" />

            <include layout="@layout/shimmer_placeholder_layout" />

            <include layout="@layout/shimmer_placeholder_layout" />
        </LinearLayout>
    </com.facebook.shimmer.ShimmerFrameLayout>

    <androidx.recyclerview.widget.RecyclerView
        android:id="@+id/recyclerView"
        android:layout_width="match_parent"
        android:layout_height="match_parent"
        android:visibility="gone" />

</androidx.constraintlayout.widget.ConstraintLayout>
Understanding the above code:
- We have added the ShimmerFrameLayout .
- Next, inside the ShimmerFrameLayout, we need to include some placeholder layouts( shimmer_placeholder_layout ) inside LinearLayout . These are blank layouts similar to our RecyclerView layouts on which the shimmering effect will be performed while the network call is going on. Note that we have added these placeholder layouts multiple times to create the appearance as a list.
- The RecyclerView will display the list of data fetched after executing network requests and receiving the content from the API.
Now, create a data class User like below:
package com.mindorks.example.shimmer

import com.google.gson.annotations.SerializedName

data class User(
    @SerializedName("id")
    val id: Int = 0,
    @SerializedName("name")
    val name: String = "",
    @SerializedName("email")
    val email: String = "",
    @SerializedName("avatar")
    val avatar: String = ""
)
Now, create a Kotlin class MainAdapter and add the following code.
package com.mindorks.example.shimmer

import android.view.LayoutInflater
import android.view.View
import android.view.ViewGroup
import androidx.recyclerview.widget.RecyclerView
import com.bumptech.glide.Glide
import kotlinx.android.synthetic.main.item_layout.view.*

class MainAdapter(
    private val users: ArrayList<User>
) : RecyclerView.Adapter<MainAdapter.DataViewHolder>() {

    class DataViewHolder(itemView: View) : RecyclerView.ViewHolder(itemView) {
        fun bind(user: User) {
            itemView.textViewUserName.text = user.name
            itemView.textViewUserEmail.text = user.email
            Glide.with(itemView.imageViewAvatar.context)
                .load(user.avatar)
                .into(itemView.imageViewAvatar)
        }
    }

    override fun onCreateViewHolder(parent: ViewGroup, viewType: Int) =
        DataViewHolder(
            LayoutInflater.from(parent.context).inflate(
                R.layout.item_layout, parent,
                false
            )
        )

    override fun getItemCount(): Int = users.size

    override fun onBindViewHolder(holder: DataViewHolder, position: Int) =
        holder.bind(users[position])

    fun addData(list: List<User>) {
        users.addAll(list)
    }

}
Now open the MainActivity and add the following code:
package com.mindorks.example.shimmer

import android.os.Bundle
import android.view.View
import android.widget.Toast
import androidx.appcompat.app.AppCompatActivity
import androidx.recyclerview.widget.DividerItemDecoration
import androidx.recyclerview.widget.LinearLayoutManager
import com.androidnetworking.AndroidNetworking
import com.androidnetworking.error.ANError
import com.androidnetworking.interfaces.ParsedRequestListener
import kotlinx.android.synthetic.main.activity_main.*

class MainActivity : AppCompatActivity() {

    private lateinit var adapter: MainAdapter

    override fun onCreate(savedInstanceState: Bundle?) {
        super.onCreate(savedInstanceState)
        setContentView(R.layout.activity_main)
        setupUI()
        setupAPICall()
    }

    private fun setupUI() {
        recyclerView.layoutManager = LinearLayoutManager(this)
        adapter = MainAdapter(arrayListOf())
        recyclerView.addItemDecoration(
                DividerItemDecoration(
                        recyclerView.context,
                        (recyclerView.layoutManager as LinearLayoutManager).orientation
                )
        )
        recyclerView.adapter = adapter
    }

    private fun setupAPICall() {
        AndroidNetworking.initialize(applicationContext)
        AndroidNetworking.get("https://5e510330f2c0d300147c034c.mockapi.io/users")
                .build()
                .getAsObjectList(User::class.java, object : ParsedRequestListener<List<User>> {
                    override fun onResponse(users: List<User>) {
                        shimmerFrameLayout.stopShimmerAnimation()
                        shimmerFrameLayout.visibility = View.GONE
                        recyclerView.visibility = View.VISIBLE
                        adapter.addData(users)
                        adapter.notifyDataSetChanged()
                    }

                    override fun onError(anError: ANError) {
                        shimmerFrameLayout.visibility = View.GONE
                        Toast.makeText(this@MainActivity, "Something Went Wrong", Toast.LENGTH_LONG).show()
                    }
                })
    }

    override fun onResume() {
        super.onResume()
        shimmerFrameLayout.startShimmerAnimation()
    }

    override fun onPause() {
        shimmerFrameLayout.stopShimmerAnimation()
        super.onPause()
    }
}
To start shimmering effect as soon as our app opens, we add shimmerFrameLayout .startShimmerAnimation() in the onResume() activity lifecycle method and to stop it we added shimmerFrameLayout .stopShimmerAnimation() in the onPause() activity lifecycle method.
To stop the shimmering effect and making recyclerview visible after the network request has executed and data has been set in the recyclerview, we have added:
shimmerFrameLayout.stopShimmerAnimation()
shimmerFrameLayout.visibility = View.GONE
recyclerView.visibility = View.VISIBLE
Finally, add the Internet Permission in your project. Add the following in the AndroidManifest.xml:
<uses-permission android:name="android.permission.INTERNET" />Now, run the application and you will see the below result :)

You can find the complete project here .
This is all about the Shimmer effect in Android. Hope you enjoyed this blog. You can read more blogs on Android on our blogging website .
Video for this blog: Check here .
Happy Learning :)
Team MindOrks!

