Install Android Studio

Android Studio is the official Integrated Development Environment (IDE) recommended by Google for Android application development, based on IntelliJ IDEA .
In this blog, we will learn how to install Android Studio that we will use for making some cool Android projects with ease. So let's get started.
A sword never kills anybody; it is a tool in the killer’s hand
Download Android Studio
Before installing Android Studio, you need to download the latest version of the Android Studio (always prefer the latest version because it has fewer bugs and improved features).
Download the latest version of Android Studio from here.
If you are installing the Android Studio 2.2 or higher, then you need not install the JDK separately because it comes with JDK. But if you are installing the Android Studio version 2.1 or lower(which you are not going to do :) ), then you can download the JDK from here .
So, you are done with the downloading part. Let's install Android Studio in various machines available.
Installation on Windows Machine
Requirements:
- 4 GB RAM minimum, 8 GB RAM recommended
- 2 GB of available disk space minimum, 4 GB Recommended (500 MB for IDE + 1.5 GB for Android SDK and emulator system image)
- 1280 x 800 minimum screen resolution
- Microsoft Windows 7/8/10 (32- or 64-bit). The Android Emulator supports 64-bit Windows only
Installation steps on Windows:
- For .exe file (recommended), double-click to launch it.
- For the . zip file, unpack the ZIP, copy the android-studio folder into your Program Files folder(usually in C drive), and then open the android-studio > bin > studio64.exe (for a 64-bit machine) or studio.exe (for a 32-bit machine).
- Follow Android Studio Setup Wizard which helps you with the rest of the process and install any recommended SDK packages.
Custom SDK — If you have SDK files with you, select Custom Install in the Install Type. In the SDK components uncheck SDK. You will be prompted to provide the location of the SDK directory.
If there is an update in the Android Studio, then a pop-up will be shown to you for downloading the new updates. Also, you can check for updates from Help > Check for Updates .
Installation on MAC
Requirements:
- 4 GB RAM minimum, 8 GB RAM recommended
- 2 GB of available disk space minimum, 4 GB Recommended (500 MB for IDE + 1.5 GB for Android SDK and emulator system image)
- 1280 x 800 minimum screen resolution
- Mac OS X 10.10 or higher
Installation steps on Mac:
- Launch the Android Studio DMG file
- Drag and drop Android Studio into the Applications folder and launch Android Studio.
- Check/Uncheck to import previous Android Studio settings, then click OK .
- Follow Android Studio Setup Wizard which helps you with the rest of the process which includes downloading Android SDK components that required for the development.
DMG Damage Error — If you see a warning when opening Android Studio that says the package is damaged, go to System Preferences > Security & Privacy and under Allow applications downloaded from , select Anywhere . Then open Android Studio again.
If there is an update in the Android Studio, then a pop-up will be shown to you for downloading the new updates. Also, you can check for updates from Help > Check for Updates .
Installation on Linux Machine
Requirements:
- 4 GB RAM minimum, 8 GB RAM recommended
- 2 GB of available disk space minimum, 4 GB Recommended (500 MB for IDE + 1.5 GB for Android SDK and emulator system image)
- 1280 x 800 minimum screen resolution
- GNOME or KDE desktop
- GNU C Library (glibc) 2.19 or later
- 64-bit distribution capable of running 32-bit applications
Installation steps on Linux:
- Unpack the . zip file downloaded to your preferred location, such as within /usr/mindorks/ for your user profile, or /opt/ for shared users.
- To launch Android Studio, open a terminal(ctrl + alt + T), navigate to the directory android-studio/bin , and execute studio.sh by running ./studio.sh
- Check/Uncheck to import previous Android Studio settings, then click OK .
- Follow the Android Studio Setup Wizard which helps you with the rest of the process which also includes downloading Android SDK components that required for the development.
For the 64-bit version of Ubuntu, you need to install some 32-bit libraries with the following command:
$ sudo apt-get install libc6:i386 libncurses5:i386 libstdc++i386 lib32z1 libbz2–1.0:i386For 64-bit Fedora, the command is:
$ sudo yum install zlib.i686 ncurses-libsi686 bzip2-libs.i686Note : You can add android-studio/bin/ your PATH environment variable so that you can start Android Studio from any directory.
If there is an update in the Android Studio, then a pop-up will be shown to you for downloading the new updates. Also, you can check for updates from Help > Check for Updates .
So you are done with the installation part of the Android Studio. Now, you can run the applications made in Android Studio in the Android Emulator provided by the Android Studio. But this will slow down your laptop(if you have less RAM). Other option to run your application is your mobile device. For running the Android Studio applications on your mobile device, you need to enable the developer options in your mobile device.
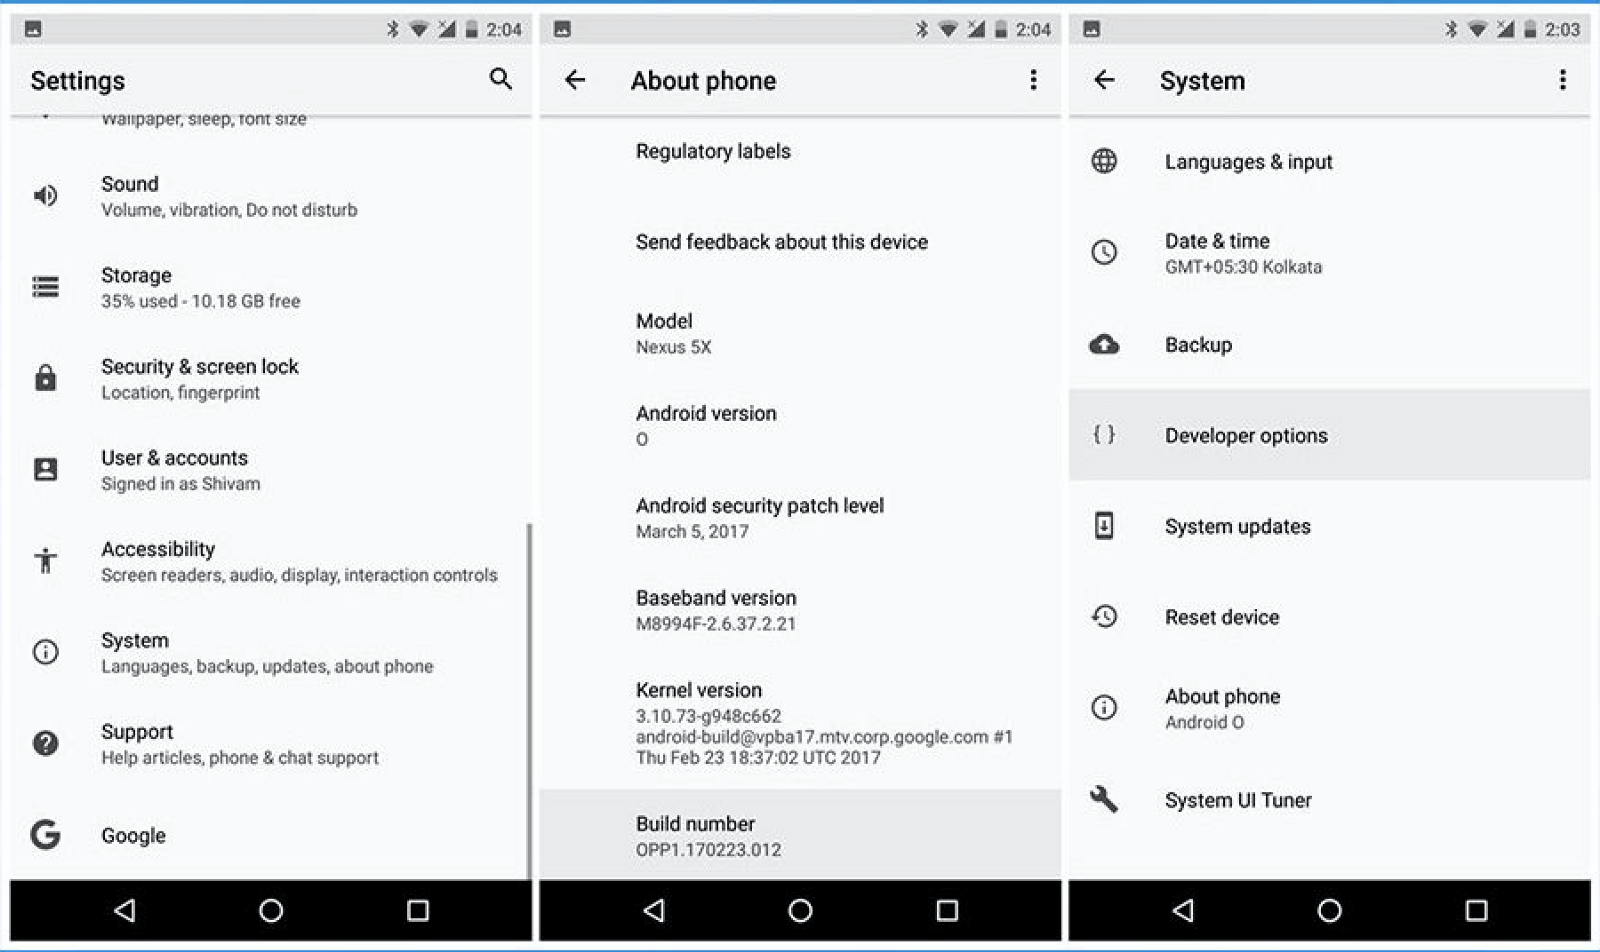
Enable Developer Options
To enable your device to run the application directly from Android Studio to mobile, you need to configure your device by allowing Developer Options .
Go to Settings > System > About Phone > Tap Build Number 7 times(this number may change according to devices). You will see one message in the form of Toast saying "You are a developer now :)"
Return to the previous screen and you will see " Developer Options ". Open it and enable "USB Debugging" inside it to install the applications via your USB.
That's it! You are ready to build your first Android Studio application :) This is the first step you have taken as an Android Developer. Comment down, if you find some error during installation of Android Studio.
Happy Learning :)
Team MindOrks!