How to Add Uber Car Animation in Android App?

We all must have used the Uber or Lyft or some other cab sharing applications. Apart from picking and dropping you from your source to destination, the best part that I like the most about the Uber app is the movement of the car when it comes to our source or when it goes to our destination and I know, most of you also like the same animation. So, in this tutorial, we are going to build a project that will show how to add Uber car animation in the Android app.
We will discuss the below in this blog:
- Project Setup
- Setting up Google Map
- Setting Project Structure
- Adding the Origin and Destination marker and drawing a path between the Origin and Destination on the map
- Moving the car icon from Origin to Destination
- Project Source Code and What next?
So, let's get started.
Project Setup
Here, we are going to set up the Android Project:
- Start a new Android Studio Project
- Select Empty Activity and Next
- Name: Uber-Car-Animation-Android
- Package name: com.mindorks.example.ubercaranimation
- Language: Kotlin
- Finish
- Your starting project is ready now
Setting up Google Map
In this project, we are going to show the car animation on the Google Map and in order to use the Google Map in our application, we need an API key with Map feature enabled.
Getting an API key and enabling :
- Visit the Google Cloud Platform Console .
- Click the project drop-down and select or create the project for which you want to add an API key.
- Click the menu button and select APIs & Services > Credentials .
-
On the
Credentials
page, click
Create credentials > API key
.
The API key created dialog displays your newly created API key. - Copy the API key and keep it somewhere.
- Again, click the menu button and select APIs & Services > Library .
- Search for " Map SDK for Android " and enable it.
-
Click
Close.
The new API key is listed on the Credentials page under API keys .
(Remember to restrict the API key before using it in production.)
Adding API key in the AndroidManifest file:
Open the
AndroidManifest.xml
file of your Android project and add your API key in the
meta-data
tag under
application
tag;
<application>
    <meta-data
        android:name="com.google.android.geo.API_KEY"
        android:value="PASTE_YOUR_API_KEY_HERE" />
    ...
</application>
Adding Google Map fragment in the
activity_main.xml
file:
Open the
activity_main.xml
file and add the Google Map fragment in it:
<?xml version="1.0" encoding="utf-8"?>
<fragment xmlns:android="http://schemas.android.com/apk/res/android"
    xmlns:tools="http://schemas.android.com/tools"
    android:id="@+id/map"
    android:name="com.google.android.gms.maps.SupportMapFragment"
    android:layout_width="match_parent"
    android:layout_height="match_parent"
    tools:context=".MainActivity" />
Setting up the Google Map in
MainActivity.kt
:
Now, we need to add the map fragment. Also, to use Google Map in your application, you need to implement the
OnMapReadyCallback
interface and this interface contains
onMapReady()
method, which is called when the map is loaded. So, the code for the
MainActivity.kt
file will be:
class MainActivity : AppCompatActivity(), OnMapReadyCallback {

    private lateinit var googleMap: GoogleMap

    override fun onCreate(savedInstanceState: Bundle?) {
        super.onCreate(savedInstanceState)
        setContentView(R.layout.activity_main)
        val mapFragment = supportFragmentManager
            .findFragmentById(R.id.map) as SupportMapFragment
        mapFragment.getMapAsync(this)
    }

    override fun onMapReady(googleMap: GoogleMap) {
        this.googleMap = googleMap
    }

}
Run the application and see if Google Map is visible in the App or not.
Showing some default location on the Google Map:
By default, some random positions will be visible in the Google Map, but we can set our location on the map or some other location when the map gets loaded.
In this example, we will be using
LatLng(28.435350000000003, 77.11368)
location as the default location, when the app starts. So, we need to make two functions
moveCamera()
and
animateCamera()
. The
moveCamera()
method, we will be used to reposition the camera to some latitude and longitude. While the
animateCamera()
method will be used to animate the movement of the camera from the current position to some new position. So, add the below two methods:
private fun moveCamera(latLng: LatLng) {
    googleMap.moveCamera(CameraUpdateFactory.newLatLng(latLng))
}

private fun animateCamera(latLng: LatLng) {
    val cameraPosition = CameraPosition.Builder().target(latLng).zoom(15.5f).build()
    googleMap.animateCamera(CameraUpdateFactory.newCameraPosition(cameraPosition))
}
Make another function
showDefaultLocaitonOnMap()
which will take one LatLng and show that location on the map by calling the
moveCamera
and
animateCamera
function:
private fun showDefaultLocationOnMap(latLng: LatLng) {
    moveCamera(latLng)
    animateCamera(latLng)
}
Now, call the above function from the
onMapReady()
method and pass some
LatLng
to it:
private lateinit var defaultLocation: LatLng

override fun onMapReady(googleMap: GoogleMap) {
    this.googleMap = googleMap
    defaultLocation = LatLng(28.435350000000003, 77.11368)
    showDefaultLocationOnMap(defaultLocation)

}
Run the application and see if the
LatLng(28.435350000000003, 77.11368)
is displayed or not.
Setting Project Structure
In this part, we will structure our project to enhance the readability of the project.
-
In the
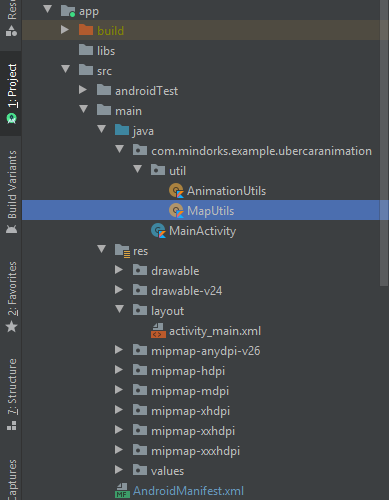
com.minidorks.example.ubercaranimationpackage, add oneutilpackage(right-click on com.mindorks.example.ubercaranimation > new > package). The utils package will contain all the utility classes used in the project. -
In the
utilpackage, add one Object class namedAnimationUtils(right-click on utils > new > Kotlin file/class > select object). TheAnimationUtilswill contain all the Animation related functions. -
Again in the
utilpackage, add one Object class namedMapUtils. This will contain all the functions related to Map.
The following is our project structure:
Now, we are done with all the setup part. Let's move on to the functionality part of the application.
Adding the Origin and Destination marker and drawing a path between the Origin and Destination on the map
In a real project, you will get a list of locations from the server. These locations are nothing but
LatLng
of various points present in between the source and destination. These locations are used to draw a path between the source and the destination.
In our project, we will be using some hard-coded values of
LatLng
. So, in the
MapUtils
class, create a function
getListOfLocations()
that will return a list of
LatLng
that corresponds to a path.
fun getListOfLocations(): ArrayList<LatLng> {
    val locationList = ArrayList<LatLng>()
    locationList.add(LatLng(28.436970000000002, 77.11272000000001))
    locationList.add(LatLng(28.43635, 77.11289000000001))
    locationList.add(LatLng(28.4353, 77.11317000000001))
    locationList.add(LatLng(28.435280000000002, 77.11332))
    locationList.add(LatLng(28.435350000000003, 77.11368))
    locationList.add(LatLng(28.4356, 77.11498))
    locationList.add(LatLng(28.435660000000002, 77.11519000000001))
    locationList.add(LatLng(28.43568, 77.11521))
    locationList.add(LatLng(28.436580000000003, 77.11499))
    locationList.add(LatLng(28.436590000000002, 77.11507))
    return locationList
}
Now, we have a list of LatLng and with the help of these LatLng, we can draw a path between the Origin and the Destination. We will use Polyline , which is a list of points, where line segments are drawn between consecutive points.
Also, we will be drawing two polylines, one of grey color and another black color. The basic idea is to draw the grey line first and then draw the black line by sowing some animation.
So, create a function named
showPath()
that will take a list of
LatLng
and this function will be used to draw a path between origin and destination by using the
addPolyline()
method.
private var grayPolyline: Polyline? = null
private var blackPolyline: Polyline? = null


private fun showPath(latLngList: ArrayList<LatLng>) {
    val builder = LatLngBounds.Builder()
    for (latLng in latLngList) {
        builder.include(latLng)
    }
    // this is used to set the bound of the Map
    val bounds = builder.build()
    googleMap.animateCamera(CameraUpdateFactory.newLatLngBounds(bounds, 2))

    val polylineOptions = PolylineOptions()
    polylineOptions.color(Color.GRAY)
    polylineOptions.width(5f)
    polylineOptions.addAll(latLngList)
    grayPolyline = googleMap.addPolyline(polylineOptions)

    val blackPolylineOptions = PolylineOptions()
    blackPolylineOptions.color(Color.BLACK)
    blackPolylineOptions.width(5f)
    blackPolyline = googleMap.addPolyline(blackPolylineOptions)

}
In the above code, we have used bound in the Google Map. It is an area that is created by using the
LatLng
we have.
The path is ready. Now, we need to add the origin and destination marker at the starting and the endpoint of the path. For this, we will draw a rectangle black marker as used in the Uber app for Origin and Destination marker. We will draw this marker with the help of
Canvas
.
So, in the
MapUtils
class, add one method named
getOriginDestinationMarkerBitmap()
which will return a
Bitmap
.
fun getOriginDestinationMarkerBitmap(): Bitmap {
    val height = 20
    val width = 20
    val bitmap = Bitmap.createBitmap(height, width, Bitmap.Config.RGB_565)
    val canvas = Canvas(bitmap)
    val paint = Paint()
    paint.color = Color.BLACK
    paint.style = Paint.Style.FILL
    paint.isAntiAlias = true
    canvas.drawRect(0F, 0F, width.toFloat(), height.toFloat(), paint)
    return bitmap
}
The Bitmap for the marker is ready. Now, we can add the marker on the map by using the
addMarker()
method of Google Map. In the
MainActivity.kt
file, add one function named
addOriginDestinationMarkerAndGet()
which will take a
LatLng
as input and return a
Marker
:
private fun addOriginDestinationMarkerAndGet(latLng: LatLng): Marker {
    val bitmapDescriptor =
        BitmapDescriptorFactory.fromBitmap(MapUtils.getOriginDestinationMarkerBitmap())
    return googleMap.addMarker(
        MarkerOptions().position(latLng).flat(true).icon(bitmapDescriptor)
    )
}
Now, we need to call the above method from the
showPath()
method to draw the origin and destination marker. For the origin marker, the
LatLng
will be the first value of the
latLngList
and for the destination marker, the
LatLng
will be the last value of the
latLngList
.
private var originMarker: Marker? = null
private var destinationMarker: Marker? = null
private fun showPath(latLngList: ArrayList<LatLng>) {
...
originMarker = addOriginDestinationMarkerAndGet(latLngList[0])
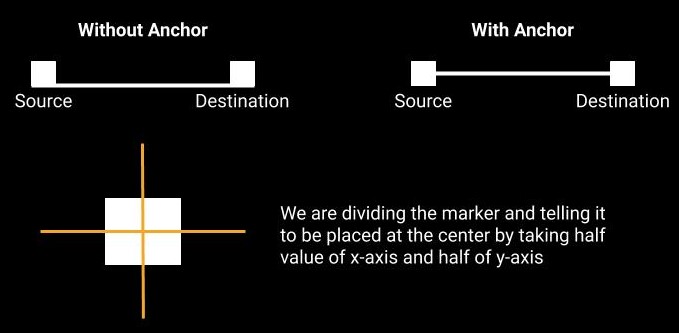
originMarker?.setAnchor(0.5f, 0.5f)
destinationMarker = addOriginDestinationMarkerAndGet(latLngList[latLngList.size - 1])
destinationMarker?.setAnchor(0.5f, 0.5f)
}
In the above code, we are using the
setAnchor()
function which is used to place the marker at the correct position. The following image describes the usage of Anchor:
So, are we done with the path of the car? No, one thing is missing i.e. the Animation is missing.
Here, we will draw the grey line first and then draw the black line in a duration of 4000ms i.e. 4 seconds. When we draw the grey line then we have a list of points also because a line is a combination of points. After that, we will use
LinearInterpolator
that will give some percentage between (0, 100) every 4 seconds. So, after every 4 sec, we will draw some part of the line with the help of the interpolator value and some index from the points of the grey line and this seems like we are animating the black line over the grey line.
In the
AnimationUtils
class, add one function named
polylineAnimator
that will return an interpolator value:
fun polylineAnimator(): ValueAnimator {
    val valueAnimator = ValueAnimator.ofInt(0, 100)
    valueAnimator.interpolator = LinearInterpolator()
    valueAnimator.duration = 4000
    return valueAnimator
}
Now, we will use the above function in the
showPath
method to show the animation of the black path over the grey path:
private fun showPath(latLngList: ArrayList<LatLng>) {
    ...

    val polylineAnimator = AnimationUtils.polylineAnimator()
    polylineAnimator.addUpdateListener { valueAnimator ->
        val percentValue = (valueAnimator.animatedValue as Int)
        val index = (grayPolyline?.points!!.size) * (percentValue / 100.0f).toInt()
        blackPolyline?.points = grayPolyline?.points!!.subList(0, index)
    }
    polylineAnimator.start()
}
That's it, we are done with the animation of the black path and addition of marker on the path. Now, let's see how to show the movement of the car from source to destination.
Moving the car icon from Origin to Destination
In a real project, the server will be continuously sending the current location of the car and this location is updated on the path that is already there on the map.
In our example, we will be using the locations returned by the
getListOfLocations()
function of the
MapUtils
class. We will take one location at a time and then update the location of the car on the map.
So, the first thing that we need is the car icon. I have a car icon in my
drawable
folder having name
ic_car.png
. In the
MapUtils
class, make a function named
getCarBitmap
that will return the Bitmap of a car:
fun getCarBitmap(context: Context): Bitmap {
    val bitmap = BitmapFactory.decodeResource(context.resources, R.drawable.ic_car)
    return Bitmap.createScaledBitmap(bitmap, 50, 100, false)
}
Just like the animation of the black line while drawing the path, here also, we will use the same logic to animate the car icon using the
LinearInterpolator
. So, in the
AnimationUtils
class, add a function named
carAnimator()
:
fun carAnimator(): ValueAnimator {
    val valueAnimator = ValueAnimator.ofFloat(0f, 1f)
    valueAnimator.duration = 3000
    valueAnimator.interpolator = LinearInterpolator()
    return valueAnimator
}
Now, in the
MainActivity.kt
file, create a function named
updateCarLocation()
that will update the location of the car on the map. Here, we will set the moving car marker and we will use two variables i.e.
previousLatLng
and
currentLatLng
. These variables will be used to aminate the car from the previous location to the current location. Initially, nothing will be there in these two variables, so we need to check for that and update accordingly and then call the
carAnimator()
to animate the car. So, in the
updateCarLocation()
function, add the below code:
private var movingCabMarker: Marker? = null
private var previousLatLng: LatLng? = null
private var currentLatLng: LatLng? = null


private fun updateCarLocation(latLng: LatLng) {
    if (movingCabMarker == null) {
        movingCabMarker = addCarMarkerAndGet(latLng)
    }
    if (previousLatLng == null) {
        currentLatLng = latLng
        previousLatLng = currentLatLng
        movingCabMarker?.position = currentLatLng
        movingCabMarker?.setAnchor(0.5f, 0.5f)
        animateCamera(currentLatLng!!)
    } else {
        previousLatLng = currentLatLng
        currentLatLng = latLng
        val valueAnimator = AnimationUtils.carAnimator()
        valueAnimator.addUpdateListener { va ->
            if (currentLatLng != null && previousLatLng != null) {
                val multiplier = va.animatedFraction
                val nextLocation = LatLng(
                    multiplier * currentLatLng!!.latitude + (1 - multiplier) * previousLatLng!!.latitude,
                    multiplier * currentLatLng!!.longitude + (1 - multiplier) * previousLatLng!!.longitude
                )
                movingCabMarker?.position = nextLocation
                movingCabMarker?.setAnchor(0.5f, 0.5f)
                animateCamera(nextLocation)
            }
        }
        valueAnimator.start()
    }
}
Now, you can call the
updateCabLocation
from the
onMapReady
method by providing all the locations that you get from the
getListOfLocations
method. Since we are reading the locations from the array of size 10 and not from the server, the cab position will be updated so fastly that you will never see any animation in between.
So, in this project, we will use
Handler
to delay the location feeding by 5 sec. In the
MainActivity.kt
file, create a function named
showMovingCab()
and get the location from the array of 10 elements(you can change this with your array size) and then call the
updateCabLocation()
.
private lateinit var handler: Handler
private lateinit var runnable: Runnable


private fun showMovingCab(cabLatLngList: ArrayList<LatLng>) {
    handler = Handler()
    var index = 0
    runnable = Runnable {
        run {
            if (index < 10) {
                updateCarLocation(cabLatLngList[index])
                handler.postDelayed(runnable, 3000)
                ++index
            } else {
                handler.removeCallbacks(runnable)
                Toast.makeText(this@MainActivity, "Trip Ends", Toast.LENGTH_LONG).show()
            }
        }
    }
    handler.postDelayed(runnable, 5000)
}
From the
onMapReady
method, call the above method as:
override fun onMapReady(googleMap: GoogleMap) {
    this.googleMap = googleMap
    defaultLocation = LatLng(28.435350000000003, 77.11368)
    showDefaultLocationOnMap(defaultLocation)

    Handler().postDelayed(Runnable {
        showPath(MapUtils.getListOfLocations())
        showMovingCab(MapUtils.getListOfLocations())
    }, 3000)
}
But if you run the application, then you will see that the orientation of the cab is always fixed. It is moving, but it is not moving with the correct orientation because the car is not rotating correctly.
Let's first understand the concept of rotation of marker on Google Map:
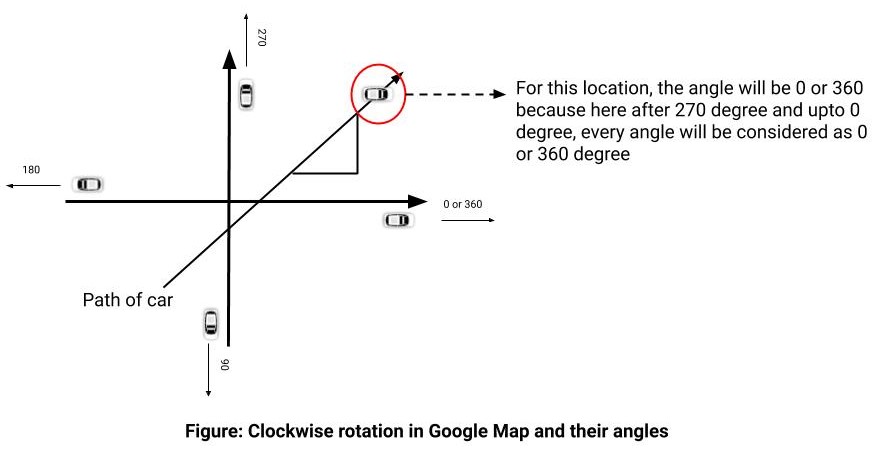
In Google Map, the rotation is done in a clockwise manner. By default, the orientation of the cab will be perfect if it moves on the x or y-axis. But what if there is a change in the angle of the cab? In the above image for the drawn path, the angle will be taken as 0 or 360 and this will result in bad orientation. So, we need to find the angle of the cab.
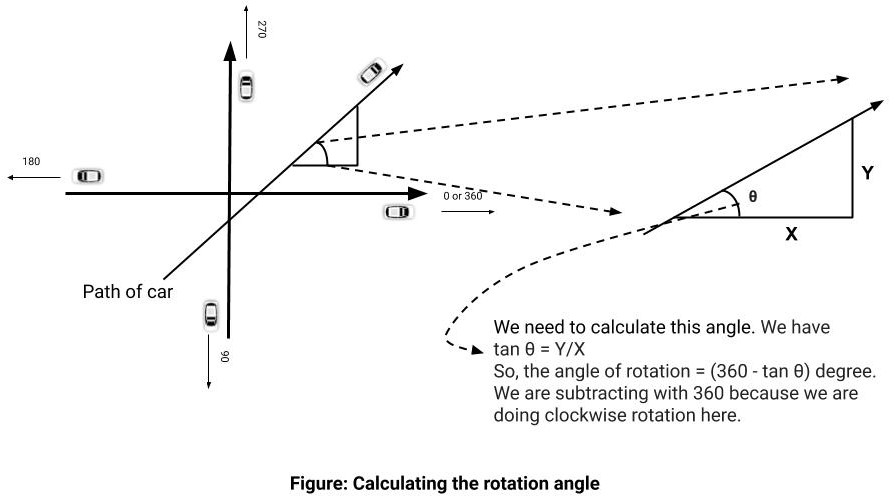
In the above image, we find the angle of the car by applying some mathematics and if the angle is with us, then we can rotate the cab according to our needs.
So, in the MapUtils class, add a function named
getRotation
which takes two locations i.e. start and end and then return the angle between them:
fun getRotation(start: LatLng, end: LatLng): Float {
    val latDifference: Double = abs(start.latitude - end.latitude)
    val lngDifference: Double = abs(start.longitude - end.longitude)
    var rotation = -1F
    when {
        start.latitude < end.latitude && start.longitude < end.longitude -> {
            rotation = Math.toDegrees(atan(lngDifference / latDifference)).toFloat()
        }
        start.latitude >= end.latitude && start.longitude < end.longitude -> {
            rotation = (90 - Math.toDegrees(atan(lngDifference / latDifference)) + 90).toFloat()
        }
        start.latitude >= end.latitude && start.longitude >= end.longitude -> {
            rotation = (Math.toDegrees(atan(lngDifference / latDifference)) + 180).toFloat()
        }
        start.latitude < end.latitude && start.longitude >= end.longitude -> {
            rotation =
                (90 - Math.toDegrees(atan(lngDifference / latDifference)) + 270).toFloat()
        }
    }
    return rotation
}
Now, we will call the above function in the
updateCarLocation
function. So, the final code of the
updateCarLocation
function will be:
private var movingCabMarker: Marker? = null
private var previousLatLng: LatLng? = null
private var currentLatLng: LatLng? = null


private fun updateCarLocation(latLng: LatLng) {
    if (movingCabMarker == null) {
        movingCabMarker = addCarMarkerAndGet(latLng)
    }
    if (previousLatLng == null) {
        currentLatLng = latLng
        previousLatLng = currentLatLng
        movingCabMarker?.position = currentLatLng
        movingCabMarker?.setAnchor(0.5f, 0.5f)
        animateCamera(currentLatLng!!)
    } else {
        previousLatLng = currentLatLng
        currentLatLng = latLng
        val valueAnimator = AnimationUtils.carAnimator()
        valueAnimator.addUpdateListener { va ->
            if (currentLatLng != null && previousLatLng != null) {
                val multiplier = va.animatedFraction
                val nextLocation = LatLng(
                    multiplier * currentLatLng!!.latitude + (1 - multiplier) * previousLatLng!!.latitude,
                    multiplier * currentLatLng!!.longitude + (1 - multiplier) * previousLatLng!!.longitude
                )
                movingCabMarker?.position = nextLocation
                val rotation = MapUtils.getRotation(previousLatLng!!, nextLocation)
                if (!rotation.isNaN()) {
                    movingCabMarker?.rotation = rotation
                }
                movingCabMarker?.setAnchor(0.5f, 0.5f)
                animateCamera(nextLocation)
            }
        }
        valueAnimator.start()
    }
}
Now, run the application and you will see the correct orientation of the car as it moves across the path. The animation is also looking perfect.
Project Source Code and What next?
You can find the complete project from here.
In this tutorial, we have animated the car just like in the Uber app. Up next, you can learn to build a ride-sharing Android Taxi Clone App like Uber, Lyft - Open-Source Project By MindOrks .
You can find more Open-Source projects by MindOrks from here .
Have a look at our Interview Kit for company preparation.
Do share this tutorial with your fellow developers to spread the knowledge. You can read more blogs on Android on our blogging website .
Apply Now: MindOrks Android Online Course and Learn Advanced Android
Happy Learning :)
Team MindOrks!
Also, Let’s connect on Twitter , Linkedin , Github , and Facebook