Using WebViews in Flutter: Tutorial
Think of a situation where you want to display some content on your application that you already have on your website. This content can be some user agreement page or some payment page or something else. So, you can either build the whole page by writing the logic of it and then use it in your application. The second thing that you can do is just display the content from your website in your app and you are good to go. And the best part is, you need not use some browser app to open that webpage. In this way, you will end up saving your time for writing the code for that page in your application.
Even many applications are using this feature. For example, whenever you are performing some payment operation on any application, then one thing that you will notice that during the payment, one webpage will be loaded and you will perform your payments there. The benefit of doing this is we need not write the payment code again for mobile applications. As you are dealing with money, so it is better to display the webpage that is already tested and do the transaction instead of writing the code again.
So, in order to display some webpage in your application, you can use one plugin named
webview_flutter
that is built by the Flutter team. In this blog, we will learn how to use this plugin to display a webpage.
The
webview_flutter
plugin provides a
WebView
widget. On iOS, the
WebView
widget is backed by a
WKWebView
and on Android, the
WebView
widget is backed by a
WebView
. So, let's learn how to use this.
Setting up the project
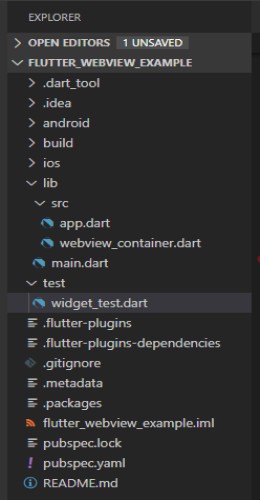
- Create a new Flutter project. Name : flutter_webview_example
-
The following is the project structure. So, you can set up the project by making the desired folder(
src) and files(main.dart,app.dart,webview_container.dart).
Adding dependency
To use
webview_flutter
, you need to add the dependency of it. So, in your
pubspec.yaml
file, add the below dependency:
dependencies:
  webview_flutter: ^0.3.20
Note: While adding dependencies, give proper indentation otherwise you will end up having errors.
Now, install the dependency by saving the file(if you are using VS Code) or by pressing the
pub get
option(in Android Studio) to install the dependency. Also, you can install packages from the command line with Flutter:
$ flutter pub getAdditional set up for iOS
To use
on iOS, open the
WebView
file and add the following in the file's
Info.plist
element:
<dict>
<dict>
    ...
    <key>io.flutter.embedded_views_preview</key>
    <string>YES</string>
    ...
Now, we are done with the dependency part. Let's move on to the coding part.
Coding part
Open the
main.dart
file and add the below code:
import 'package:flutter/material.dart';
import 'package:flutter_webview_example/src/app.dart';

void main() => runApp(App());
Now, create a new folder named
src
and under this folder create two files i.e.
app.dart
and
webview_container.dart
. The
app.dart
file will be used to provide the URL to be loaded and Title of the AppBar to the
webview_container.dart
file. The
webview_container.dart
file is responsible for adding the
WebView
to display the desired URL in the application.
The following is the code for the
app.dart
file:
import 'package:flutter/material.dart';
import 'package:flutter_webview_example/src/webview_container.dart';

class App extends StatelessWidget {
  @override
  Widget build(BuildContext context) {
    return MaterialApp(
      home: WebViewContainer('https://blog.mindorks.com', 'MindOrks'),
    );
  }
}
here, we are returning a
MaterialApp
and providing the URL and the Title to the
WebViewContainer
class. The code for the
webview_container.dart
file is:
import 'package:flutter/material.dart';
import 'package:webview_flutter/webview_flutter.dart';

class WebViewContainer extends StatefulWidget {
  final url;
  final title;
  WebViewContainer(this.url, this.title);
  @override
  createState() => _WebViewContainerState(this.url, this.title);
}

class _WebViewContainerState extends State<WebViewContainer> {
  var _url;
  var _title;
  final _key = UniqueKey();
  _WebViewContainerState(this._url, this._title);
  @override
  Widget build(BuildContext context) {
    return Scaffold(
      appBar: AppBar(
        title: Text(_title),
      ),
      body: Column(
        children: [
          Expanded(
            child: WebView(
              key: _key,
              javascriptMode: JavascriptMode.unrestricted,
              initialUrl: _url,
            ),
          ),
        ],
      ),
    );
  }
}
In the above code, you can see that we are using
WebView
widget and inside that widget, we are using
initialUrl
to open our desired URL. You can also enable or disable JavaScript in your WebView with the
parameter as used above. By default, JavaScript in your WebView is disabled.
javascriptMode
That's it, you can run your application and see the below screen on your app.

Apart from this, you can modify your
WebView
with the help of
WebViewController
. The
WebViewController
is returned whenever the
WebView
is fully built. So, by using this controller, you can perform various operations like loading some other URL or getting the current URL, adding the URL into favorites, etc. The following is an example of
WebViewController
:
WebViewController _controller;
WebView(
  initialUrl: 'https://blog.mindorks.com',
  onWebViewCreated: (WebViewController webViewController) {
    _controller = webViewController;
  },
);
//...After some operations:
_controller.loadUrl('https://mindorks.com');
This is all about using
WebViews
in Flutter. You can read more about the functionalities and drawbacks of this plugin from the
Flutter webview plugin page
.
What next?
You can learn about some of the cool topics of Flutter, by reading blogs from our website .
Do share this tutorial with your fellow developers to spread the knowledge.
Apply Now: MindOrks Android Online Course and Learn Advanced Android
Learn System Design for your next Interview from here.
Happy Learning :)
Team MindOrks!
Also, Let’s connect on Twitter , Linkedin , Github , and Facebook