StatelessWidget vs StatefulWidget in Flutter
Everything that you see on the screen of the application that is built using Flutter is a Widget. For example, the buttons, the images, the alert box, the app bar, etc, all these are widgets in Flutter and with the help of these widgets, you can build a simpler app like a Calculator app to more complex and interactive applications like an Instagram app.
These Widgets are broadly divided into two types i.e. StatelessWidget and StatefulWidget . In this blog, we will learn about the difference between these two types of Widgets. So, let's start by taking an analogy.
Analogy
There are various things present on your work desk such as a laptop, a screen, a flower pot, a water bottle, etc. If you leave all the items present on the work desk as it is, then you are not changing the state of your work desk. But someday, you thought that the position of the flower pot is not correct. So, you changed the position of the pot. Here, you changed the state of the flower pot i.e. there is a change in the initial and final position or the state of the flower pot.
The same is in the case of applications also. In any mobile application, there are some Widgets that will not change and are static in nature. For example, the contact information that is present in any application remains the same i.e. the name of the developer is not going to change during the lifetime of the app. So, you use one
Text
widget to show the contact information and this Text does not change its state at runtime.
But there are certain cases where the Widgets are dynamic in nature i.e. they keep on changing as the user interacts with the widget. For example, whenever you like some posts on Instagram, then the text that is showing the number of likes is increased by 1 and also the color of the like button changes to red. So, here both
Image
and
Text
are dynamic in nature and are changing its state at runtime.
So, based on the ability of the widgets to reload itself at the runtime, the Widgets are divided into two categories:
- StatelessWidget
- StatefulWidget

The first image is a kind of contact page where various static information is present such as the company logo, website, etc. The state of the Widgets is fixed and they are Stateless in nature. But the second image is from Twitter. Here, the number of Followers or the number of Following will change. So, the state of the Text that is representing these numbers doesn't have a fixed state. They are Stateful in nature.
Let's learn more about these two categories of Widgets by diving deeper into it.
StatelessWidget
StatelessWidgets are used when the part of the UI is not changing dynamically i.e. we are having the static content only and are immutable.
To create a Stateless Widget, you need to extend your class from
StatelessWidget
and you also need to override the
build
method that will return one or more widgets. The following is an example of
StatelessWidget
:
class MyApp extends StatelessWidget {
 @override
 Widget build(BuildContext context) {
   return MaterialApp(
      home: Scaffold(
        appBar: AppBar(
          title: Text('Example'),
          backgroundColor: Colors.blueGrey[900],
        ),
        backgroundColor: Colors.white,
        body: Container(),
      ),
    );
  }
}
The above code is an example of
StatelessWidget
where
MyApp
is a
StatelessWidget
and it is overriding the
build
method. The
build
method is returning a
MaterialApp
widget and this method will be called only once i.e. whenever the
MyApp
will be initialized then
build
will be called and the widgets will be drawn on the screen.
But if there is a change in any of the variables associated with the Widgets, then the
build
method will not be called and nothing will be updated on the screen because it is
StatelessWidget
.
Note:
To create a StatelessWidget, you can type
stless
and press enter in VS code or Android Studio.
To change the state of the Widgets based on the state of the variables associated with the Widgets, we use StatefulWidgets.
StatefulWidget
StatefulWidgets are used when the part of the UI changes dynamically i.e. when we have mutable widgets then we use
StatefulWidget
.
To create a Stateful Widget, you need to extend your class from
StatefulWidget
and here instead of overriding the
build
method, you need to override the
createState()
method. The
createState()
method returns a
State
object. Then we create another class that is extended from
State
and here in this class, we need to override the
build
method and this
build
method will return one or more widgets. The following is an example of a
StatefulWidget
:
class MyApp extends StatefulWidget {
 @override
 _MyAppState createState() => _MyAppState();
}

class _MyAppState extends State<MyApp> {
 @override
 Widget build(BuildContext context) {
    return MaterialApp(
      home: Scaffold(
        appBar: AppBar(
          title: Text('Example'),
          backgroundColor: Colors.blueGrey[900],
        ),
        backgroundColor: Colors.white,
        body: Container(),
      ),
    );
  }
}
In the above example,
MyApp
is a
StatefulWidget
and it is overriding the
createState()
method. This method is returning the instance of
MyAppState
class and inside this class, we are overriding the
build
method.
So, the advantage of overriding the
build
method in
MyAppState
is that now the
build
method will be called whenever there is a change in the variables associated with the Widgets present in it and the whole widget will be redrawn once again. But in order to call the
build
method, you need to add another method called
setState()
that will call the build method whenever there is a change in the state.
Note:
To create a StatefulWidget, you can type
stful
and press enter in VS code or Android Studio.
Let's understand with the help of an example.
Example
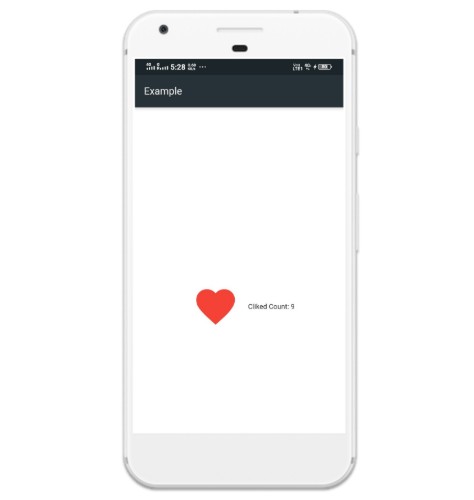
In this example, we will be making a simple application that will contain one Favorite icon and this icon will change its color from black to red and again red to black whenever you tap on the icon. Also, there is one
Text
that will display how many times the icon is clicked.
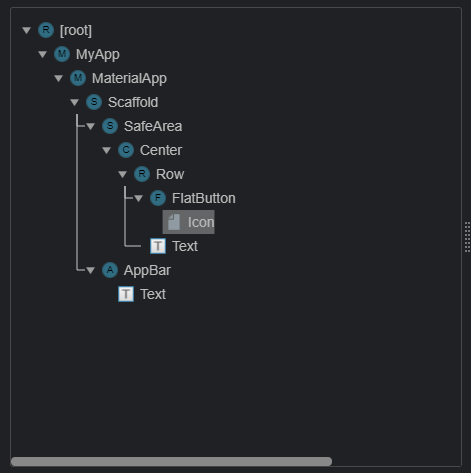
The following is the widget tree for this application:
First, we will start with the
StatelessWidget
. In the
main.dart
file, type
stless
and press enter to create a stateless widget and name it as
MyApp
.
In the
MyApp
, apart from the widgets, we will be having one function
changeColor
that will change the color of the icon when pressed and it will increase the
counter
variable by 1. The following is the code for the
main.dart
file:
import 'package:flutter/material.dart';

void main() {
  runApp(MyApp());
}

class MyApp extends StatelessWidget {
  int counter = 0;
  Color buttonColor = Colors.black;

  void changeColor() {
    counter++;
    if (buttonColor == Colors.black) {
      buttonColor = Colors.red;
    } else {
      buttonColor = Colors.black;
    }
  }

  @override
  Widget build(BuildContext context) {
    return MaterialApp(
      home: Scaffold(
        appBar: AppBar(
          title: Text('Example'),
          backgroundColor: Colors.blueGrey[900],
        ),
        backgroundColor: Colors.white,
        body: SafeArea(
          child: Center(
            child: Row(
              mainAxisAlignment: MainAxisAlignment.center,
              children: <Widget>[
                FlatButton(
                  child: Icon(
                    Icons.favorite,
                    color: buttonColor,
                    size: 80.0,
                  ),
                  onPressed: () {
                    changeColor();
                    print(counter);
                  },
                ),
                Text('Cliked Count: $counter'),
              ],
            ),
          ),
        ),
      ),
    );
  }
}
Now, run the application and tap on the icon. Did you see any change in the color of the icon? No. You will not see any change in the color or in the value of the text that represents how many times the icon is pressed. Is the value of the
counter
variable is updating or not? Let's see.
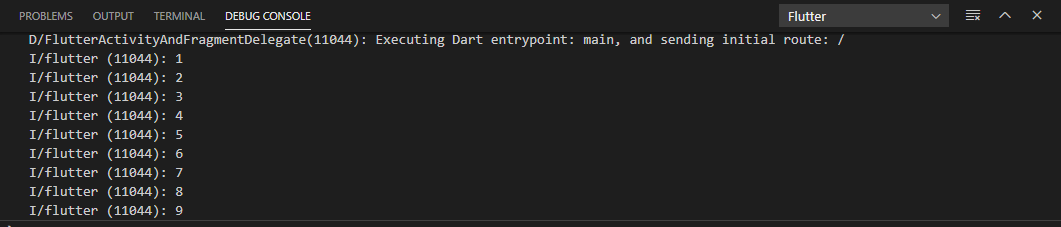
In the
onPressed
method, we have printed the value of the
counter
variable, so when you are pressing the icon, then you can see the change in the value of the
counter
variable in the Debug Console.
You can also see the changed value of the
counter
variable by Hot Reloading the application. When you Hot reload the application, then you will see the updated value of the counter variable on the screen. Again, if you tap on the icon, then nothing will change. So, what is happening here?
Since the above code is Stateless, the
build
method is called only once and even after calling the
changeColor
method from the
onPressed
method, the
counter
variable is increasing but it is not shown on the screen because for that you need to call the
build
method whenever the value of the counter is changing. Now, when you Hot Reload the app, then the
build
method is called and the updated value of the
counter
variable is displayed. Again if you tap on the icon then nothing will change because the
build
method is not being called again.
So, how can we fix the above problem i.e. how to change the color of the icon and update the value of the text at runtime?
Yeah, obviously, we are going to use the
StatefulWidget
for the same because this is our use-case. Here, on pressing the icon, the color of the icon and the text is changing.
Create a
StatefulWidget
by typing
stful
and press enter. Set name as
MyApp
. The code for the
main.dart
file will look something like below:
import 'package:flutter/material.dart';

void main() {
  runApp(MyApp());
}

class MyApp extends StatefulWidget {
  @override
  _MyAppState createState() => _MyAppState();
}

class _MyAppState extends State<MyApp> {
  int counter = 0;
  Color buttonColor = Colors.black;
  void changeColor() {
    counter++;
    if (buttonColor == Colors.black) {
      buttonColor = Colors.red;
    } else {
      buttonColor = Colors.black;
    }
  }

  @override
  Widget build(BuildContext context) {
    return MaterialApp(
      home: Scaffold(
        appBar: AppBar(
          title: Text('Example'),
          backgroundColor: Colors.blueGrey[900],
        ),
        backgroundColor: Colors.white,
        body: SafeArea(
          child: Center(
            child: Row(
              mainAxisAlignment: MainAxisAlignment.center,
              children: <Widget>[
                FlatButton(
                  child: Icon(
                    Icons.favorite,
                    color: buttonColor,
                    size: 80.0,
                  ),
                  onPressed: () {
                    setState(() {
                      changeColor();
                      print(counter);
                    });
                  },
                ),
                Text('Cliked Count: $counter'),
              ],
            ),
          ),
        ),
      ),
    );
  }
}
Now, run the application and tap on the Favorite icon. You will see the change in color as well as the increase in the counter variable.
If you closely look at the code, then you will find that the code is almost similar to the above Stateless code, the only difference is that here in the
onPressed
method, we introduced one more method called
setState
. This
setState
method will be called whenever you press the icon and it is the duty of the
setState
method to call the
build
function, again and again, to show the changes on the screen.
The following is the output of our application:
So, in this way, you can use the Stateless or Stateful widgets according to your use-case. If you are having something on the screen that will change whenever the user interacts with the application, then you need to use the
StatefulWidget
. Otherwise, if the content on the screen is static, then you can use
StatelessWidget
.
What next?
You can learn about some of the cool topics of Flutter, by reading blogs from our website .
Do share this tutorial with your fellow developers to spread the knowledge.
Apply Now: MindOrks Android Online Course and Learn Advanced Android
Learn System Design for your next Interview from here.
Happy Learning :)
Team MindOrks!
Also, Let’s connect on Twitter , Linkedin , Github , and Facebook