Getting started with Lottie Animation in Android
Enhancing the User Experience of an application is one of the priorities for any developer. Providing Animations for certain descriptions always enhances the User Experience of an application when compared to images and text descriptions!
Lottie is one of the libraries which is used in mobile applications that helps in providing animations in a simpler way. How to get started with using Lottie Animations in Android? Let’s dive through this article and understand this.
Welcome to our MindOrks blog on “Getting Started with Lottie Animation in Android”.
Today, we are going to learn and build this.
As always, we will be quickly understanding this with the help of an example project.
Create a Project
- Start a new Android Studio Project
- Select Empty Activity and Next
- Name: Anything of your choice
- Package name: Anything of your choice
- Language: Kotlin
- Finish
- Your starting project is ready now
If you would wish to refer the sample project used for this article, you can follow this GitHub link .
Let’s add the required Lottie animation dependency in the app level build.gradle file:
//Lottie Animation
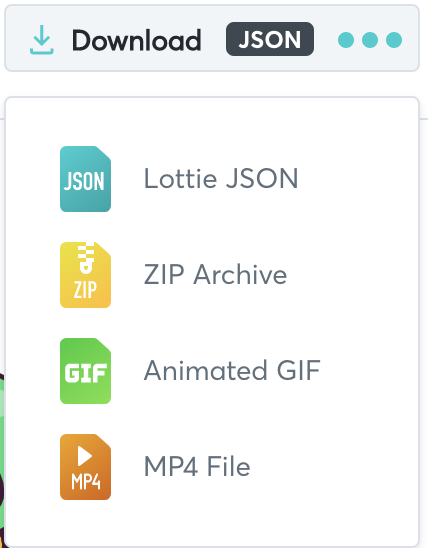
implementation 'com.airbnb.android:lottie:3.4.0'Before proceeding with the project, we have to select the required animations from https://lottiefiles.com/ . We can type the category in the search bar, select the respective animations, and download the JSON version of the file.
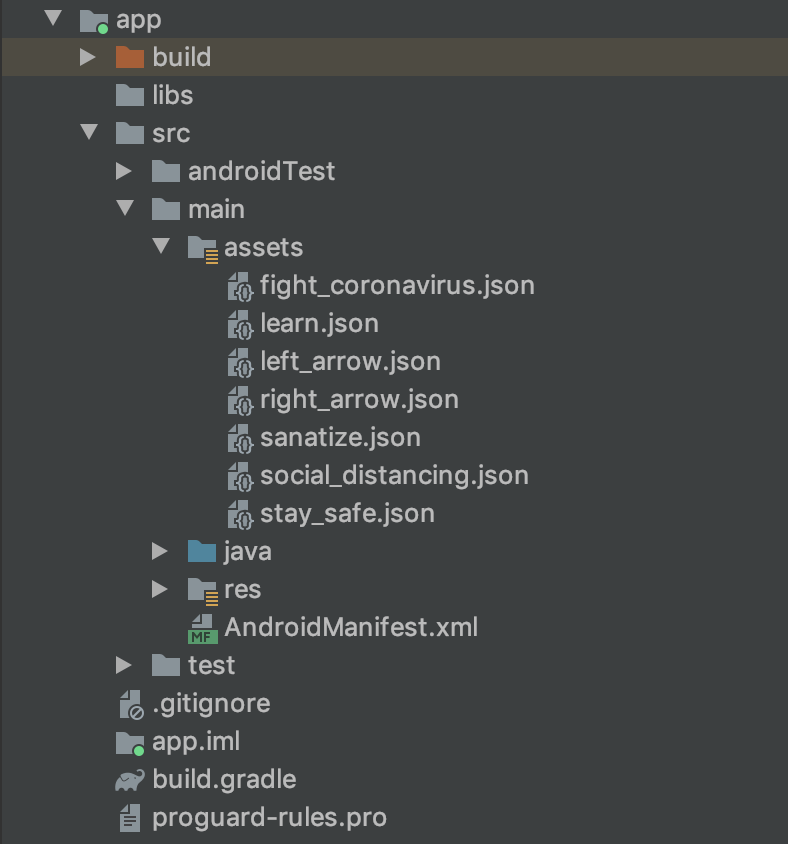
Now create an assets folder in our project.
The assets directory in the project structure should be placed in the src directory.
Add all the required downloaded JSON files to this assets folder.
Now, once we create the project, we know that we have two files MainActivity.kt and activity_main.kt.
Let’s start with our activity_main.kt file:
<?xml version="1.0" encoding="utf-8"?>
<androidx.constraintlayout.widget.ConstraintLayout xmlns:android="http://schemas.android.com/apk/res/android"
    xmlns:app="http://schemas.android.com/apk/res-auto"
    xmlns:tools="http://schemas.android.com/tools"
    android:layout_width="match_parent"
    android:layout_height="match_parent"
    tools:context=".MainActivity">

    <TextView
        android:layout_width="wrap_content"
        android:layout_height="wrap_content"
        android:id="@+id/tv_headline"
        app:layout_constraintBottom_toTopOf="@+id/lav_main"
        android:layout_marginTop="16dp"
        android:text="Steps to follow during this CoronaVirus Quarantine!"
        android:textSize="24sp"
        android:textStyle="bold"
        android:gravity="center"
        android:textColor="@android:color/black"
        app:layout_constraintLeft_toLeftOf="parent"
        app:layout_constraintRight_toRightOf="parent"
        app:layout_constraintTop_toTopOf="parent"/>

    <com.airbnb.lottie.LottieAnimationView
        android:id="@+id/lav_main"
        android:layout_width="match_parent"
        android:layout_height="300dp"
        app:lottie_autoPlay="true"
        app:lottie_fileName="fight_coronavirus.json"
        app:lottie_loop="false"
        app:lottie_speed="1"
        app:layout_constraintLeft_toLeftOf="parent"
        app:layout_constraintRight_toRightOf="parent"
        app:layout_constraintBottom_toTopOf="@+id/layout_click"
        app:layout_constraintTop_toBottomOf="@id/tv_headline" />

    <LinearLayout
        android:layout_width="match_parent"
        android:layout_height="wrap_content"
        android:id="@+id/layout_click"
        android:orientation="horizontal"
        app:layout_constraintLeft_toLeftOf="parent"
        app:layout_constraintRight_toRightOf="parent"
        app:layout_constraintTop_toBottomOf="@id/lav_main">

        <com.airbnb.lottie.LottieAnimationView
            android:id="@+id/lav_click_left"
            android:layout_width="0dp"
            android:layout_height="100dp"
            android:layout_weight="1"
            app:lottie_autoPlay="true"
            android:visibility="gone"
            app:lottie_fileName="left_arrow.json"
            app:lottie_loop="true"
            app:lottie_speed="1" />


        <com.airbnb.lottie.LottieAnimationView
            android:id="@+id/lav_click_right"
            android:layout_width="0dp"
            android:layout_weight="1"
            android:layout_height="100dp"
            app:lottie_autoPlay="true"
            app:lottie_fileName="right_arrow.json"
            app:lottie_loop="true"
            app:lottie_speed="1" />

    </LinearLayout>


</androidx.constraintlayout.widget.ConstraintLayout>
In this example, we have a basic UI which contains
- A text view as a heading
- A LottieAnimationView which describes the content of the text view through an animation
- Left and right buttons for navigation.
We can see from the activity_main.xml that the required files to be added to the Lottie Animation views are done through the attribute:
//The json file added to the assets directory
app:lottie_fileName="filename.json"
Now, let’s update our MainActivity.kt file:
package com.mindorks.lottieanimation
import android.os.Bundle
import android.view.View
import androidx.appcompat.app.AppCompatActivity
import kotlinx.android.synthetic.main.activity_main.lav_click_left
import kotlinx.android.synthetic.main.activity_main.lav_click_right
import kotlinx.android.synthetic.main.activity_main.lav_main
import kotlinx.android.synthetic.main.activity_main.tv_headline
class MainActivity : AppCompatActivity() {
private var count: Int = 0
override fun onCreate(savedInstanceState: Bundle?) {
super.onCreate(savedInstanceState)
setContentView(R.layout.activity_main)
initListeners()
}
private fun initListeners() {
lav_click_right.setOnClickListener {
count++
showStep(count = if (count > 4 ) 4 else count)
}
lav_click_left.setOnClickListener {
count--
showStep(count = if (count < 0 ) 0 else count)
}
}
private fun showStep(count: Int) {
when (count) {
0 -> {
setFooter(
isLeftVisible = false,
isRightVisible = true
)
setStepContent(
header = "Steps to follow during this CoronaVirus Quarantine!",
lottieAnimationFile = "fight_coronavirus.json"
)
}
1 -> {
setFooter(
isLeftVisible = true,
isRightVisible = true
)
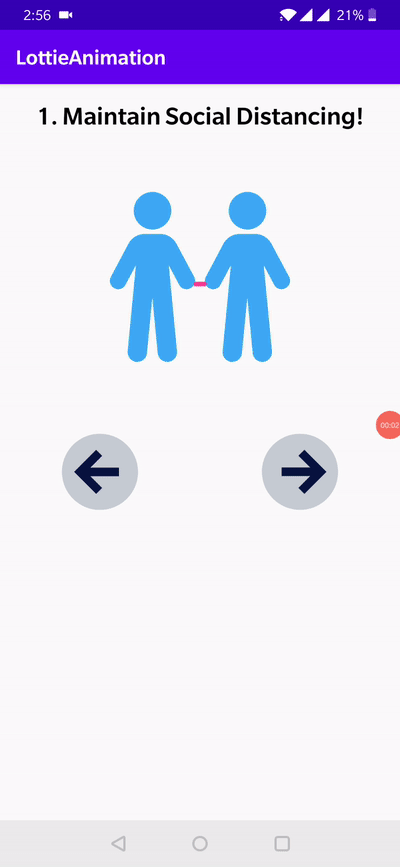
setStepContent(header = "1. Maintain Social Distancing!", lottieAnimationFile = "social_distancing.json")
}
2 -> {
setFooter(
isLeftVisible = true,
isRightVisible = true
)
setStepContent(header = "2. Stay Home, Stay Safe!", lottieAnimationFile = "stay_safe.json")
}
3 -> {
setFooter(
isLeftVisible = true,
isRightVisible = true
)
setStepContent(header = "3. Wash/Sanatize your hands!", lottieAnimationFile = "sanatize.json")
}
4 -> {
setFooter(
isLeftVisible = true,
isRightVisible = false
)
setStepContent(header = "4. Learn/Upgrade your skill set!", lottieAnimationFile = "learn.json")
}
}
}
private fun setStepContent(header: String, lottieAnimationFile: String) {
tv_headline.text = header
lav_main?.apply {
setAnimation(lottieAnimationFile)
repeatCount = 5
playAnimation()
}
}
private fun setFooter(
isLeftVisible: Boolean,
isRightVisible: Boolean
) {
lav_click_left?.apply {
visibility = if (isLeftVisible) View.VISIBLE else View.GONE
}
lav_click_right?.apply {
visibility = if (isRightVisible) View.VISIBLE else View.GONE
}
}
}Understanding the Logic in the Example
- This example shows the basic steps required to be followed during the Covid-19 Quarantine.
- By default (At the initial launch), the left arrow view visibility is set to GONE, since the user is yet to start the navigation
- We are maintaining a variable named “count” in the MainActivity.kt file, initialized to zero.
- We are updating the value of count, visibility of the left and right buttons, content change for the text view and LottieAnimation View through handling the clicks of left and right arrows
      lav_click_right.setOnClickListener {
            count++
            showStep(count = if (count > 4 ) 4 else count)
        }
        lav_click_left.setOnClickListener {
            count--
            showStep(count = if (count < 0 ) 0 else count)
}- showStep method is called with the updated count parameter. This method internally calls setStepContent and setFooter methods for updating the UI
private fun showStep(count: Int)- setStepContent method helps in setting the value of the header(text view) and updating the Lottie Animation View
private fun setStepContent(header: String, lottieAnimationFile:String)- setFooter method helps in handling the left and right arrows
private fun setFooter(isLeftVisible: Boolean,isRightVisible:Boolean)We are all set with the code now. Let’s run this application on any device to see how the Lottie Animation works!
LottieAnimationViews Attributes
There are a lot of attributes present for a LottieAnimation view through which we can control the animation of the view. Some of them used in the project are
- “lottie_autoPlay” boolean to control the autoplay functionality
app:lottie_autoPlay="true"- “lottie_loop” boolean to control the looping of the animation
app:lottie_loop="false"- “lottie_speed” float to control the speed of the animation
app:lottie_speed="1"What Next?
You can clone this project and experiment with the following:
- There is some business logic involved. So you can define an architecture to this project (If you want to apply MVVM, you can check this MindOrks blog for reference)
- You can add some more steps to be followed during the Covid-19 Quarantine
- You can improvise the UI
- You can explore different attributes of LottieAnimationViews and learn to set them programmatically, to keep the application dynamic
And many more...
Summary
- Add the Lottie dependency to the project
- Download the required JSON files from https://lottiefiles.com/
- Save them to the assets folder of the project.
- Use them wherever required! :)
That’s it for this article. We hope that this article has been of some use to you and helped you in understanding how to get started with Lottie Animations in Android!
If you are reading this article during the Covid-19 Quarantine, Please do follow the required steps to fight the Pandemic!
Thank you so much for your time!
Keep Learning, Keep Sharing, Keep Supporting!
Team MindOrks!