Getting started with Android NDK: Android Tutorial
We all started our journey of programming language with C or C++. After that, some of you might move to Java or Python or something else that will help in some kind of development like Android development or Web development. Talking about Android specifically, we normally use Java or Kotlin for application development. Can we add some C or C++ code in our application? Yes, you can use the code in Android that you have developed during the learning phase of programming language i.e. while learning C or C++.
In this blog, we will learn how to use native language in Android application development. We will discuss the following topics in this blog:
- What is NDK and why to use it?
- What is JNI?
- Some prerequisite
- "Hello World!" example with Android NDK
- The "Calculator App" example with Android NDK
- The disadvantage of using native language
So, let's get started.
What is NDK and why to use it?
NDK or Native Development Kit is a toolset that is provided by Android to use C or C++ code in our Android application. So, if you are using Android Studio version 2.2 or higher then you can use C or C++ in your Android application.
But for Android development, Java and Kotlin are the recommended languages. So, why to use native languages in Android? Let' find out the advantages of using native languages in Andoird:
- Very Fast: We all know that to convert a Java code into machine-level code, we need to go to JVM and then to JNI to perform the operations. Same is with Kotlin also because Kotlin also runs Java under the hood. While on the other hand, the NDK directly compiles the native code i.e. the C or C++ code into machine level language by generating a .so file. So, you need not perform the intermediate steps that were required in the case of Java/Kotlin.
- Code Re-usability: You can reuse the code written in C or C++ for different platform in your Android application. You can use the code that you wrote while learning C or C++ or the codes of other developers in your Android application.
So, whenever you want to make some high-performance applications for great speed or want to use some preexisting code written in some native language then you can use C or C++. Due to the speed factor, most of the game developers use C or C++ for writing the code for their games. Also, it becomes an easier task for them to use their C or C++ code in the Android application.
What if you want to use both Java/Kotlin and native language in your application? This is the most used case. Is it possible to use Java code from C++ and vice-versa? How will the Java code communicate with the native code? The communication is done by JNI. What is this JNI? Let's find out.
What is JNI?
JNI or Java Native Interface is the interface between your Java/Kotlin and the C/C++ code. It defines a way for the byte code that is generated by the Android to communicate with the native code. Java or Kotlin Code uses JNI to communicate with the C or C++ code.
Before getting started with our first "Hello World!" application with the Android NDK, let's have a look at the Native primitive data types that we will be using in our code later.
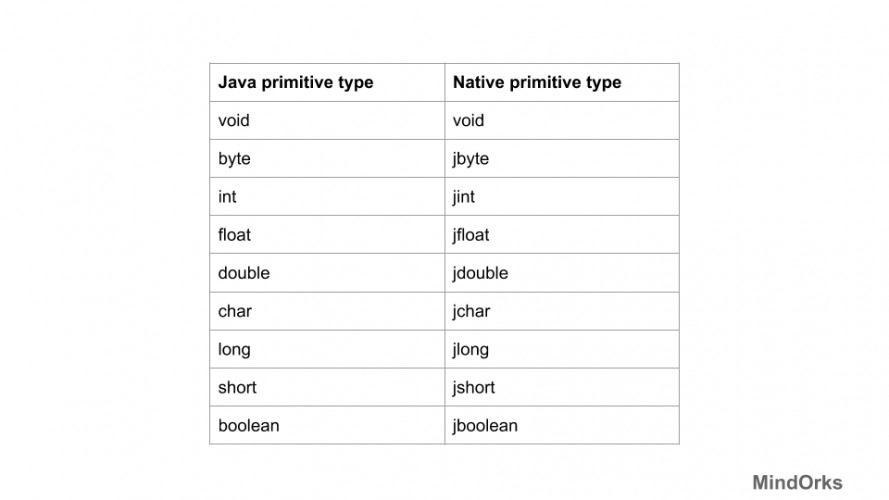
So, you can notice that all you need to do is just add " j " before any data type. For example, int is written as " jint ", byte is written as " jbyte " and so one.
Some SDK tools need to be added in Android Studio to use NDK support. Let's see what are those tools and how to download those tools?
Prerequisite
To use Android NDK support in your application, you need to download the following three tools:
- LLDB: It is used by Android Studio to debug the native code present in your project.
- NDK: Native Development Kit(NDK) is used to code in C and C++ i.e. native languages for Android.
- CMake: It is an open-source system that manages the build process in an operating system and a compiler-independent manner.
Let's see how to download all the above mentioned in Android Studio.
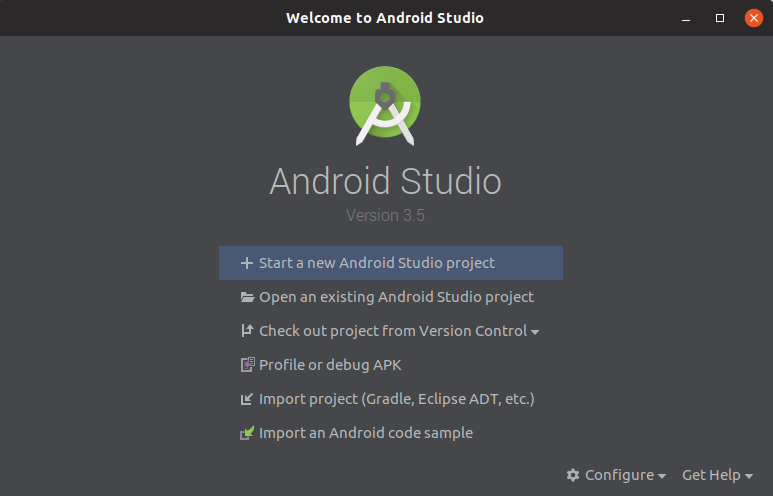
Following is the screen that you see when you open Android Studio. Click on the Configure button that is present in the bottom right corner of the Welcome screen.
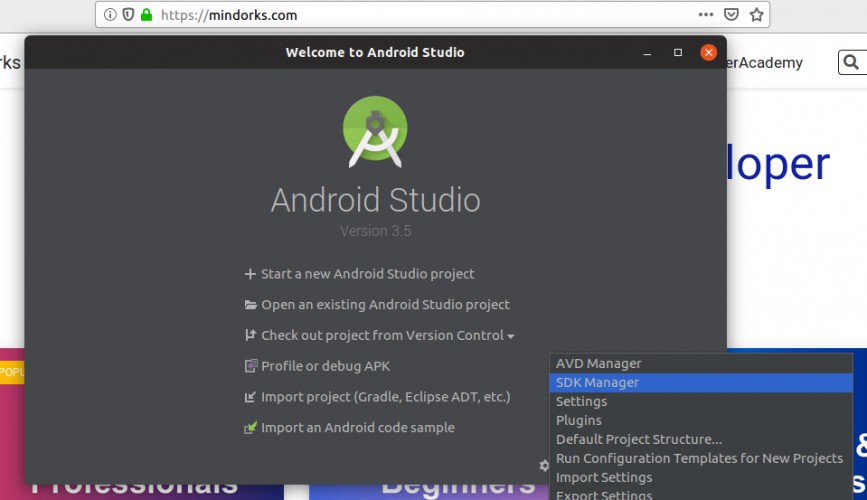
Now select SDK Manager from the list available to you.
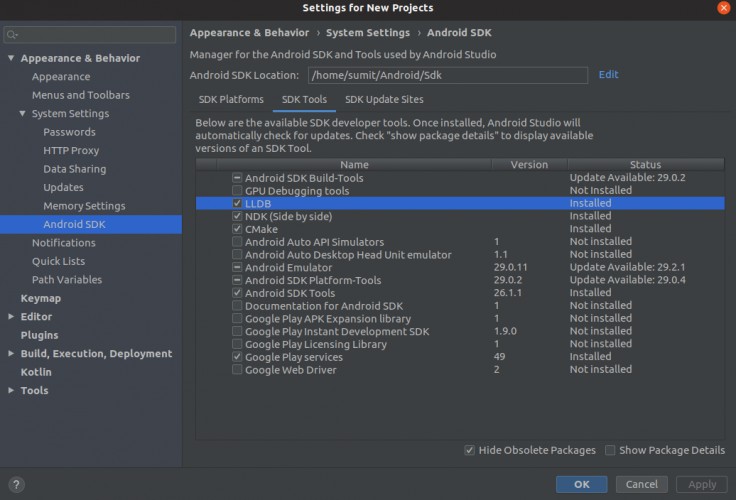
Under the SDK Tools tab, select LLDB, NDK, and CMake. After selecting these three, click on OK and wait for the tools to download.
Close the SDK Manager and get back to Welcome screen of Android Studio.
"Hello World!" example with Android NDK
So, we are done with the prerequisites of Android NDK. Now, let's quickly move on to the classic "Hello, World!" example using Android NDK. Follow the below steps:
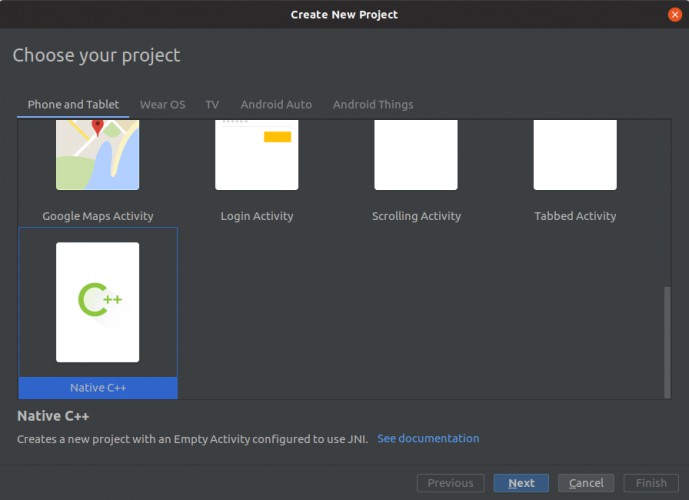
Step1: Open the Welcome screen of the Android Studio and create a new project.
Step2: Select the Native C++ template and click on Next. This will include all the files necessary for the use of native language in Android.
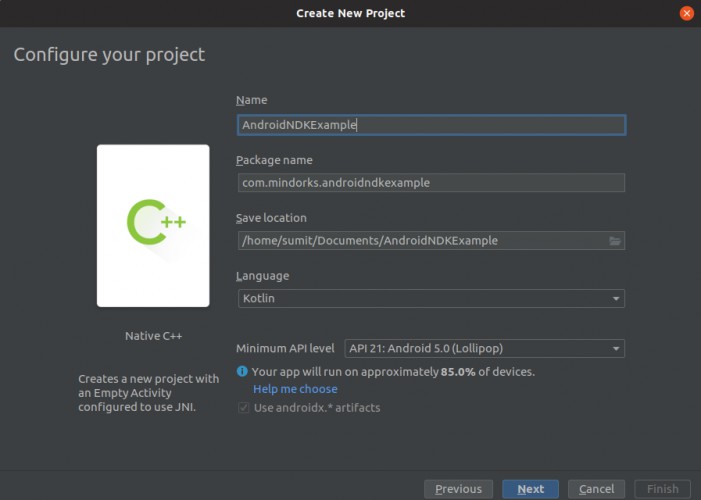
Step3: Enter the details of the project like Project Name, Package Name, and all other relevant information and click on Next.
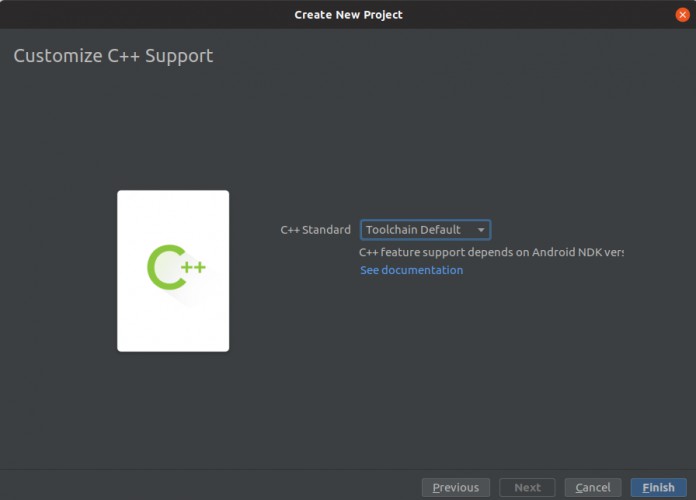
Step4: You can choose the compiler that you want to use for compiling the C++ code. We are using the default settings. Click on Finish.
Following is the project structure that you will get after using the C++ template.
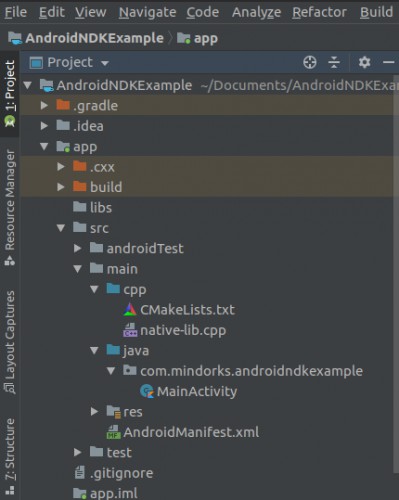
Here you can see that apart from the usual java directory, we are having one more directory named cpp that contains all the native files and CMakeLists.txt file. By default, we are having one native-lib.cpp file that contains the C++ code. Following is the code of the native-lib.cpp file:
#include <jni.h>
#include <string>

extern "C" JNIEXPORT jstring JNICALL
Java_com_mindorks_androidndkexample_MainActivity_stringFromJNI( JNIEnv *env, jobject /* this */) {
    std::string hello = "Hello, World!";
    return env->NewStringUTF(hello.c_str());
}
Following is the description of the above code:
- Above code is C++ code, so as like normal C++ file, we can include some libraries by using:
#include <library_name>- Here, you have to follow the combination of PackageName_ActivityName_MethodName .
- In the above example, com_mindorks_androidndkexample is the package name, MainActivity is the activity/file name and stringFromJNI is the method that returns a string from the native code and will be called from the Java/Kotlin code.
- Finally, in the return statement, you can see that we are returning the hello string from the function.
Till now, we are done with the native part. Now, let's find out how to call the native functions that we have created from our Kotlin code.
In your Kotlin code i.e. in the MainActivity.kt file, you need to load the native code by calling the System.loadLibrary("native-lib") method in the init block.
// Used to load the 'native-lib' library on application startup.
init {
    System.loadLibrary("native-lib")
}
Now, you have to declare a Kotlin external function with the same name as used in the native-lib.cpp file
/**
 * A native method that is implemented by the 'native-lib' native library,
 * which is packaged with this application.
 */
external fun stringFromJNI(): String
Finally, you can get the values from the function present in the native-lib.cpp file by calling:
// Example of a call to a native method
sample_text.text = stringFromJNI()
That's it. All the above code is already present in your project. So, run your application by pressing shift+f10 and see the output.
The "Calculator App" example with Android NDK
We have seen the basic "Hello, World!" example by using the native language. Now, let's build one calculator app that will take input from the user and will perform the following four actions(we will only cover the logical part):
- Add
- Subtract
- Multiply
- Divide
So, as in the "Hello, World!" example, we first declared a method in the native-lib.cpp file. In the "Calculator App" also, we are going to define four different methods for performing the above four operations.
//Addition function
extern "C" JNIEXPORT jint JNICALL
Java_com_mindorks_androidndkexample_MainActivity_add( JNIEnv *env, jobject, jint x, jint y) {

    //return an integer
    return x + y;
}

//Subtraction function
extern "C" JNIEXPORT jint JNICALL
Java_com_mindorks_androidndkexample_MainActivity_sub( JNIEnv *env, jobject, jint x, jint y) {

    //return an integer
    return x - y;
}

//Multiplication function
extern "C" JNIEXPORT jint JNICALL
Java_com_mindorks_androidndkexample_MainActivity_multiply( JNIEnv *env, jobject, jint x, jint y) {

    //return an integer
    return x * y;
}

//Division function
extern "C" JNIEXPORT jint JNICALL
Java_com_mindorks_androidndkexample_MainActivity_divide( JNIEnv *env, jobject, jint x, jint y) {

    //return an integer
    return x / y;
}
Here, you can see that we have four functions named add (for the addition of two numbers), sub (for the subtraction of two numbers), multiply (for the multiplication fo two numbers), and divide (for the division of two numbers). The return type of each function is jint . Also, each function is taking two integers as parameters and both are of type jint .
Now, our next task is to load the native-lib file in our Kotlin file. So, we can do that by using the System.loadLibrary("native-lib") method.
// Used to load the 'native-lib' library on application startup.
init {
    System.loadLibrary("native-lib")
}
Now, declare four Kotlin external methods with the same name as used in the native-lib file.
external fun add(x: Int, y: Int): Int
external fun sub(x: Int, y: Int): Int
external fun multiply(x: Int, y: Int): Int
external fun divide(x: Int, y: Int): Int
That's it, you are done with all the four functions. Now, you can use these functions according to your need in the Java/Kotlin file. That's it.
The disadvantage of using native language
The disadvantage associated with using native language is that if you don't use the APK Split or APK Bundle then using NDK alone will increase the APK size. What happens is that the NDK makes the .so file i.e. the machine executable file based on the Architecture of Android. For example, if we are having mips, x86, armeabi, armeabi-v7a, armeabi-v8a, then the .so file will be generated for all the five architectures. So, if the size of one .so file is 5MB then the application size should be 5MB but in reality, it will be of 5*5 = 25MB.
But if you are using APK Split or APK Bundle, then you will make five different APK for different architecture and you will upload all the five APK on play store. Now, the Play Store must identify the device architecture and then give the desired APK to download.
Closing note
In this blog, we learned how to use native languages like C and C++ in our Android applications. Usually, when we are dealing with some cross-platform application or we need to build some high-performance application, then we use native languages in our application. Otherwise, it is advised to go with Java or Kotlin.
Hope you learned something new today.
Check our all the Android tutorial here .
Do share this blog with your fellow developers to spread the knowledge. You can read more blogs on Android on our blogging website .
Apply Now: MindOrks Android Online Course and Learn Advanced Android
Happy Learning :)
Team MindOrks!