Using ConstraintLayout in Jetpack Compose
Till now we might have worked with ConstraintLayout in our android projects. But in this blog, we are going to talk about how we can use ConstrainLayout in Jetpack Compose.
In this blog, we are going to discuss,
- What is ConstraintLayout?
- How we can use ConstraintLayout in our project?
What is ConstraintLayout?
ConstraintLayout is a ViewGroup that position its children based on relative constraint between different views inside it or the parent itself.
ConstraintLayout helps us to design responsive UI for our screen and reduces nesting of views by keeping a flat structure. This also improves the performance of the layout as well as it reduces the number of nested views in it.
How we can use ConstraintLayouts in our project?
In this project, we are going to build,
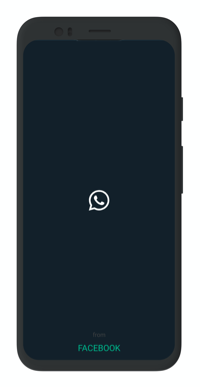
Here, we have an image, and two text views as well. And we are going to align all of these using ConstraintLayout.
We are going to use dev10 version for this project.
You can get the complete project here.
And to get started in Jetpack Compose click here.
Step 1.
First, let's design a container that will hold our ConstraintLayout and its children. Here we will use Scaffold for this purpose.
Scaffold(
    scaffoldState = scaffoldState,
    bodyContent = {

    }
)
Here in the
bodyContent
we are going to add our code for ConstraintLayout.
Step 2.
A ConstraintLayout in Compose is similar to a ConstraintLayout from the classic Android View System but here it is a composable function. We can design a simple layout in ConstrainLayout like,
@Composable fun MyConstraintLayoutView(){
    ConstraintLayout(constraintSet = ConstraintSet {}) {
        Text("Hey Mindorks")
    }
}
Here, ConstraintLayout is the container which will have the,
- ConstraintSet : ConstraintSet the set of constraints that we will use on views to align it with other views.
- Children : The other composable which will help us to design the views.
Now, let's design our
SplashView
as the above design.
We will declare the ConstraintLayout, and we are going to declare the ConstraintSet inside which we are going to declare out constraints as well like,
Scaffold(
    scaffoldState = scaffoldState,
    bodyContent = {
        ConstraintLayout(ConstraintSet {

            val surface = tag(SURFACE_TAG)
            val textFrom = tag(TEXT_FROM_TAG)
            val textCompany = tag(TEXT_COMPANY_TAG)
            val imageLogo = tag(IMAGE_LOGO_TAG)
        }
        )
    }
)
Here, the
tag()
have constant values which are,
private const val SURFACE_TAG = "surface"
private const val TEXT_FROM_TAG = "textFrom"
private const val TEXT_COMPANY_TAG = "textCompany"
private const val IMAGE_LOGO_TAG = "imageLogo"
Now, we will add the variables using a tag which is of type,
ConstrainedLayoutReferenceIt helps us to reference the widgets that we will be creating which corresponds to the ConstraintLayout children with a specific tag, which can be used to define the constraints to be imposed on those children.
tagcan be considered asfindViewById.
Now, we are going to set constraints to these 4 layout references.
Here, the surface is like the background which has to align to the top, bottom, right, and left of the parent. So to add the constraint for it we will use,
surface.apply {
    left constrainTo parent.left
    top constrainTo parent.top
    right constrainTo parent.right
    bottom constrainTo parent.bottom
}
Here
,
we constrained the
surface
to the
parent's
left, right, bottom, top.
Left here in the direction of children and we use
constrainTo
to set the required constraints to it by mapping to the other view.

Here, from the image, consider that the square is the parent and circle is the surface. Then, the left of the circle is constrained to the left of the parent and similarly for all other respective sides. This is what,
left constrainTo parent.left means in ConstraintLayout as well when we constraint view's left to the left of parent.
Similarly, we want the
imageLogo
to be constrained to center with the width and height to be wrapped. For that, we will use,
imageLogo.apply {
    left constrainTo parent.left
    top constrainTo parent.top
    right constrainTo parent.right
    bottom constrainTo parent.bottom
    width to wrap
    height to wrap
}
Here
,
we constrained the
imageLogo
to the parent's left, right, bottom, top. We also see that we have set the width and height to
wrap
.
Now, for
textCompany
we want it constrained to be at the bottom of the screen and
textFrom
to be constrained to
textCompany
.
So,
textCompany
and
textFrom
will look like,
textCompany.apply {
    bottom constrainTo parent.bottom
    right constrainTo parent.right
    left constrainTo parent.left
}
textFrom.apply {
    bottom constrainTo textCompany.top
    right constrainTo textCompany.right
    left constrainTo textCompany.left
}
Here
,
textCompany
is constrained to bottom, right, and left of parent and
textFrom
is constrained to top, right, and left of textCompany.
Now, since we are done adding the constraints, the complete code will look like,
Scaffold(
    scaffoldState = scaffoldState,
    bodyContent = {
        ConstraintLayout(ConstraintSet {

            val surface = tag(SURFACE_TAG)
            val textFrom = tag(TEXT_FROM_TAG)
            val textCompany = tag(TEXT_COMPANY_TAG)
            val imageLogo = tag(IMAGE_LOGO_TAG)

            surface.apply {
                left constrainTo parent.left
                top constrainTo parent.top
                right constrainTo parent.right
                bottom constrainTo parent.bottom
            }
            imageLogo.apply {
                left constrainTo parent.left
                top constrainTo parent.top
                right constrainTo parent.right
                bottom constrainTo parent.bottom
                width to wrap
                height to wrap
            }
            textCompany.apply {
                bottom constrainTo parent.bottom
                right constrainTo parent.right
                left constrainTo parent.left
            }
            textFrom.apply {
                bottom constrainTo textCompany.top
                right constrainTo textCompany.right
                left constrainTo textCompany.left
            }

        }) {
          //our views
        }
    })
Let us start designing the views and add these constraints to it.
We would need 4 views, one for surface, one image view, and two textViews.
So, let's start us by designing a view for the surface. We will create a container Box like,
Box(
    modifier = Modifier.fillMaxSize() +
            Modifier.drawBackground(colorLightGreen()) +
            Modifier.tag(SURFACE_TAG)
)
Here, we added a
modifier
to it fill the
maxWidth
and
maxHeight
available to it. It will add a green color background using
drawBackground()
and at last to implement the constraint we added above, we use
Modifier.tag()
with the SURFACE_TAG we defined above.
By using a
tag()
we will implement the constraint to Box which we added above. This will implement a background of green color with full width and height.
Now, for other views as well, we will add the
constraints
using
Modified.tag()
and the views will be constrained to that position. To design the rest of the views we will write using,
Text(
    text = "from",
    modifier = Modifier.tag(TEXT_FROM_TAG) + Modifier.padding(bottom = _8dp),
    color = Color.DarkGray
)
Text(
    text = "FACEBOOK",
    style = TextStyle(
        fontSize = _20sp,
        fontFamily = FontFamily.SansSerif,
        fontStyle = FontStyle.Normal
    ),
    modifier = Modifier.tag(TEXT_COMPANY_TAG) + Modifier.padding(bottom = _16dp),
    color = colorGreen()
)

ImageLoader.load(
    imageUrl = R.drawable.ic_whatsapp,
    modifier = Modifier.tag(IMAGE_LOGO_TAG)
) {}
Here, we have added tags to all three views and they now have implemented the constraints we have defined earlier.
ImageLoader.Load()
is a composable function which helps us loading an image and the code looks like,
@Composable
fun load(@DrawableRes imageUrl: Int, modifier: Modifier, onClick: (Boolean) -> Unit) {

    val vectorAsset = loadVectorResource(imageUrl)
    vectorAsset.resource.resource?.let {
        Clickable(onClick = {
            onClick(true)
        }) {
            Image(
                asset = it,
                modifier = modifier,
                contentScale = ContentScale.Fit

            )
        }
    }
}
Now, if we run the app setting this view we will get our desired output.
Conclusion
In Jetpack Compose we still use the ConstraintLayout same as how we use it in XML by constraining it to the views and parent for creating the layout.
You can get the complete project here.
Happy learning.
Team MindOrks :)