Changing App language in Android
In your app, you can add as many languages as you want. By languages, I mean the language of the text that we see in any mobile application. For example, if you have English, French, and Hindi users, then you can have language support for all these languages. Like "Hello" in English will become "Bonjour" in French and "नमस्ते" in Hindi.
But how can we change the language? That's the topic for this blog. In this blog, we will learn how to change the App locale in Android with ease.
By default, you have English as your default language for the whole app and the text corresponding to the English language will be there in our
strings.xml
file. So, similarly, for other languages, you need to add their
strings.xml
file.
So, basically Android loads the resources related to language based on the system locale setting. For example, if the language of your Android phone is English, then
strings.xml
of English will be loaded by Android. We do not have to do anything extra here.
But, many times, we want our users to change the language of our App only by selecting the preferred language and not by changing the language of our Android phone. So, let's see how to add this.
First of all, create a project in Android Studio. Here, we will be having 2 activities:
- MainActivity: This will contain one welcome TextView and two Buttons, one for opening the next activity in the English language and the other for opening the next activity in the Hindi language.
- LanguageActivity: This will simply contain a TextView displaying some message. The message will be shown in English if the language of the app is English and the message will be shown in Hindi if the language of the app is Hindi.
So, let's start with the MainActivity. The following is the code for the
activity_main.xml
file:
<?xml version="1.0" encoding="utf-8"?>
<androidx.constraintlayout.widget.ConstraintLayout xmlns:android="http://schemas.android.com/apk/res/android"
    xmlns:app="http://schemas.android.com/apk/res-auto"
    xmlns:tools="http://schemas.android.com/tools"
    android:layout_width="match_parent"
    android:layout_height="match_parent"
    tools:context=".MainActivity">

    <TextView
        android:id="@+id/tvWelcome"
        android:layout_width="match_parent"
        android:layout_height="wrap_content"
        android:layout_marginTop="40dp"
        android:text="@string/msg_welcome"
        android:textAlignment="center"
        app:layout_constraintEnd_toEndOf="parent"
        app:layout_constraintStart_toStartOf="parent"
        app:layout_constraintTop_toTopOf="parent" />

    <Button
        android:id="@+id/btnEnglish"
        android:layout_width="match_parent"
        android:layout_height="56dp"
        android:layout_marginTop="40dp"
        android:text="@string/label_btn_english"
        android:textAllCaps="false"
        app:layout_constraintEnd_toEndOf="@id/tvWelcome"
        app:layout_constraintStart_toStartOf="@id/tvWelcome"
        app:layout_constraintTop_toBottomOf="@id/tvWelcome" />

    <Button
        android:id="@+id/btnHindi"
        android:layout_width="match_parent"
        android:layout_height="56dp"
        android:layout_marginTop="16dp"
        android:text="@string/label_btn_hindi"
        android:textAllCaps="false"
        app:layout_constraintEnd_toEndOf="@id/tvWelcome"
        app:layout_constraintStart_toStartOf="@id/tvWelcome"
        app:layout_constraintTop_toBottomOf="@id/btnEnglish" />

</androidx.constraintlayout.widget.ConstraintLayout>
Here, we have 1 TextView and 2 Buttons.
Similarly, you can add one TextView in your LanguageActivity. The following is the XML code for the same:
<?xml version="1.0" encoding="utf-8"?>
<androidx.constraintlayout.widget.ConstraintLayout xmlns:android="http://schemas.android.com/apk/res/android"
    xmlns:app="http://schemas.android.com/apk/res-auto"
    xmlns:tools="http://schemas.android.com/tools"
    android:layout_width="match_parent"
    android:layout_height="match_parent"
    tools:context=".LanguageActivity">

    <TextView
        android:id="@+id/tvLearning"
        android:layout_width="match_parent"
        android:layout_height="wrap_content"
        android:text="@string/msg_learning"
        android:textAlignment="center"
        app:layout_constraintBottom_toBottomOf="parent"
        app:layout_constraintTop_toTopOf="parent" />

</androidx.constraintlayout.widget.ConstraintLayout>
And finally, here is the
strings.xml
file:
<resources>
    <string name="app_name">ChangeAppLocale</string>
    <string name="msg_welcome">Welcome to MindOrks!</string>
    <string name="label_btn_english">Open Next Activity in English</string>
    <string name="label_btn_hindi">Open Next Activity in Hindi</string>
    <string name="msg_learning">Hello Everyone! I am learning how to change the App Locale. Having fun in learning this.</string>
</resources>
So, we are done with our prerequisite part. Now, we are ready to add a new language to our app. Follow the below steps to do so:
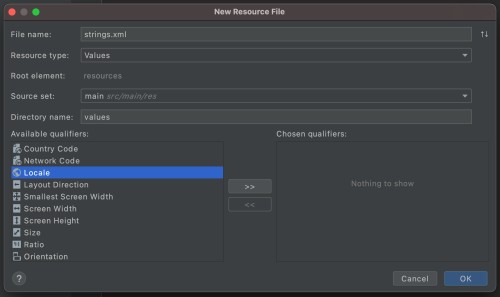
- Right Click on res > New > Android Resource File
-
Put the file name as
strings.xml - Select the option of Locale
- Select the locale for Hindi with code "hi"
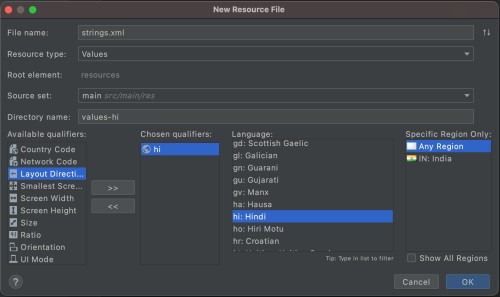
-
Click on Ok and now, you will be having two
valuesdirectory i.e. the default one with the namevaluesand the other with namevalues-hi. The default one will contain thestrings.xmlfile for the default language(in our case, English) and thevalues-hiwill contain thestrings.xmlfile for the Hindi language.
Now, you need to put all the values of all the strings that we defined in our default
strings.xml
file for our new Hindi strings.xml file.
But there are certain cases where we want to keep the text of the default language. For example, the name of the App should be the same for all languages. In our case, we just need to translate the message that is shown on the LanguageActivity and not all texts like AppName, WelcomeMessage, etc.
So, for that, we need to set translatable to false in our default strings.xml file(the English one). For example:
<string name="app_name" translatable="false">ChangeAppLocale</string>
Similarly, you can set
translatable = "false"
for other string values as well. Now, for the other strings that you want to translate, you can simply add their values in the strings.xml file of the Hindi language. For example, the code of
strings.xml
(hi) will be:
<resources>
    <string name="msg_learning">सभी को नमस्कार! मैं ऐप लोकेल को बदलना सीख रहा हूं। यह सीखने में मज़ा आ रहा है।</string>
</resources>
In this way, you are telling the Android app to use the string value according to the locale of the App.
Now, our final task is to change the locale or simply the language of the app when we click on the button. For this, add the below function in your
MainActivity.kt
file:
fun setAppLocale(context: Context, language: String) {
    val locale = Locale(language)
    Locale.setDefault(locale)
    val config = context.resources.configuration
    config.setLocale(locale)
    context.createConfigurationContext(config)
    context.resources.updateConfiguration(config, context.resources.displayMetrics)
}
In the above code, pass the context and the language code and then start the
LanguageActivity
. For example:
enButton.setOnClickListener {
    setAppLocale(this, "en")
    val intent = Intent(this, LanguageActivity::class.java)
    startActivity(intent)
}

hiButton.setOnClickListener {
    setAppLocale(this, "hi")
    val intent = Intent(this, LanguageActivity::class.java)
    startActivity(intent)
}
Now, when you open the LangaugeActivity, then you can see the changes in the language.
Points to keep in mind:
- Whenever an activity is loaded then the corresponding string.xml file is loaded at that time only. For example, if the current locale of your app is English and on button click, you changed it to Hindi. Then no change on that particular activity will be observed because the string file of that activity is already loaded. But if you move to some other activity and then come back to the first activity, then you will see the language changes. If you want to see instant changes, then you need to refresh the activity after the change of the locale.
- In some Android Versions, you might not see the locale change if you are opening some WebView in your app. Always take care of the case when you load the WebView for the very first time. One possible option is to set again the locale after loading the WebView.
- You need to handle the case of orientation change of your activity. The locale will be reset in this case as well, so handle this as well.
- It is recommended by Android to not change the locale at runtime. So, you can avoid this if the use-case of language is not that much important in your app.
This is how you can change the locale of your App. That's it for this blog. Hope you enjoyed this blog.
Happy Learning :)
Team MindOrks!