Building Android applications with Gradle — Tutorial

Nowadays, there are various modern build automation tools that are used to have a faster build while developing a project. One of these modern-day automation tools is Gradle. Today, Android is using Gradle to automate and manage build process and at the same time to define flexible custom build configurations. So, it becomes necessary to develop or build an Android application by using such advanced build toolkit i.e. by using Gradle. So, in this blog, we will learn how to use Gradle to supercharge our builds. Also, we will learn the basic syntax in build.gradle file generated by Android Studio. Later on in this blog, we will learn about gradlew tasks, build variants and many other applications of Gradle that can be used to build Android Application. So, let’s get started.
What is Gradle?
Before moving forward, let’s have a quick introduction of Gradle. Android Studio uses Gradle , an advanced build toolkit, to automate and manage the build process while allowing you to define flexible custom build configurations . So, with the help of Gradle, you can do the building, testing and deployment of your application and the files which are responsible for this type of automation is the “ Build.gradle ” file. For example, the simple task to copy some images from one place/directory to another can be performed by Gradle build script before the actual build process happens. Android projects need Gradle for putting source code and resources together.
By default, when you create an Android Project in Android Studio, then the build.gradle file for the project will be automatically generated and whenever you press the run button in the Android Studio then the corresponding Gradle task will be called and the application will be started or launched.
When you press the run button in the Android Studio, then your source code will be converted into DEX(Dalvik Executable) files. These DEX files include the bytecode that is required to run the app on Android. With the help of APK Packager, various DEX files are combined with the resources of the application. After that, the APK Packager signs your APK using either the debug or release keystore and before generating your final APK, the packager optimize your app to remove useless code.
Build Configuration Files
When you start a new project on Android Studio, then it will create some files for you. Let’s understand the scope and purpose of these files. Following is the project view of a typical Android project:
Picture courtesy: Android Developer website
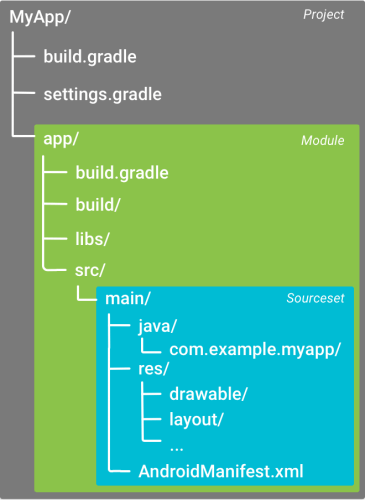
- The Gradle settings file: The settings.gradle file is located in the root directory. It consists of all the modules that are present in the app.
- The top-level build file: The top-level build.gradle file, located in the root directory. If you want to apply the same configuration to all modules of your project then you should define these in this file.
- The module-level build file: The module-level build.gradle file, located in each project/module/ directory, allows us to configure build settings for the specific module it is located in.
- Gradle properties file: To specify settings for the Gradle toolkit, you can specify these settings in the Gradle properties file.
Gradle Commands
Till now, we have learned the basics of Gradle and now we will look upon some of the commands of Gradle that can be used to perform the build process without using Android Studio i.e. by using the command line. It is recommended that you should learn to use Gradle by using command line because doing the same will help you understand the build process is a better way.
1. Gradle Wrapper: Since Gradle is under development and new version can come anytime. So, to have a smooth flow while executing Gradle commands, Gradle Wrapper is used. The Gradle Wrapper is a shell script called gradlew on Mac OS or Linux and a batch file called gradlew.bat in Windows. So, when you run this script and the selected version of Gradle is not present then this will automatically download the selected version of Gradle.
If you are creating an Android project with the help of Android Studio then this Gradle Wrapper will be automatically created. If you want to create the Gradle Wrapper by yourself then you have to first download the Gradle from here and after that run the below command in your project directory:
$ gradle wrapper --gradle-version x.xHere, x.x is your Gradle version. To find Gradle version use the below command:
$ gradle -v2. gradlew: gradlew is the Gradle wrapper. If you have created the Android Project by using Android Studio, then go to the root directory of your project on the command line and run the below command:
$ ./gradlewThis will show you a list of things that you can do using the gradle:
> Task :help
Welcome to Gradle 5.1.1.
To run a build, run gradlew <task> ...
To see a list of available tasks, run gradlew tasks
To see a list of command-line options, run gradlew --help
To see more detail about a task, run gradlew help --task <task>
For troubleshooting, visit https://help.gradle.org
3. gradlew tasks: This is used to show a list of tasks that are available. Run the below command in command line:
$ ./gradlew tasksThis will show a list, containing all the tasks:
> Task :tasks
-----------------------------------------------------------
Tasks runnable from root project
-----------------------------------------------------------
Android tasks
-------------
androidDependencies - Displays the Android dependencies of the project.
signingReport - Displays the signing info for the base and test modules
sourceSets - Prints out all the source sets defined in this project.

Build tasks
-----------
assemble - Assemble main outputs for all the variants.
assembleAndroidTest - Assembles all the Test applications.
build - Assembles and tests this project.
buildDependents - Assembles and tests this project and all projects that depend on it.
buildNeeded - Assembles and tests this project and all projects it depends on.
bundle - Assemble bundles for all the variants.
clean - Deletes the build directory.
cleanBuildCache - Deletes the build cache directory.
compileDebugAndroidTestSources
compileDebugSources
compileDebugUnitTestSources
compileReleaseSources
compileReleaseUnitTestSources

Build Setup tasks
-----------------
init - Initializes a new Gradle build.
wrapper - Generates Gradle wrapper files.
4. gradlew lint: The gradlew lint command is used to find the mistakes in the whole project i.e. it will look for various mistakes, typos, and vulnerabilities. Run the below command in the root directory:
$ ./gradlew lintYou will get output, something like this:
> Task :app:lint
Ran lint on variant debug: 47 issues found
Ran lint on variant release: 47 issues found
Wrote HTML report to file:///Users/username/path/to/your/Android/projects/MindOrks/app/build/reports/lint-results.html
Wrote XML report to file:///Users/username/path/to/your/Android/projects/MindOrks/app/build/reports/lint-results.xml
In order to view the result in Linux, type the following:
xdg-open app/build/reports/lint-results.htmlor in Mac, use the below line:
open app/build/reports/lint-results.htmlThis will open your default browser to display the generated result.
5. gradlew build: To build your project, run the below code in your root directory on the command line:
$ ./gradlew build6. gradlew clean build: This is used to clean your build i.e. build will be syarted from scratch.
$ ./gradlew clean build 7. gradlew test: To run the application test, use the below command:
$ ./gradlew testOther Gradle properties
Apart from using Gradle in command lines, Gradle provides lots of other features also. Some of these are mentioned below:
- Manage dependencies version: In a multi-module project, there are a number of dependencies used and due to this, the biggest problem that arises is the conflict in the version of the dependencies i.e you should have the dependencies with the same version. It is very difficult to manage the versions of these dependencies but Gradle provides ext block where we can define our common property values and use them in dependencies.
apply plugin: 'com.android.application'

android {
    defaultConfig{...}
    buildTypes{...}
    ProductFlavours{...}
}

ext {
    supportLibraryVersion = '28.0.0'
    playServiceVersion = '16.0.1'

}

dependencies {
    //android supported libraries
    implementation "com.android.support:appcompat-v7:$supportLibraryVersion"
    implementation "com.android.support:design:$supportLibraryVersion"
    implementation "com.android.support:cardview-v7:$supportLibraryVersion"

    //google play service
    implementation "com.google.android.gms:play-services:$playServiceVersion"
    implementation "com.google.android.gms:play-services-fitness:$playServiceVersion"

    //other dependencies
}- Build types and build flavors: By default, in Android, there are two types of build i.e. debug and release . These build types are used to create different flavors of the application. By the word flavor, we mean to say that the same application can have different properties for different users. For example, the functionalities for the paid version of the app should be different from that of the unpaid version. In order to define different flavors, you can use the productFlavors closure in your app level build.gradle file. Following is an example of the same:
productFlavors {
    paid {
        applicationId = "app id goes here"
        versionName = "1.0-paid"
    }
free {
applicationId = "app id goes here"
versionName = "1.0-free"
}
}Creating tasks: We have seen that, we can use the ./gradlew tasks command to find the list of available tasks. But we can create our own tasks also. For example, to create a task where we want the Gradle to generate an APK file which has the build date in its name. To do so, you can add the below code in your module level build.gradle file:
task addCurrentDate() {
    android.applicationVariants.all { variant ->
        variant.outputs.all { output ->
            def date = new Date().format("dd-MM-yyyy")
            def fileName = variant.name + "_" + date + ".apk"
            output.outputFileName = fileName
        }
    }
}
Here, we are having one task named addCurrentDate() and you are creating a new filename by adding the varient and the build date to it.
Conclusion
In this blog, we learned how to use Gradle in our Android project. we learned some commands of the Gradle. You can find the whole list of commands on the Gradle’s website .
If you want to learn more about Gradle and the tips and tricks of Gradle that can be used in Android Studio, then you can refer to our blog Gradle Tips and Tricks for Android .
Keep Learning :)
Team MindOrks!