Gradle Tips and Tricks for Android

Gone are the days when you will be watching some cool videos and enjoying the coffee just after you have started the build process of your Android Project because it takes ages to complete. The current state of build automation tools handles several aspects of building project more efficiently than in past and Gradle is one of those modern build automation tools.
But at the same time, if you are using Gradle then you will encounter a number of Gradle error and to be honest, this is very common for a new Android Developer. So, in this blog, we will look upon some of the Gradle Tips and Tricks that can be used to utilize the functionalities of Gradle in Android App Development. We will understand Gradle in such a way that whenever there is a Gradle related error in your project, then you will remove the error by yourselves and not by searching for answers on StackOverflow.
What is Gradle?
Before moving towards the Gradle tips and tricks, let's understand what Gradle is? Android Studio uses Gradle , an advanced build toolkit, to automate and manage the build process while allowing you to define flexible custom build configurations . So, with the help of Gradle, you can do the building, testing and deployment of your application and the files which are responsible for this type of automation is the “ Build.gradle ” file. For example, the simple task to copy some images from one place/directory to another can be performed by Gradle build script before the actual build process happens.
Android projects need Gradle for putting source code and resources together. The build process of an Android app summarized in the figure below :
Picture courtesy : Android Developer website
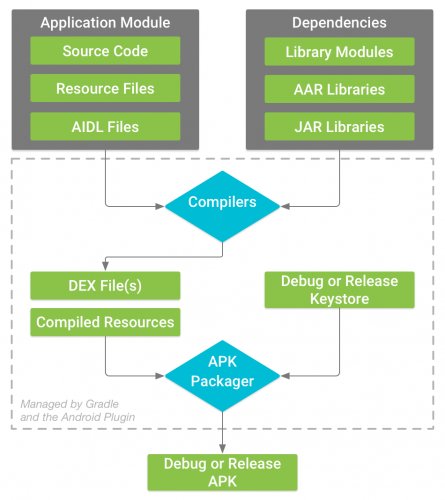
Following steps are performed:
- Firstly, your source code is converted into DEX(Dalvik Executable) files. These DEX files include the bytecode that is required to run your app on Android. Dex file is something like the .class file.
- There can be more than one DEX files, and these DEX files are combined with the resources with the help of APK Packager.
- After that, the APK Packager signs your APK using either the debug or release keystore.
- If you are building an app for testing and profiling, then the packager signs your app with the debug keystore.
- If you are building an app for the release version, then the packager signs your app with the release keystore.
- Before generating your final APK, the packager optimize your app to remove the useless code.
When the build process is finished, you will get the APK of the project.
Build Configuration Files
When you start a new project on Android Studio, then it will create some files for you. Let's understand the scope and purpose of these files. Following is the project view of a typical Android project:
Picture courtesy : Android Developer website
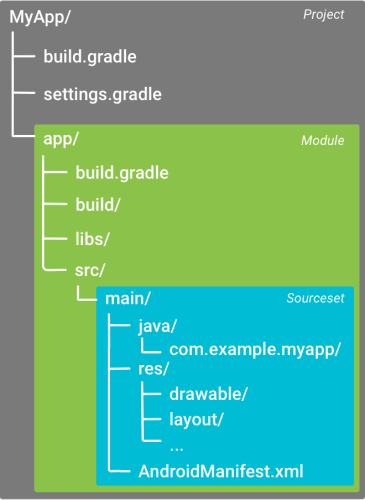
- The Gradle settings file: The settings.gradle file is located in the root directory. It consists of all the modules that are present in the app.
- The top-level build file: The top-level build.gradle file, located in the root directory. If you want to apply the same configuration to all modules of your project then you should define these in this file..
- The module-level build file: The module-level build.gradle file, located in each project/module/ directory, allows us to configure build settings for the specific module it is located in.
- Gradle properties file: To specify settings for the Gradle toolkit, you can specify these settings in the Gradle properties file.
Gradle Tips and Tricks
Now, we are done with the introduction of Gradle. Let's focus on some cool tips and trick of Gradle for Android. Some of them are listed below:
1. Add build dependencies:
An Android project can have more than one module and it is possible that each module may have some dependency or it uses some library. To add more and more functionalities to your app, you must include some dependencies.
To add a dependency to your project, you can add the dependency in the dependencies section of your build.gradle file.
For example, to add dependencies in your file add the dependency in the
build.gradle:
apply plugin: 'com.android.application'

android { ... }

dependencies {
    // Dependency on a local library module
    implementation project(":mylibrary")

    // Dependency on local binaries
    implementation fileTree(dir: 'libs', include: ['*.jar'])

    // Dependency on a remote binary
    implementation 'com.example.android:app-magic:12.3'
}
2. Manage dependencies version :
In a multi-module project, there are a number of dependencies used and due to this, the biggest problem that arises is the conflict in the version of the dependencies i.e you should have the dependencies with the same version. Let's say our module level build.gradle file looks like :
apply plugin:'com.android.application'
android{

    defaultConfig{...}
    buildTypes{...}
    ProductFlavours{...}
}

dependencies{

    //android supported libraries
    implementation'com.android.support:appcompat-v7:28.0.0'
    implementation'com.android.support:design:28.0.0'
    implementation'com.android.support:cardview-v7:28.0.0'

    //google play service
    implementation'com.google.android.gms:play-services:16.0.1'
    implementation'com.google.android.gms:play-services-fitness:16.0.1'

    //other dependencies
}
It is very difficult to manage the versions of these dependencies but Gradle provides ext block where we can define our common property values and use them in dependencies.
apply plugin: 'com.android.application'

android {
    defaultConfig{...}
    buildTypes{...}
    ProductFlavours{...}
}

ext {
    supportLibraryVersion = '28.0.0'
    playServiceVersion = '16.0.1'

}

dependencies {
    //android supported libraries
    implementation "com.android.support:appcompat-v7:$supportLibraryVersion"
    implementation "com.android.support:design:$supportLibraryVersion"
    implementation "com.android.support:cardview-v7:$supportLibraryVersion"

    //google play service
    implementation "com.google.android.gms:play-services:$playServiceVersion"
    implementation "com.google.android.gms:play-services-fitness:$playServiceVersion"

    //other dependencies
}
You can see that in above code, the ext block contains playServiceVersion and supportLibraryVersion .
Notice that instead of a version number, we added $ with its version property and also changed single quotes to double quotes .
For a multiple module project, you can set the same version by moving the ext block from module-level build.gradle to the root-level build.gradle .
buildscript {

}

allprojects {

}

ext {

    supportLibraryVersion = '28.0.0'

    playServiceVersion = '16.0.1'

}
Now in the build.gradle file of the different module, use this supportLibraryVersion and playServiceVersion .
com.android.support:appcompatv7:$rootProject.supportLibraryVersion3. Optimize your build speed :
Whenever you build a project, then it takes some time and long build times slow down the development process. The build process is also dependent on the processor speed but if we ignore the hardware part then in order to have a very fast build we can use any of the following techniques :
- Always have an updated Android Studio. This will keep your Android tools up to date and this is done because on every update Android tools receive some build optimization.
- Always avoid compiling and packaging the resources that you aren't testing. There may be various packages that can be avoided during package and you should not compile those packages. To do so, you can specify one language resource and screen density for your " dev " flavor, as shown in the following sample:
android {
  ...
  productFlavors {
    dev {
      ...
      // The following configuration limits the "dev" flavor to using
      // English stringresources and xxhdpi screen-density resources.
      resConfigs "en", "xxhdpi"
    }
    ...
  }
}
- If you don't need to run a Crashlytics report , then disable the plugin and speed the build process as follows:
android {
    ...

    buildTypes {
        debug {
            ext.enableCrashlytics = false
        }
     }
}-
Avoid using a dynamic version of the dependencies in your
build.gradle
file. So, don't use something like this:
'com.android.tools.build:gradle:2.+'. Using dynamic version numbers can cause unexpected version updates or difficulty in resolving version differences and this will finally slow down your build process. Always use static/hard-coded version numbers instead. - If your network connection is slow, then build times may suffer when Gradle attempts to use network resources to resolve dependencies. So, in a weak or slow network connection, use offline mode. To use offline mode, follow the below steps:
- Click on File > Settings > Preferences
- Click on Build, Execution, Deployment > Gradle .
- Check the Offline work checkbox.
- Click Apply or OK .
If you're building from the command line, pass the
--offline
option.
4. Shrink and Optimize your App
To make your app as small as possible, you should enable shrinking in your project. By using this, you will remove the unused code and resources. Many times you import a lot of libraries and you need only a few of them. So, instead of keeping all those libraries, you should keep only those libraries that are in use. This will reduce the app size to a large extent(a 42 MB app can be reduced to 10 MB by using this process).
When you build your project using Android Gradle plugin 3.4.0 or higher, the plugin no longer uses ProGuard to perform compile-time code optimization. With the help of R8 compiler, the following tasks are handled:
- Code shrinking (or tree-shaking): scans for unused classes, fields, methods, and attributes and safely removes these from your app.
- Resource shrinking: by using this, you remove the unused resources from your app.
- Obfuscation: shortens the name of classes and members, which results in reduced DEX file sizes.
- Optimization: inspects and rewrites your code to further reduce the size of your app’s DEX files. The R8 removes the unreachable statements i.e. the statements that are never reached.
When building the release version of your app, by default, R8 automatically performs the compile-time tasks described above for us.
When we create a new project in Android Studio, shrinking, obfuscation and optimization are not enabled by default because these compile-time optimizations increase the build time and might introduce some bugs.
So, it’s best to enable these compile-time tasks when building the final version of our app. Include the following in project-level build.gradle file.
android {
    buildTypes {
        release {
            // Enables code shrinking, obfuscation, and optimization for only
            // your project's release build type.
            minifyEnabled true

            // Enables resource shrinking, which is performed by the
            // Android Gradle plugin.
            shrinkResources true

            // Includes the default ProGuard rules files that are packaged with
            // the Android Gradle plugin. To learn more, go to the section about
            // R8 configuration files.
            proguardFiles getDefaultProguardFile(
                    'proguard-android-optimize.txt'),
                    'proguard-rules.pro'
        }
    }
    ...
}
5. Configure dynamic version codes
By default, when Gradle generates APKs for our project, each APK has the same version information, as specified in the module-level
build.gradle
file.
But when you place or upload your app on the Google Play Store, then it doesn't allow you to publish the app with the same version number. So, every APK must have some unique versionCode.
We can do this with custom build logic that assigns a different version code to each APK at build time.
android {
  ...
  defaultConfig {
    ...
    versionCode 4
  }
  splits {
    ...
  }
}

// Map for the version code that gives each ABI a value.
ext.abiCodes = ['armeabi-v7a':1, mips:2, x86:3]

// For per-density APKs, create a similar map like this:
// ext.densityCodes = ['hdpi': 1, 'xhdpi': 2, 'xxhdpi': 3, 'xxxhdpi': 4]

import com.android.build.OutputFile

// For each APK output variant, override versionCode with a combination of
// ext.abiCodes * 1000 + variant.versionCode. In this example, variant.versionCode
// is equal to defaultConfig.versionCode. If you configure product flavors that
// define their own versionCode, variant.versionCode uses that value instead.
android.applicationVariants.all { variant ->

  // Assigns a different version code for each output APK
  // other than the universal APK.
  variant.outputs.each { output ->

    // Stores the value of ext.abiCodes that is associated with the ABI for this variant.
    def baseAbiVersionCode =
            // Determines the ABI for this variant and returns the mapped value.
            project.ext.abiCodes.get(output.getFilter(OutputFile.ABI))

    // Because abiCodes.get() returns null for ABIs that are not mapped by ext.abiCodes,
    // the following code does not override the version code for universal APKs.
    // However, because we want universal APKs to have the lowest version code,
    // this outcome is desirable.
    if (baseAbiVersionCode != null) {

      // Assigns the new version code to versionCodeOverride, which changes the version code
      // for only the output APK, not for the variant itself. Skipping this step simply
      // causes Gradle to use the value of variant.versionCode for the APK.
      output.versionCodeOverride =
              baseAbiVersionCode * 1000 + variant.versionCode
    }
  }
}
Conclusion
Phew, that was a lot of stuff about Gradle. Now, you are a master in the art of Gradle.
Gradle is a solid and very customizable build automation system. It makes the life of developers so much better by handling a lot of the nuances around the build system in a graceful manner — making the build system a joy to work with.
Hopefully, after finishing this blog, you have a solid understanding of how you can use the powerful features of Gradle.
If you want to learn some more Gradle tips or you want to know more about the build process in Android, then you can find the Google Official Documentation on Gradle .
Happy Learning :)
Team MindOrks