Best Practices for Using Text in Android
The most commonly used element in Android application is Text. We use Text in the form of TextView or in the form of EditText. So, to have a better performance, we must use Text in the best possible way. In this blog, we will learn some of the best practices for using text in Android. The following is the timeline for this blog:
- Improving Text performance
- Text Styling
- Custom Fonts
- System Fonts
- Editable Text
- Closing Notes
Improving Text performance
Performance of an Android application is very important. As we know that in an Android application, almost 70% of the application area is filled with Text and due to this the performance of application majorly depends on Texts. So in order to do so, various steps were taken by Andriod Developers all over the world. In Google I/O 19, the following changes were announced:
Hyphenation: Now, the hyphenation is off by default in Android Q and in AppCompact v1.1.0. This is done because Hyphenation has a huge impact on text performance. To be more precise, 70% of the text work is done for hyphenation. If you want to turn on hyphenation, then you have to manually add the hyphenation code. You can do so by setting the hyphenation frequency to normal in style.xml file:
<style name="MyTextAppearnace" parent="TextAppearance.AppCompat">
    <item name="android:hyphenationFrequency">normal</item>
</style>
Or in your layout.xml file, you can add a TextView with hyphenation frequency set to normal.
<TextView android:hyphenationFrequency="normal"/>Precomputed Text: It is a tool that is used to do text work in the background thread. So, it does 90% of the TextView work. It is available from API 21 onward. At the I/O 19, new utility APIs were added for easy integration with RecyclerView prefetch. Let’s understand the RecyclerView prefetch.
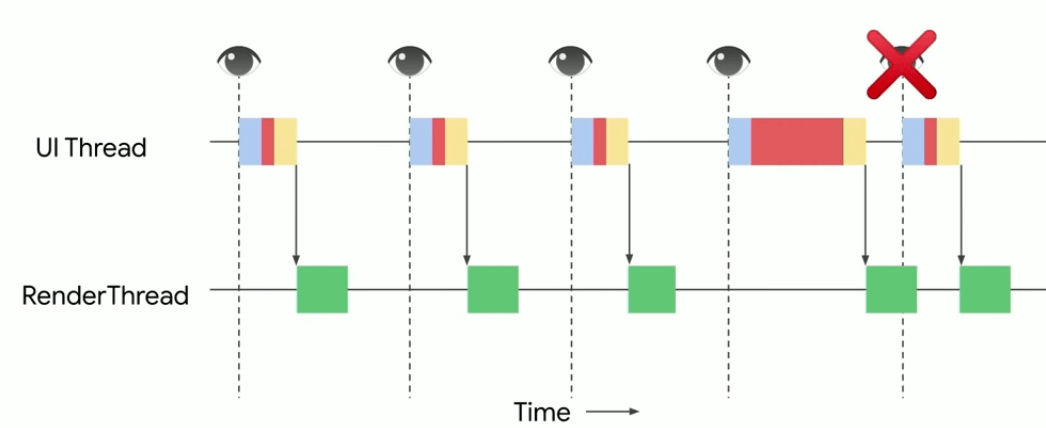
In the below figure we have two threads i.e. the UI thread and the Render thread. The UI thread does some work and passes the rendering work to the render thread. The eye icon shows the timing of VSYNC i.e. Vertical SYNC. In normal case, there is no problem with the VSYNC. But if some work takes time and couldn’t finish until the next VSYNC then it will block the next VSYNC.
One thing you might notice here is that the UI Thread is ideal for a long period of time. At a time, only one thread i.e. either the UI or the Render thread is working. So, we can use this ideal time to do some work on the UI Thread and in this way we can avoid VSYNC overlapping. This is called prefetch as we are doing the work before we come into the condition of VSYNC overlapping.
Image source: Google I/O 19
The problem here is that if the process still takes a very large amount of time than the VSYNC, then again the VSYNC overlapping will be seen and UI junk will take place. One solution to this problem is that we can move some work to some background thread by using
PrecomputedText
and remove the UI junk.
Image source: Google I/O 19

For moving some text work to a background thread, some APIs are introduced:
1. PrecomputedTextCompact.getTextFuture()
2. AppCompatTextView.setTextFuture()
Let’s see how to implement this:
override fun onBindViewHolder(viewHolder: ViewHolder, pos:Int) {
    viewHolder.textView.setTextFuture(
        PrecomputedTextCompat.getTextFuture(
            dataSet[pos],
            viewHolder.textView.getTextMetricsParamsCompat(),
            null)
    )
}
Note: Don’t change the text style after using the getTextFuture . You can do it before using the getTextFuture .
Text Styling
After the Text performance, the next thing that should be taken care of is Text Styling. By styling the text, we change the look and feel of the text. There are many ways of doing this. Let's learn one by one.
By using TextView attributes
We can style the text by using TextView attributes such as textSize, textColor, etc. The following is an example of the same:
<TextView
    ...
    android:textColor="@color/colorPrimaryDark"
    android:textSize="16sp"
    android:textStyle="bold"
    ...
/>
But the problem here is that by using the above method we can style only one TextView. What if you want to add the same text colour or the same style to all the TextViews present in your application? To do so, you can use styles.
By using styles.xml
You can define a certain style in the
styles.xml
file for your TextViews and then use this style wherever you need a TextView. The following is an example of the same:
<!-- adding TextView styles in styles.xml -->
<style name="MyApp.Widget.Text.Body" parent="...">
    <item name="android:textSize">12sp</item>
    <item name="android:textColor">?android:attr/textColorPrimary</item>
</style>


<!-- using style in TextView -->
<TextView
    ...
    style:"@style/MyApp.Widget.Text.Body"
/>
In the above example, the style of the TextView will be similar to the styles declared in the
styles.xml
file.
There may be cases where you want to change some attributes of a particular TextView and keep the rest attributes as it is like other TextViews present in the application. For example, for a particular TextView, you want to set the textSize to 16sp. How to do that? Let's find.
Precedence Order
So, we want to change the textSize of one TextView and keep other attributes as it is. To do so, we can manually add the textSize attribute in desired TextView. For example:
<TextView
    ...
    style:"@style/MyApp.Widget.Text.Body"
    android:textSize="16sp"
/>
Here in the above example, the size of the TextView will be 16sp and not 12 sp because the view attribute overrides the style.
Every view has some default style but this default style will be overridden by some other style if we add it manually. So, the precedence order will be:
View > Style > Default Style > TextAppearance
Also, the
TextAppearanceSpan
is updated to read and apply typeface or shadow. Two new spans are added in Android Q i.e. the
LineHeightSpan
and
LineBackgroundSpan
.
The properties set by the Span will override any other property of the view
. So, the updated precedence order will be:
Span > View > Style > Default Style > TextAppearance
If you want to make some app-level changes i.e. if you want to change the font of the whole app at one go then you can perform this with the help of Themes. In the below example, we are changing the font-family of the text used in an application:
<style name="Theme.MyApp"
    parent="@style/Theme.MaterialComponents.Light">
    ...
    <item name="android:fontFamily">@font/space_mono</item>
</style>
So, the Theme will come before the TextAppearance in the precedence list:
Span > View > Style > Default Style > Theme > TextAppearance
Custom Fonts
There are very few fonts that are available in Android and due to this, the concept of downloadable fonts came into existence.
Let’s have a look at the below image:
Image source: Google I/O 19
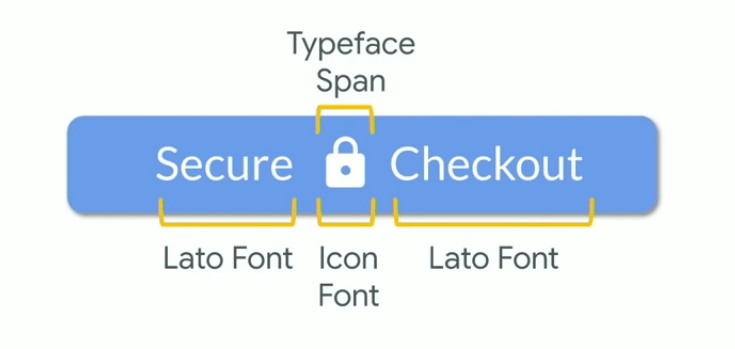
Here, we are having one button and on the button, there is one lock icon and texts are there on both the sides of the icon. So, for the icon, we want some other font and for the remaining text, we want to use some other font. But we will be in trouble here because for a button we can have only one typeface and this can be achieved by having only one font family. But here we need two font family(one for text and other for the icon).
Here, we can use a typeface span, give the icon font into it and cover the icon character and then for the whole button we can choose any font.
The things become worse if we are having more than one language support with more than one fonts. Here, we can’t make use of spans.
Image source: Google I/O 19
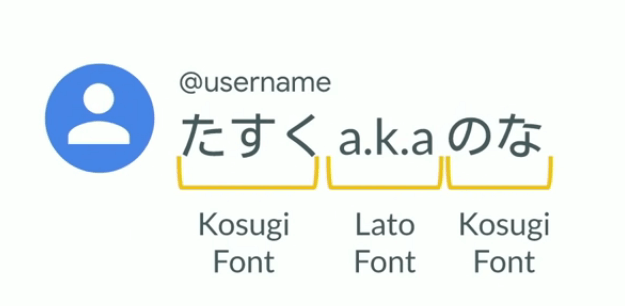
So, in the Android Q,
CustomFallbackBuilder
is added to the Typeface class. It enables you to create a typeface with multiple fonts or font family. The following is an example of multi-language and multi-font:
textView.typeface = Typeface.CustomFallbackBuilder(
    FontFamily.Builder(
        Font.Builder(assets, "lato.ttf").build()
    ).build()
).addCustomFallback(
    FontFamily.Builder(
        Font.Builder(assets, "kosugi.ttf").build()
    ).build()
).build()
Following is an example of the icon and text using different fonts:
buttton.typeface = Typeface.CustomFallbackBuilder(
    FontFamily.Builder(
        Font.Builder(assets, "lato.ttf").build()
    ).build()
).addCustomFallback(
    FontFamily.Builder(
        Font.Builder(assets, "icon_font.ttf").build()
    ).build()
).build()
When creating a typeface using this builder, you can add up to 64 font families but you can’t put those fonts together which differ conceptually. Also, you can’t put the same styled font in the same font family.
In general, the system performs some sequential searching for the fonts. For example, if the font is lato then it will search for lato . If lato is present then that font will be assigned otherwise the system will use the system font fallback use case. Following is the code that will define the system font fallback:
Typeface.CustomFallbackBuilder(
    FontFamily.Builder(
        Font.Builder(assets, "lato.ttf").build()
    ).build()
).setSystemFallback("sans-serif")
.build()
So, in the above example, if a character is not supported by lato , then the system will use the sans-serif font.
Font.Builder: While creating a font, you can set the weight, and slant of the font object with the help of the builder only.
Font.Builder(assets, "lato_bold_italic.ttf")
    .setWeight(700)
    .setSlant(FontStyle.FONT_SLANT_ITALIC)
    .build()
System Fonts
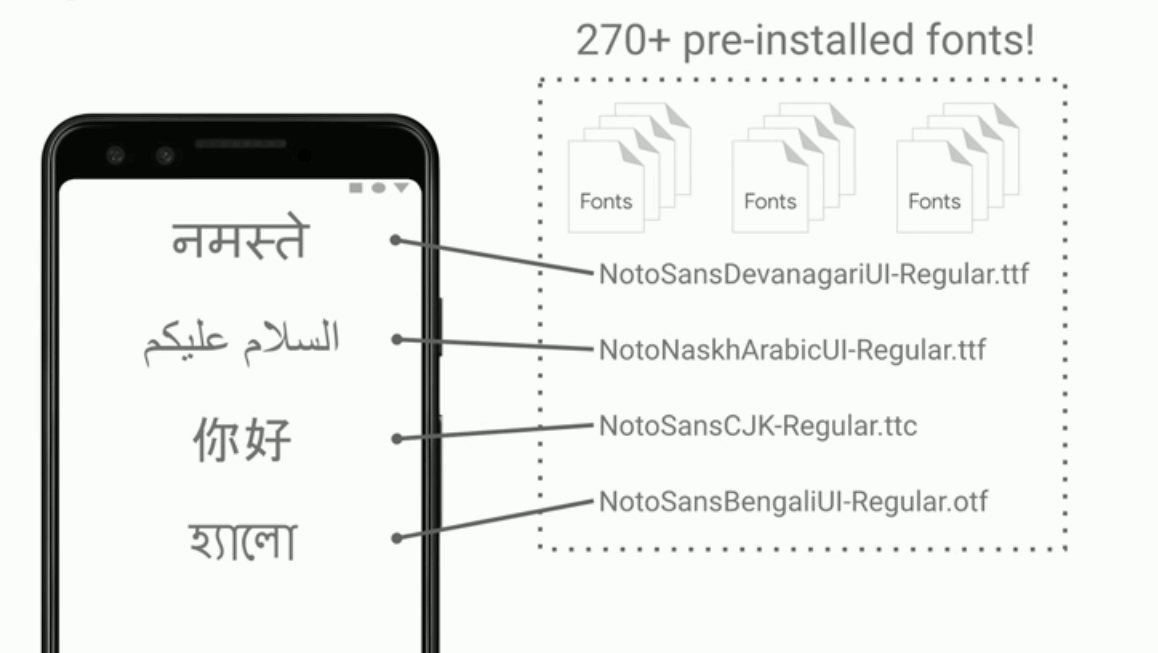
Android supports over more than 100 languages and all these languages may require different font files. For example, the Hindi font requires the Devanagari font. So, to support a large number of languages, Android devices have many font files. For example, in pixel 3, it has over 270 font files installed. So, these are called System Fonts.
Image source: Google I/O 19
To draw text, the NDK applications like document viewer needs to know which system font can render the given text. So, for the same process, two APIs are added:
Font Matcher API: AFontMatcher_match is used to find which system font can render a given text. Look at the below image:
Image source: Google I/O 19
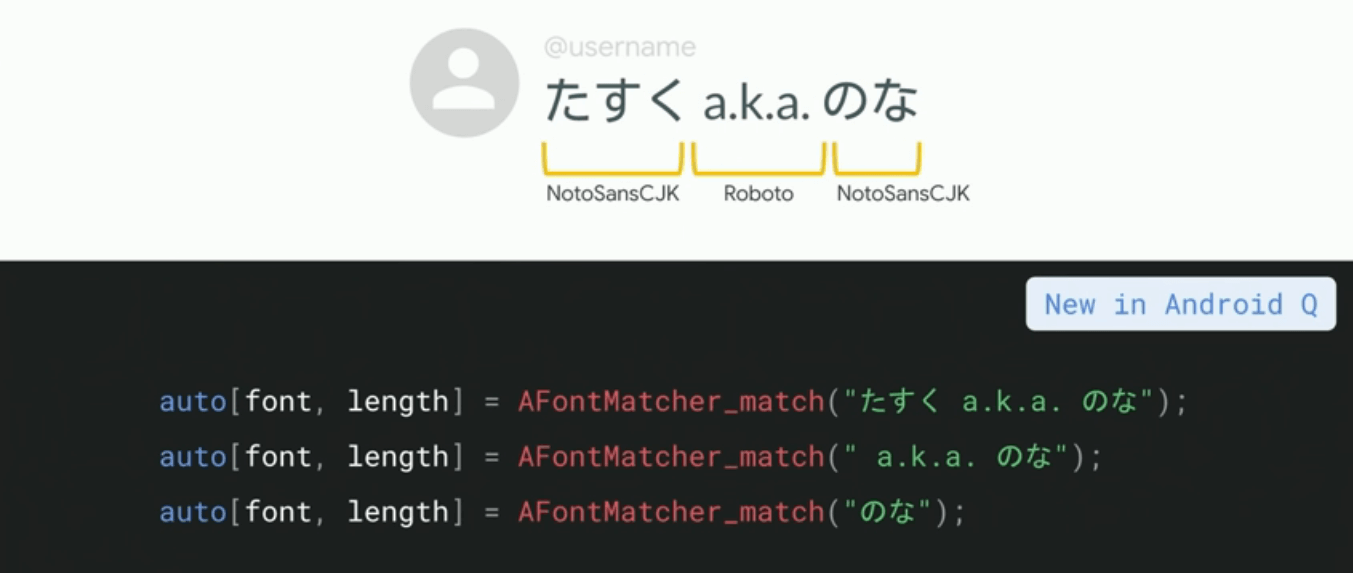
In the above image, the first line of the code will return NotoSansCJK font and length as 3. The second line will return the Roboto font and length as 8 and the third line of code will return NotoSansCJK font with length as 2.
This API will never return a Null Pointer . If no font is rendered then it will return a byte font object . And this font object should be used for drawing missing symbol called Tofu . Also, if no font is matched then the API will return a font which is closest to that required font.
Font Enumeration API: If you want to know which font files are there in your Android system then you can find this with the help of Font Enumeration API. This will give access to the system-installed font files. Let’s see how to use this:
for(font in SystemFonts.getAvailableFonts()) {
    //choose your font here
}
Here, with the help of the
getAvailableFonts()
method, you can access all the fonts present in the System.
In the case of NDK, we have to create an iterator and then with the help of ASystemFontIterator, you can point the next font and then use it.
ASystemFontIterator* iterator = ASystemFontIterator_open();
AFont* font;
while((font = ASystemFontIterator_next(iterator)) != nullptr) {
    AFont_close(font);
}
ASystemFontIterator_close(iterator);
This Font Enumeration API is not so fast. So, it is recommended to cache the result and this will be present with you until the next system update because the System fonts are read-only and are updated on System updates.
Editable Text
One of the most used subclasses of TextView is EditText. In general, almost everything applied on the TextView is by default applied to the EditText also. But apart from this, we should care about some of the other things related to the EditText. Following three processes take place while using the EditText:
Image source: Google I/O 19
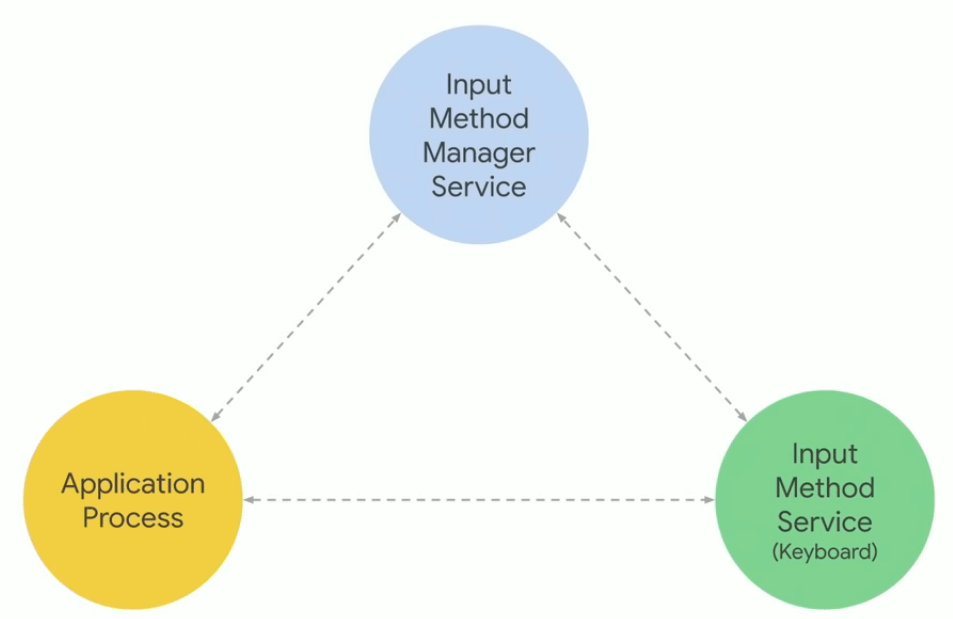
The first process is your application process, the second is the soft keyboard that is used to take input from the device and the third is the system process that orchestrates these two processes. All these communications are Inter-Process Communication. So, delay in one process can result in a delay on the other.
Generally, the EditText has the following six major components:
Image source: Google I/O 19
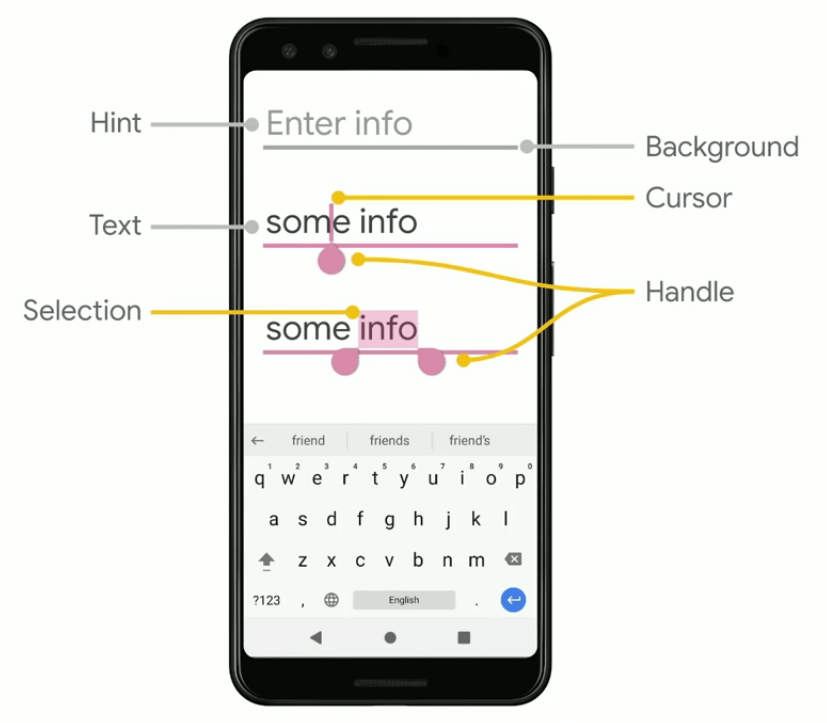
- Background: This is the background of the EditText i.e. you can update the background colour by using the background attribute.
- Cursor: It is the cursor that appears when you type something on the EditText. Its colour can be changed by changing the secondary colour.
- Handle: This is the handle of the cursor. You can change the colour of the handle by changing the secondary colour.
- Edit Text Colour: This is the colour of the text present in the EditText.
- Text Colour Hint: It is the colour of the hint that is present in the EditText.
- Text Highlight Color: It is the colour of the EditText that is displayed when you select some text on the EditText.
There are many problems which may come while using the EditText. For example, while using the EditText for entering the username, the following case might happen:
Image source: Google I/O 19
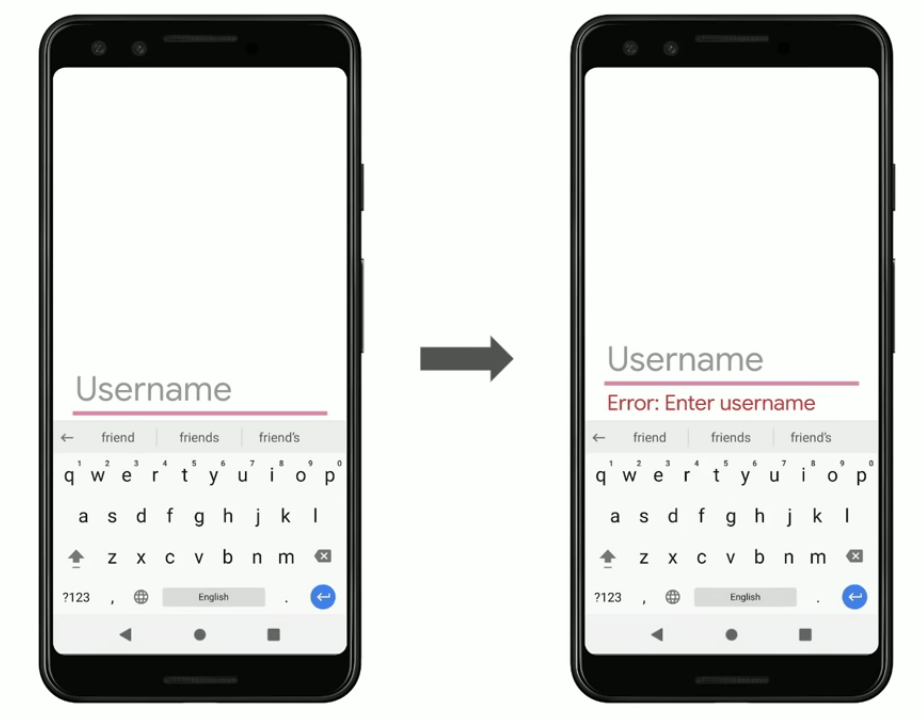
So, you have to use EditText in such a way that it should display the error message correctly and the message shouldn’t be hidden beside the soft keyboard.
There is a very simple solution to the above problem. All you need to do is tell the system to use the yellow box instead of using the Green box as shown below.
Image source: Google I/O 19
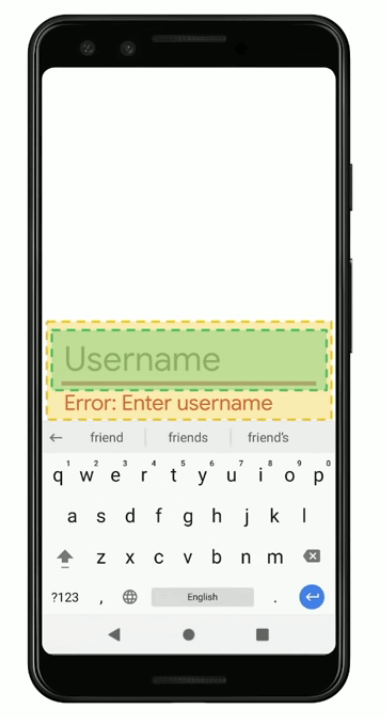
To do that, you have to extend from the EditText and override three functions:
class MyEditText : AppCompatEditText {

    //find next focusable widget
    override fun getFocusedRect(rect : Rect?) { }

    //return visible view area
    override fun getGlobalVisibleRect(r: Rect?, globalOffset: Point?): Boolean { }

    //request for an area to be visible if required by scroll
    override fun requestRectangleOnScreen(rectangle: Rect?): Boolean { }
}
getFocusedRect()
will find the next focused area available,
getGlobalVisibleRect()
defines the visible area of a view and the
requestRectangleOnScreen()
is used by EditText to request the System to make a certain area visible on the screen.
Closing Notes
In this blog, we learned some of the best practices for using text in Android. As 70% of an Android application is covered by the texts, so it becomes necessary to use text in such a way that it improves the performance of the application. We saw that hyphenation is by default off from Android Q. You have to turn it on if you want to use it. We saw some text styling methods and we also learned the precedence order of views. Finally, we saw some custom fonts, system fonts and properties of EditText.
Reference: Google I/O 2019
Hope you learned something new today.
Do share this blog with your fellow developers to spread the knowledge. You can read more blogs on Android on our blogging website .
Happy Learning :)
Team MindOrks!