Android Material Tabs
Welcome, Hope you had great fun creating Mindorks Intro Slider application in the previous chapter. Here, we are going to develop an application which will have three tabs like WhatsApp Application.
Let’s start with the development:
To use TabLayout , which is an Android’s Material Component, we need to add its dependency to get access to all the material components and click on sync.
implementation ‘com.google.android.material:material:1.0.0’Let’s set some vibrant colours to make our app looks good.
<color name=”colorPrimary”>#478ADB</color>
<color name=”colorPrimaryDark”>#39579A</color>
<color name=”colorAccent”>#69EFA</color>
Now, we are removing the default toolbar from the screen, and we will make one. Creating custom toolbar helps us to do any modification.
Goto styles.xml in values folder and change parentTheme to
<!-- Base application theme. -->
<style name="AppTheme" parent="Theme.AppCompat.Light.NoActionBar">
    <!-- Customize your theme here. -->
    <item name="colorPrimary">@color/colorPrimary</item>
    <item name="colorPrimaryDark">@color/colorPrimaryDark</item>
    <item name="colorAccent">@color/colorAccent</item>
</style>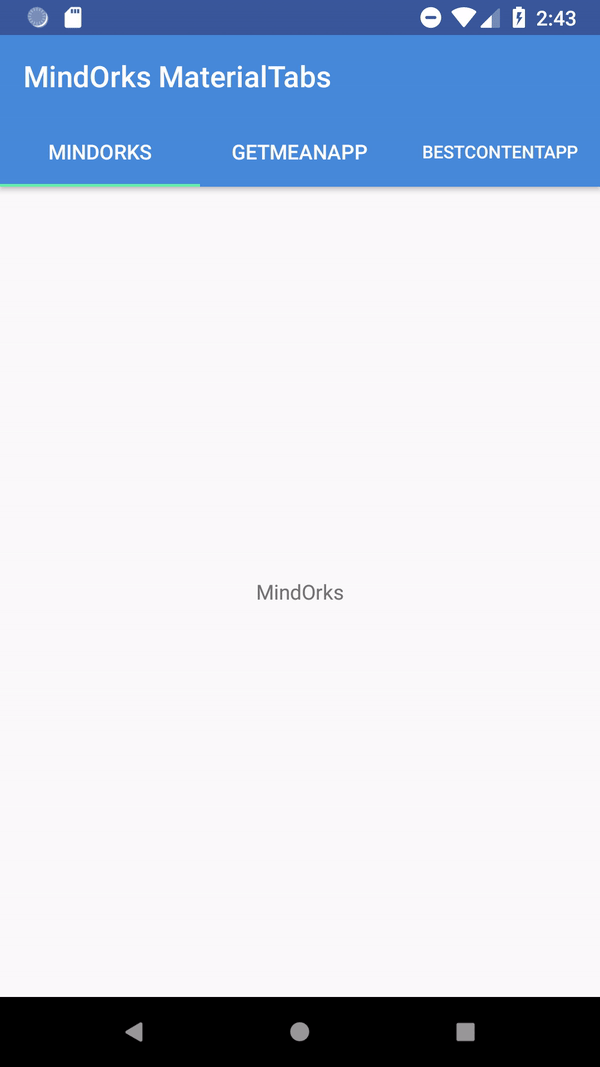
Let’s start designing the main screen. Our parent view will be ConstraintLayout. To make a toolbar where application name comes and tabs below it, we need to add AppBarLayout. Now, we will put toolbar and tabslayout inside it.
To show the content of each tab, we will require fragment and to show fragment on screen we will again use the ViewPager same as we did in the previous chapter.
<?xml version="1.0" encoding="utf-8"?>
<androidx.constraintlayout.widget.ConstraintLayout xmlns:android="http://schemas.android.com/apk/res/android"
    xmlns:app="http://schemas.android.com/apk/res-auto"
    android:layout_width="match_parent"
    android:layout_height="match_parent">

    <com.google.android.material.appbar.AppBarLayout
        android:id="@+id/appBarLayout"
        android:layout_width="match_parent"
        android:layout_height="wrap_content"
        android:theme="@style/ThemeOverlay.AppCompat.Dark.ActionBar"
        app:layout_constraintBottom_toTopOf="@+id/viewPager"
        app:layout_constraintEnd_toEndOf="parent"
        app:layout_constraintStart_toStartOf="parent"
        app:layout_constraintTop_toTopOf="parent">

        <androidx.appcompat.widget.Toolbar
            android:id="@+id/toolbar"
            android:layout_width="match_parent"
            android:layout_height="?attr/actionBarSize"
            android:background="?attr/colorPrimary"
            app:popupTheme="@style/ThemeOverlay.AppCompat.Light" />

        <com.google.android.material.tabs.TabLayout
            android:id="@+id/tabs"
            android:layout_width="match_parent"
            android:layout_height="wrap_content"
            app:tabBackground="@color/colorPrimary"
            app:tabGravity="fill"
            app:tabMode="fixed"
            app:tabTextColor="@android:color/white" />
    </com.google.android.material.appbar.AppBarLayout>

    <androidx.viewpager.widget.ViewPager
        android:id="@+id/viewPager"
        android:layout_width="match_parent"
        android:layout_height="0dp"
        app:layout_constraintBottom_toBottomOf="parent"
        app:layout_constraintEnd_toEndOf="parent"
        app:layout_constraintStart_toStartOf="parent"
        app:layout_constraintTop_toBottomOf="@+id/appBarLayout">

    </androidx.viewpager.widget.ViewPager>

</androidx.constraintlayout.widget.ConstraintLayout>
To make our toolbar show the application we need to give it to the ActionBar. Open your MainActivity and set the toolbar inside onCreate method.
setSupportActionBar(toolbar)We will show three tabs, So we need to create three fragment classes and their three respective layouts.
class GetMeAnAppFragment : Fragment() {

    override fun onCreateView(inflater: LayoutInflater, container: ViewGroup?, savedInstanceState: Bundle?) =
            inflater.inflate(R.layout.fragment_webview_getmeanapp, container, false)!!
}
<?xml version="1.0" encoding="utf-8"?>
<LinearLayout xmlns:android="http://schemas.android.com/apk/res/android"
android:layout_width="match_parent"
android:layout_height="match_parent"
android:gravity="center">
<TextView
android:layout_width="wrap_content"
android:layout_height="wrap_content"
android:text="GetMeAnApp" />
</LinearLayout>
class MindOrksFragment : Fragment() {

    override fun onCreateView(inflater: LayoutInflater, container: ViewGroup?, savedInstanceState: Bundle?) =
            inflater.inflate(R.layout.fragment_webview_mindorks, container, false)!!
}
<?xml version="1.0" encoding="utf-8"?>
<LinearLayout xmlns:android="http://schemas.android.com/apk/res/android"
android:orientation="vertical" android:layout_width="match_parent"
android:layout_height="match_parent"
android:gravity="center">
<TextView
android:layout_width="wrap_content"
android:layout_height="wrap_content"
android:text="MindOrks"/>
</LinearLayout>
class BestContentAppFragment : Fragment() {

    override fun onCreateView(inflater: LayoutInflater, container: ViewGroup?, savedInstanceState: Bundle?) =
            inflater.inflate(R.layout.fragment_webview_best, container, false)!!
}
<?xml version="1.0" encoding="utf-8"?>
<LinearLayout xmlns:android="http://schemas.android.com/apk/res/android"
android:orientation="vertical" android:layout_width="match_parent"
android:layout_height="match_parent"
android:gravity="center">
<TextView
android:layout_width="wrap_content"
android:layout_height="wrap_content"
android:text="BestContentApp"/>
</LinearLayout>To connect all our fragments with the ViewPager, we need an adapter class. Here, we are creating ViewPagerAdapter class and implementing the FragmentStatePagerAdapter.
In this class, we will pass the list of fragment class instance and the title which we need to show on the tabs. FragmentStatePagerAdapter’s override method will help us to get the count of the tab, the title of the tab and which fragment on which position.
class ViewPagerAdapter(supportFragmentManager: FragmentManager) : FragmentStatePagerAdapter(supportFragmentManager) {

    private val mFragmentList = ArrayList<Fragment>()
    private val mFragmentTitleList = ArrayList<String>()

    override fun getItem(position: Int): Fragment {
        return mFragmentList.get(position)
    }

    override fun getCount(): Int {
        return mFragmentList.size
    }

    override fun getPageTitle(position: Int): CharSequence? {
        return mFragmentTitleList[position]
    }

    fun addFragment(fragment: Fragment, title: String) {
        mFragmentList.add(fragment)
        mFragmentTitleList.add(title)
    }
}
At last, from our MainActivity which is our host activity of all the fragment, we wire up the viewPager with the adapter class. Also, we will bind our viewPager with our TabLayout.
class MainActivity : AppCompatActivity() {

    override fun onCreate(savedInstanceState: Bundle?) {
        super.onCreate(savedInstanceState)
        setContentView(R.layout.activity_main)

        setSupportActionBar(toolbar)

        val adapter = ViewPagerAdapter(supportFragmentManager)
        adapter.addFragment(MindOrksFragment(), "MindOrks")
        adapter.addFragment(GetMeAnAppFragment(), "GetMeAnApp")
        adapter.addFragment(BestContentAppFragment(), "BestContentApp")
        viewPager.adapter = adapter
        tabs.setupWithViewPager(viewPager)
    }
}
Great Work!! Let’s run this application. There is much more in TabLayout like tabs designing, tab icons etc. Explore more in this and share with us on our twitter and slack channel.