Android WebView — in Kotlin
Welcome, I hope you had fun creating the “MindOrks Activity” application from our previous chapter. Here, we are going to re-implement the same application, but this time we are going to do much more from the last chapter.
In this chapter, we will learn about the WebView which helps us to show the website on the screen. WebView is a view component in which we can load our website directly, and all other handling work will be done by itself.
<WebView
   android:id="@+id/webview"
   android:layout_width="match_parent"
   android:layout_height="match_parent"
/>
To show a website in a WebView , you need website address which we will pass to loadUrl method from WebView class.
webview.loadUrl("https://www.blog.mindorks.com")To load the website in your WebView, we will require an Internet connection, and for that, we need to give permission in the manifest file.
<uses-permission android:name="android.permission.INTERNET" />Let’s continue the application:
- As we had already created the main screen where we have two buttons “MindOrks” and “GetMeAnApp” clicking on which will open a new activity.
- To modify those two screens where we will show the website, we will put the WebView in the layout file.
// activity_getmeanapp.xml<?xml version="1.0" encoding="utf-8"?>
<android.support.constraint.ConstraintLayout xmlns:android="http://schemas.android.com/apk/res/android"
xmlns:app="http://schemas.android.com/apk/res-auto"
android:layout_width="match_parent"
android:layout_height="match_parent">
<WebView
android:id="@+id/wvGetmeanapp"
android:layout_width="0dp"
android:layout_height="0dp"
android:layout_marginStart="8dp"
android:layout_marginTop="8dp"
android:layout_marginEnd="8dp"
android:layout_marginBottom="8dp"
app:layout_constraintBottom_toBottomOf="parent"
app:layout_constraintEnd_toEndOf="parent"
app:layout_constraintStart_toStartOf="parent"
app:layout_constraintTop_toTopOf="parent" />
</android.support.constraint.ConstraintLayout>// activity_mindorks.xml<?xml version="1.0" encoding="utf-8"?>
<android.support.constraint.ConstraintLayout xmlns:android="http://schemas.android.com/apk/res/android"
xmlns:app="http://schemas.android.com/apk/res-auto"
android:layout_width="match_parent"
android:layout_height="match_parent">
<WebView
android:id="@+id/wvMindorks"
android:layout_width="0dp"
android:layout_height="0dp"
app:layout_constraintBottom_toBottomOf="parent"
app:layout_constraintEnd_toEndOf="parent"
app:layout_constraintStart_toStartOf="parent"
app:layout_constraintTop_toTopOf="parent" />
</android.support.constraint.ConstraintLayout>3. To load the site in these WebView, you need to call some methods and set the URL. So, wvGetmeanapp is the id of the webview , and we are calling its loadUrl() method, passing the website as a string in this method will do our work.
// GetmeanappActivity.ktclass GetmeanappActivity : AppCompatActivity() { override fun onCreate(savedInstanceState: Bundle?) {
super.onCreate(savedInstanceState)
setContentView(R.layout.activity_getmeanapp)
wvGetmeanapp.loadUrl("https://getmeanapp.com/")
}
}// MindorksActivity.kt
class MindorksActivity : AppCompatActivity() { override fun onCreate(savedInstanceState: Bundle?) {
super.onCreate(savedInstanceState)
setContentView(R.layout.activity_mindorks)
wvMindorks.loadUrl("https://mindorks.com/")
}
}Try to run this application, and you will see that the website gets open in your activity.
Before ending this chapter, we would like to introduce one more thing about WebView. You can also load your local HTML, CSS and js files in the WebView. Let’s try one example.
- Create an activity — one kotlin file and one of its respective layout file and declare it into the manifest file. Also, add one more button to the main screen which on clicking will open your newly created activity which will open the local HTML file.
- We have to set one webview in our new layout file because to load html file we need webview just like we are loading the websites.
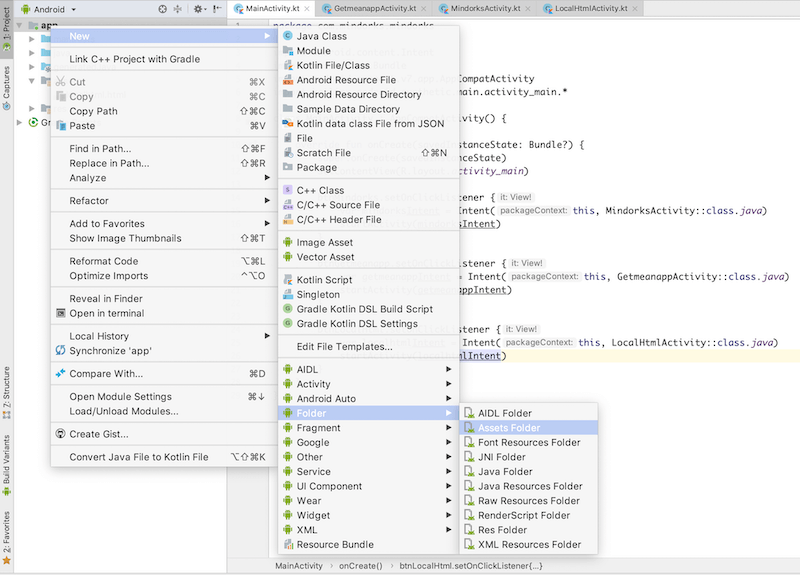
- Where can you put your HTML file? The HTML file is like an asset for our project so let’s just create an assets folder. Right Click on app > New > Assets Folder and put your HTML file into it.
Now, to load this file, you have to connect it with the respective webview. We will go the kotlin class which we had created to show local HTML.
class LocalHtmlActivity : AppCompatActivity() { override fun onCreate(savedInstanceState: Bundle?) {
super.onCreate(savedInstanceState)
setContentView(R.layout.activity_localhtml)
wvLocalhtml.loadUrl("file:///android_asset/localhtml.html")
}
}Earlier we are giving the website URL to loadUrl method, but now we have a local HTML file which doesn’t have any URL, So what should we give? In such cases, we provide the path of the HTML file in this format.
file:///android_asset/localhtml.htmlHere, localhtml.html is the name of the HTML file.Try to run this application. Experiment over this and share with us on our twitter or slack channel.
There are much more things in WebView like how to setup Javascript and many more. Explore more.