Using Retrofit with Kotlin Coroutines in Android

Networking is one of the most important parts of Android Applications. One of the most popular libraries used for Networking in Android is Retrofit . The main reason Retrofit is popular among Android Networking libraries is that it reduces a lot of Boilerplate code and helps in consuming the web service easily. Also, it keeps updating with the latest trends such as compatibility with Rxjava and now, The Coroutine Support !
Welcome to our MindOrks blog on Using Retrofit with Koltin Coroutines in Android!
Starting from version 2.6.0 Retrofit supports the concept of “suspend” functions.
Before proceeding further, we would recommend our MindOrks blog for better understanding of Coroutines
In this blog we are going to understand with a sample project:
- How to use retrofit 2.6.0 with coroutines?
- What is the suspend keyword?
- What is the LiveData scope in Coroutines?
We are going to understand these concepts with a project. Before discussing this topic, if you need to refresh the basics of MVVM project, please refer to our MVVM Architecture-Beginner’s Tutorial blog.
We strongly recommend you to go through the example project provided in MVVM Architecture-Beginner’s Tutorial blog as we are going to improvise on the same in this blog.
Set up a new project with Kotlin and other dependencies required
Here, we are going to set up the Android Project.
Create a Project
- Start a new Android Studio Project
- Select Empty Activity and Next
- Name: Retrofit-Kotlin-Coroutines-Example
- Package name: com.mindorks.retrofit.coroutines
- Language: Kotlin
- Finish
- Your starting project is ready now
Add dependencies
Add the following dependencies in your app level build.gradle.
implementation 'androidx.recyclerview:recyclerview:1.1.0'
implementation 'com.github.bumptech.glide:glide:4.9.0'

//LifeCycle
implementation 'androidx.lifecycle:lifecycle-common:2.2.0'
implementation 'androidx.lifecycle:lifecycle-runtime:2.2.0'
implementation 'android.arch.lifecycle:extensions:2.2.0'
implementation 'androidx.lifecycle:lifecycle-livedata-ktx:2.2.0'

//Retrofit
implementation 'com.squareup.retrofit2:retrofit:2.6.0'
implementation 'com.google.code.gson:gson:2.8.5'
implementation 'com.squareup.retrofit2:converter-gson:2.5.0'
implementation 'com.squareup.okhttp3:logging-interceptor:3.12.0'

//Coroutines
implementation 'org.jetbrains.kotlinx:kotlinx-coroutines-android:1.3.5'
Here, we can see that we have added our Retrofit and Coroutines dependencies. Since we will be launching the coroutines in the live data scope(we will be discussing this later in this blog), we add the required life cycle dependencies.
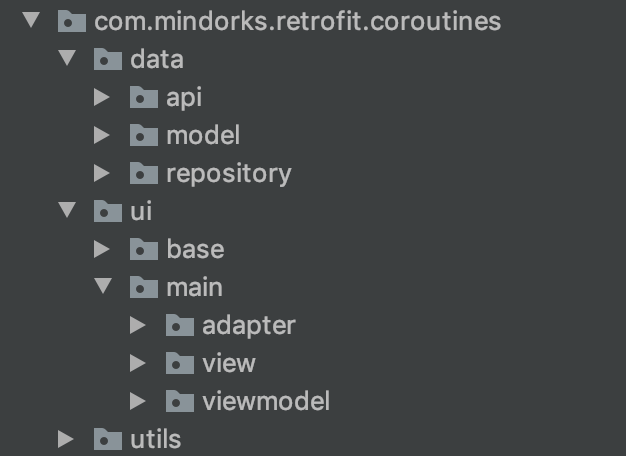
Project Structure
For the project, we are going to follow a beginner version of MVVM. Our package in the project will look like below, similar to our MVVM beginner’s tutorial blog.
Setting up the Utils
We set up the utils package exactly the way we set it up in our MVVM beginner’s tutorial blog.
Firstly, the Enum status class:
package com.mindorks.retrofit.coroutines.utils

enum class Status {
    SUCCESS,
    ERROR,
    LOADING
}
Now, the Resource class:
package com.mindorks.retrofit.coroutines.utils

import com.mindorks.retrofit.coroutines.utils.Status.ERROR
import com.mindorks.retrofit.coroutines.utils.Status.LOADING
import com.mindorks.retrofit.coroutines.utils.Status.SUCCESS


data class Resource<out T>(val status: Status, val data: T?, val message: String?) {
    companion object {
        fun <T> success(data: T): Resource<T> = Resource(status = SUCCESS, data = data, message = null)

        fun <T> error(data: T?, message: String): Resource<T> =
            Resource(status = ERROR, data = data, message = message)

        fun <T> loading(data: T?): Resource<T> = Resource(status = LOADING, data = data, message = null)
    }
}
Setting up the Model
Since we will be using the same API service we have used in our MVVM beginner’s tutorial blog, we will be creating a similar model class.
Server Response:
{
    "id": "Id of the User",
    "name": "Name of the User",
    "avatar": "url of the User avatar",
    "email": "Email of the user"
}
Model class:
package com.mindorks.retrofit.coroutines.data.model

data class User(
    val avatar: String,
    val email: String,
    val id: String,
    val name: String
)
Note: Here we haven’t used the @SerializedName annotation since we have declared the same variable name as that of the server response field. However, if you wish to change the variable name of the data class, you can do so by adding the annotation like follows.
package com.mindorks.retrofit.coroutines.data.model

import com.google.gson.annotations.SerializedName

data class User(
    @SerializedName("avatar")
    val image: String,
    @SerializedName("email")
    val userEmail: String,
    @SerializedName("id")
    val userId: String,
    @SerializedName("name")
    val userName: String
)
Setting up the Network Layer
Now, since we are using Retrofit for Network calls, let’s create a class that provides us the instance of the Retrofit Service class.
Note : We are going to come across some new keywords such as “suspend” in this Network layer. We are going to understand this later in this blog. First, let’s set up the project.
Retrofit Service class
package com.mindorks.retrofit.coroutines.data.api

import com.mindorks.retrofit.coroutines.data.model.User
import retrofit2.http.GET

interface ApiService {

    @GET("users")
    suspend fun getUsers(): List<User>

}
Retrofit Builder class:
package com.mindorks.retrofit.coroutines.data.api

import retrofit2.Retrofit
import retrofit2.converter.gson.GsonConverterFactory

object RetrofitBuilder {

    private const val BASE_URL = "https://5e510330f2c0d300147c034c.mockapi.io/"

    private fun getRetrofit(): Retrofit {
        return Retrofit.Builder()
            .baseUrl(BASE_URL)
            .addConverterFactory(GsonConverterFactory.create())
            .build() //Doesn't require the adapter
    }

    val apiService: ApiService = getRetrofit().create(ApiService::class.java)
}
Now, let’s create an API Helper class to help us with the ApiService call:
package com.mindorks.retrofit.coroutines.data.api

class ApiHelper(private val apiService: ApiService) {

    suspend fun getUsers() = apiService.getUsers()
}
Our Network Layer is now set.
Since we will be using a Repository pattern, we will be linking our ApiHelper class by using a Repository class:
package com.mindorks.retrofit.coroutines.data.repository

import com.mindorks.retrofit.coroutines.data.api.ApiHelper

class MainRepository(private val apiHelper: ApiHelper) {

    suspend fun getUsers() = apiHelper.getUsers()
}
Setting up the ViewModel
Note : We are going to come across some new keywords such as “Coroutines”, “liveData scope”, “Dispatchers” in this ViewModel. We are going to understand this later in this blog. First, let’s set up the project.
Now, that our model and network layers are set, let’s set up our ViewModel
package com.mindorks.retrofit.coroutines.ui.main.viewmodel

import androidx.lifecycle.ViewModel
import androidx.lifecycle.liveData
import com.mindorks.retrofit.coroutines.data.repository.MainRepository
import com.mindorks.retrofit.coroutines.utils.Resource
import kotlinx.coroutines.Dispatchers


class MainViewModel(private val mainRepository: MainRepository) : ViewModel() {

    fun getUsers() = liveData(Dispatchers.IO) {
        emit(Resource.loading(data = null))
        try {
            emit(Resource.success(data = mainRepository.getUsers()))
        } catch (exception: Exception) {
            emit(Resource.error(data = null, message = exception.message ?: "Error Occurred!"))
        }
    }
}
We will be providing our View Model from a Factory class. So let’s construct our ViewModelFactory class:
package com.mindorks.retrofit.coroutines.ui.base

import androidx.lifecycle.ViewModel
import androidx.lifecycle.ViewModelProvider
import com.mindorks.retrofit.coroutines.data.api.ApiHelper
import com.mindorks.retrofit.coroutines.data.repository.MainRepository
import com.mindorks.retrofit.coroutines.ui.main.viewmodel.MainViewModel

class ViewModelFactory(private val apiHelper: ApiHelper) : ViewModelProvider.Factory {

    override fun <T : ViewModel?> create(modelClass: Class<T>): T {
        if (modelClass.isAssignableFrom(MainViewModel::class.java)) {
            return MainViewModel(MainRepository(apiHelper)) as T
        }
        throw IllegalArgumentException("Unknown class name")
    }

}
Setting up the View
Our MainActivity class:
package com.mindorks.retrofit.coroutines.ui.main.view

import android.os.Bundle
import android.view.View
import android.widget.Toast
import androidx.appcompat.app.AppCompatActivity
import androidx.lifecycle.Observer
import androidx.lifecycle.ViewModelProviders
import androidx.recyclerview.widget.DividerItemDecoration
import androidx.recyclerview.widget.LinearLayoutManager
import com.mindorks.retrofit.coroutines.R.layout
import com.mindorks.retrofit.coroutines.data.api.ApiHelper
import com.mindorks.retrofit.coroutines.data.api.RetrofitBuilder
import com.mindorks.retrofit.coroutines.data.model.User
import com.mindorks.retrofit.coroutines.ui.base.ViewModelFactory
import com.mindorks.retrofit.coroutines.ui.main.adapter.MainAdapter
import com.mindorks.retrofit.coroutines.ui.main.viewmodel.MainViewModel
import com.mindorks.retrofit.coroutines.utils.Status.ERROR
import com.mindorks.retrofit.coroutines.utils.Status.LOADING
import com.mindorks.retrofit.coroutines.utils.Status.SUCCESS
import kotlinx.android.synthetic.main.activity_user.progressBar
import kotlinx.android.synthetic.main.activity_user.recyclerView

class MainActivity : AppCompatActivity() {

    private lateinit var viewModel: MainViewModel
    private lateinit var adapter: MainAdapter

    override fun onCreate(savedInstanceState: Bundle?) {
        super.onCreate(savedInstanceState)
        setContentView(layout.activity_main)
        setupViewModel()
        setupUI()
        setupObservers()
    }


    private fun setupViewModel() {
        viewModel = ViewModelProviders.of(
            this,
            ViewModelFactory(ApiHelper(RetrofitBuilder.apiService))
        ).get(MainViewModel::class.java)
    }

    private fun setupUI() {
        recyclerView.layoutManager = LinearLayoutManager(this)
        adapter = MainAdapter(arrayListOf())
        recyclerView.addItemDecoration(
            DividerItemDecoration(
                recyclerView.context,
                (recyclerView.layoutManager as LinearLayoutManager).orientation
            )
        )
        recyclerView.adapter = adapter
    }

    private fun setupObservers() {
        viewModel.getUsers().observe(this, Observer {
            it?.let { resource ->
                when (resource.status) {
                    SUCCESS -> {
                        recyclerView.visibility = View.VISIBLE
                        progressBar.visibility = View.GONE
                        resource.data?.let { users -> retrieveList(users) }
                    }
                    ERROR -> {
                        recyclerView.visibility = View.VISIBLE
                        progressBar.visibility = View.GONE
                        Toast.makeText(this, it.message, Toast.LENGTH_LONG).show()
                    }
                    LOADING -> {
                        progressBar.visibility = View.VISIBLE
                        recyclerView.visibility = View.GONE
                    }
                }
            }
        })
    }

    private fun retrieveList(users: List<User>) {
        adapter.apply {
            addUsers(users)
            notifyDataSetChanged()
        }
    }
}
Our activity_main.xml:
<?xml version="1.0" encoding="utf-8"?>
<androidx.constraintlayout.widget.ConstraintLayout xmlns:android="http://schemas.android.com/apk/res/android"
    xmlns:app="http://schemas.android.com/apk/res-auto"
    xmlns:tools="http://schemas.android.com/tools"
    android:layout_width="match_parent"
    android:layout_height="match_parent"
    tools:context=".ui.main.view.MainActivity">

    <androidx.recyclerview.widget.RecyclerView
        android:id="@+id/recyclerView"
        android:layout_width="match_parent"
        android:layout_height="match_parent"
        android:visibility="gone" />

    <ProgressBar
        android:id="@+id/progressBar"
        android:layout_width="wrap_content"
        android:layout_height="wrap_content"
        app:layout_constraintBottom_toBottomOf="parent"
        app:layout_constraintEnd_toEndOf="parent"
        app:layout_constraintStart_toStartOf="parent"
        app:layout_constraintTop_toTopOf="parent" />

</androidx.constraintlayout.widget.ConstraintLayout>
In order to load our Recycler view, we have to create a row item type:
<?xml version="1.0" encoding="utf-8"?>
<androidx.constraintlayout.widget.ConstraintLayout android:id="@+id/container"
    xmlns:android="http://schemas.android.com/apk/res/android"
    xmlns:app="http://schemas.android.com/apk/res-auto"
    xmlns:tools="http://schemas.android.com/tools"
    android:layout_width="match_parent"
    android:layout_height="60dp">

    <ImageView
        android:id="@+id/imageViewAvatar"
        android:layout_width="60dp"
        android:layout_height="0dp"
        android:padding="4dp"
        app:layout_constraintBottom_toBottomOf="parent"
        app:layout_constraintStart_toStartOf="parent"
        app:layout_constraintTop_toTopOf="parent"
        tools:ignore="contentDescription" />

    <androidx.appcompat.widget.AppCompatTextView
        android:id="@+id/textViewUserName"
        style="@style/TextAppearance.AppCompat.Large"
        android:layout_width="0dp"
        android:layout_height="wrap_content"
        android:layout_marginStart="8dp"
        android:layout_marginTop="4dp"
        app:layout_constraintEnd_toEndOf="parent"
        app:layout_constraintStart_toEndOf="@+id/imageViewAvatar"
        app:layout_constraintTop_toTopOf="parent"
        tools:text="MindOrks" />

    <androidx.appcompat.widget.AppCompatTextView
        android:id="@+id/textViewUserEmail"
        android:layout_width="0dp"
        android:layout_height="wrap_content"
        app:layout_constraintEnd_toEndOf="parent"
        app:layout_constraintStart_toStartOf="@+id/textViewUserName"
        app:layout_constraintTop_toBottomOf="@+id/textViewUserName"
        tools:text="MindOrks" />

</androidx.constraintlayout.widget.ConstraintLayout>
Note: For the ease of understanding, the dimensions are hardcoded in the provided layout files. It is strongly recommended to read the dimensions and strings from their respective dimens.xml files and strings.xml files for best coding practices.
Finally, to load our RecyclerView, we need an adapter class with a view Holder:
package com.mindorks.retrofit.coroutines.ui.main.adapter
import android.view.LayoutInflater
import android.view.View
import android.view.ViewGroup
import androidx.recyclerview.widget.RecyclerView
import com.bumptech.glide.Glide
import com.mindorks.retrofit.coroutines.R
import com.mindorks.retrofit.coroutines.data.model.User
import com.mindorks.retrofit.coroutines.ui.main.adapter.MainAdapter.DataViewHolder
import kotlinx.android.synthetic.main.item_layout.view.imageViewAvatar
import kotlinx.android.synthetic.main.item_layout.view.textViewUserEmail
import kotlinx.android.synthetic.main.item_layout.view.textViewUserName
class MainAdapter(private val users: ArrayList<User>) : RecyclerView.Adapter<DataViewHolder>() {
class DataViewHolder(itemView: View) : RecyclerView.ViewHolder(itemView) {
fun bind(user: User) {
itemView.apply {
textViewUserName.text = user.name
textViewUserEmail.text = user.email
Glide.with(imageViewAvatar.context)
.load(user.avatar)
.into(imageViewAvatar)
}
}
}
override fun onCreateViewHolder(parent: ViewGroup, viewType: Int): DataViewHolder =
DataViewHolder(LayoutInflater.from(parent.context).inflate(R.layout.item_layout, parent, false))
override fun getItemCount(): Int = users.size
override fun onBindViewHolder(holder: DataViewHolder, position: Int) {
holder.bind(users[position])
}
fun addUsers(users: List<User>) {
this.users.apply {
clear()
addAll(users)
}
}
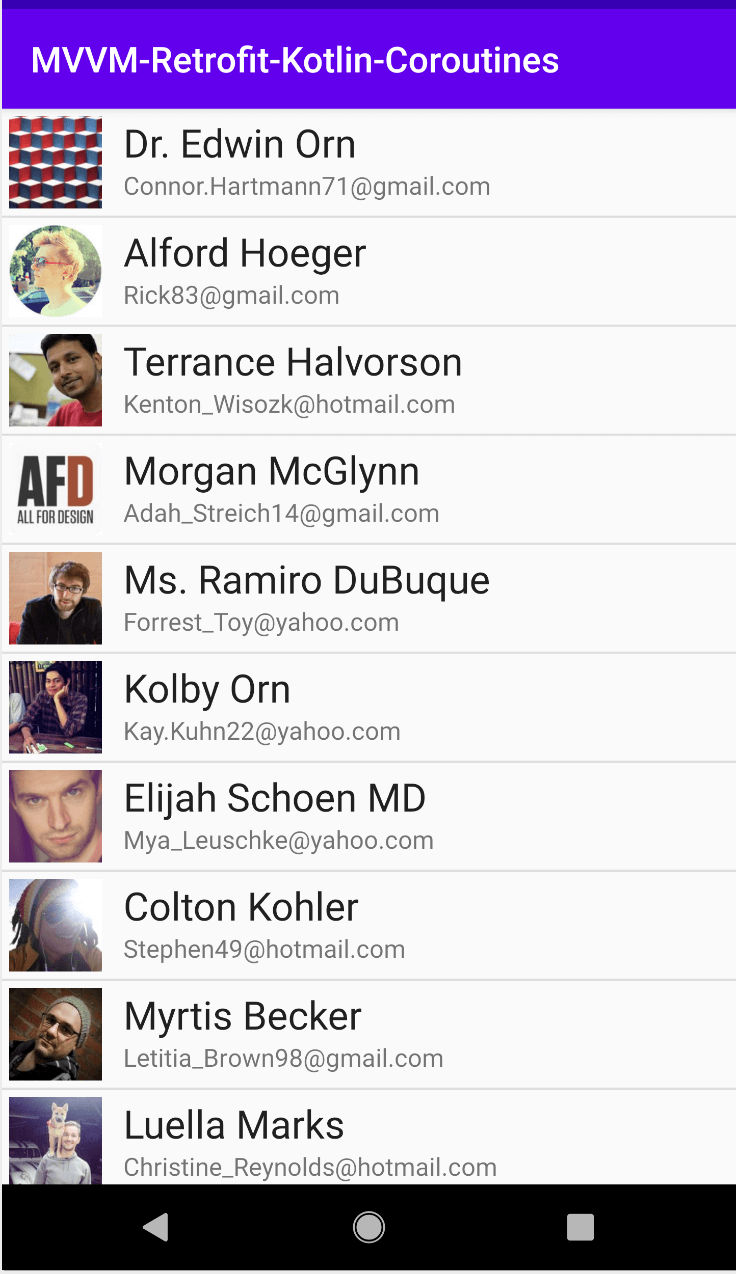
}That’s it, our project is set up. Let’s add our internet permission in the AndroidManifest file:
<uses-permission android:name="android.permission.INTERNET"/>Now, let’s run our project. Awesome! We can see the server response on the screen!
Understanding Retrofit with Kotlin Coroutines Now that we have worked on the project, let’s understand two key things:
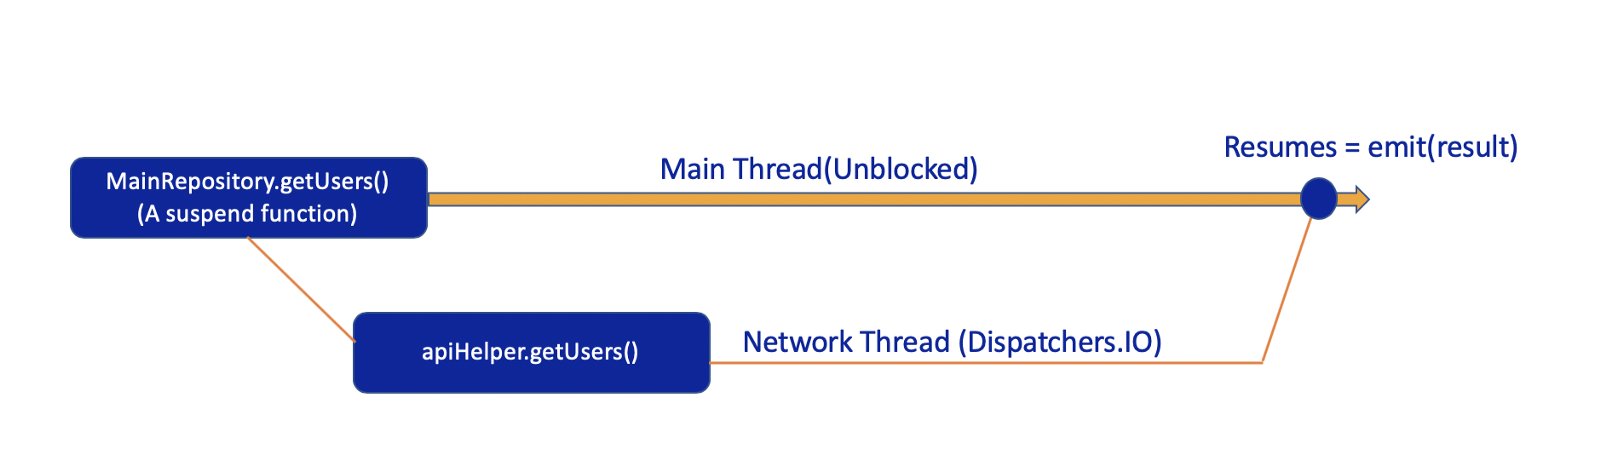
Suspend
The suspend functions can only be called from Coroutines. Adding the keyword suspend helps the coroutine to suspend (pause), perform the required job on a network thread (if Dispatchers.IO) is used, wait for the response, and then resumes from where it left off once the response is available. In our example code, the ViewModel class:
fun getUsers() = liveData(Dispatchers.IO) {
        emit(Resource.loading(data = null))
        try {
            emit(Resource.success(data = mainRepository.getUsers()))
        } catch (exception: Exception) {
            emit(Resource.error(data = null, message = exception.message ?: "Error Occurred!"))
        }
    }
Here, the getUsers function of the MainRepository class is a suspend function, and hence, only once the network call(which is run on another thread, in this case, the thread from Dispatchers.IO) is completed (success or error), the coroutine resumes by emitting the respective value that is obtained from the network call.
LifeCycle Scope
A
LifecycleScope
is defined for each Lifecycle object.
LifecycleOwner
could be an Activity or a Fragment. Any coroutine launched in this scope is canceled when the Lifecycle is destroyed. This helps us in avoiding memory leaks.
Here we have used liveData (Dispatchers.IO). If we observe the import statement:
import androidx.lifecycle.liveDataHence, the result of the function will be emitted as Live Data, which can be observed in the view (Activity or Fragment).
Project Source Code and What Next?
You can find the complete project here .
As we have done some simplifications in this project for the Beginners level, so, we can improve this project to go to the Advanced level, a few of the things which we can improve are as follows:
- Implement Dependency Inject Framework - Dagger in the project.
- Make ApiService Singleton and reuse the same instance for all the features.
- Create base classes such as BaseActivity.
- Handle all the API errors at a single place in a better way.
- Create Interfaces for the classes wherever required.
- Take advantage of Android KTX - Kotlin Extensions .
- Write Unit-Test
- and so on.
That’s it for this article!
We also have a video tutorial on this concept. Please check it out here
We hope that you have understood how to use Retrofit with coroutines in a simple way!
Thank you so much for your time!
Team MindOrks!