Using MediaPlayer to play an Audio File in Android

In this blog, we will learn how to play an audio file in Android.
When words fail, music speaks.
There are various ways of adding Audio Files in Android applications. For example, you can use ExoPlayer or MediaPlayer to Play Audio Files in Android applications.
In this blog, you will learn how to play an audio file in Android using MediaPlayer . Here is what you will be learning in this blog:
- MediaPlayer Introduction
- State Diagram of MediaPlayer
- prepare() vs prepareAsync()
- Release MediaPlayer after use
- Two-liner MediaPlayer example
- More advanced example
- Closing notes
Let's get started.
MediaPlayer Introduction
To play audio or video files in Android, the Android multimedia framework includes the support of MediaPlayer APIs. So, by using MediaPlayer APIs, you can play audio/video files from your Android filesystem or play files from your Application's resource file or even you can stream audio/video files just like Spotify.
Following are the operations that can be performed using MediaPlayer:
- Prepare media file: To play a media file, you need to first prepare it i.e. you need to load the file for playback. Methods used for doing this are prepare() , prepareAsync() , and setDataSource() .
- Start/Pause the playback: After loading the media file, you can start playing the media file by using the start() method. Similarly, you can pause the playing media file by using the pause() method.
- Stop the playback: You can stop playback by using the reset() method. This method is used when we want to stop playback and then prepare another playback for playing.
- Seek to a position: You can directly skip to a particular position(in ms) in a media file by using the seekTo(position) method.
- Length of song: You can find the length of a particular song(in ms) by using the getDuration() method.
- The current position of a song: You can get the current position of playback by using the getCurrentPosition() method.
- Resource deallocation: You can deallocate the memory and resources used by the media player by using the release() method.
These are some of the operations that can be performed by using the MediaPlayer APIs. So, should we start writing code for the MediaPlayer? No, a big no. Before getting into the code, let's see the state diagram of MediaPlayer because it is very important to understand the state diagram, otherwise, your application may lead to some unwanted crashes.
State Diagram of MediaPlayer
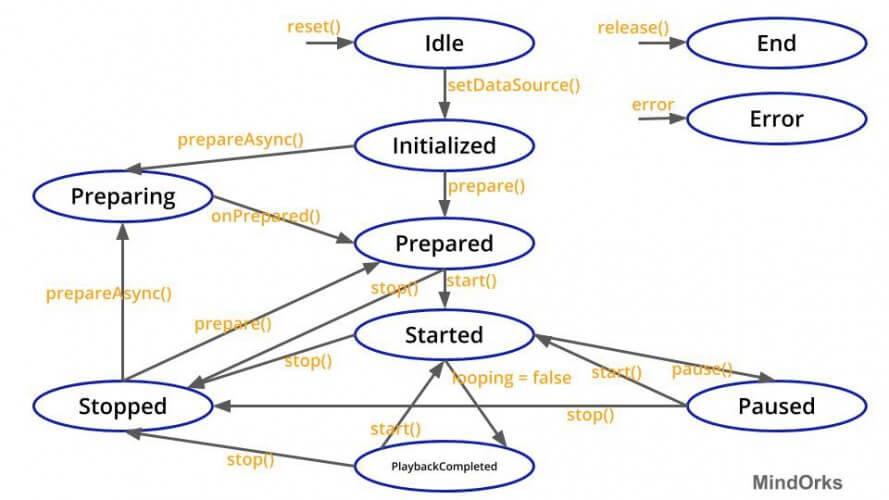
In this section, we will learn about the different states that are present from starting playback to stopping the playback. These states are:
- Idle state: When you create a MediaPlayer object by using the new keyword then that object is present in the idle state . Also, when you are calling the reset() method then the object will go into the idle state . In the idle state , there is nothing going on with the MediaPlayer object. It only indicates that the object is ready to be prepared for playing some media files. So, in the idle state , if you are trying to get the current position of a song by using getCurrentPosition() method or if you are trying to use the pause() , start() , stop() , setVolume() , getDuration , etc , methods then you will encounter some unwanted app crashes.
- Error state: If you use the above methods mentioned in the idle state just after using the reset() method, then the OnErrorListener.onError() will be invoked and your object will be transferred to the error state . But if you are using the " new' keyword then the OnErrorListener.onError() will not be called and the state will remain unchanged. To reuse the object that is present in the error state , you need to call the reset() method.
- End state: When you call the release() method then all the resources taken by the MediaPlayer object will be released and the object will go into the end state . If an object is in the end state , then there is no way of calling back the object to other states.
- Initialized state: The whole lifecycle of a MediaPlayer object lies between the idle and end state. After the idle state , you need to provide the data source you are going to use i.e. the media source. So, setDataSource() method is used for the same purpose and after that, the object will be placed into the initialized state . setDataSource() should always be used when the application is in the idle state otherwise it will through IllegalStateException.
- Prepared state: Before starting the music, you need to put the MediaPlayer object into the prepared state . In the prepared state, you can adjust the looping of the video/audio or you can set the volume. So, to bring an object from the initialized state to the prepared state , you can either use the prepare() method to directly transfer the object to the prepared state or you can use one intermediate state called preparing state . To go to the preparing state from initialized state , you can call the prepareAsync() method which transfers the object to preparing state and when the preparation is done then the onPrepared() method of the OnPreparedListener interface is called and the object is transferred to the prepared state . prepare() and prepareAsync() must be called in this state only otherwise it will through IllegalStateException.
- Started state: After the prepared state , if you use the start() method to play any audio/video file, then the object comes into the started state and here you can apply some methods like seekTo() or start() . If you are using start() in the start state , then it is fine, nothing will happen.
- Paused state: While playing an audio or video file if you pause the media then it goes into the paused state . You can use the pause() method to put the media into the pause state . In order to resume the media, you can use the start() method. The resumed playback position is the same as where it was paused and after using the start() method the playback will be resumed and the object will move to the started state . There is no effect of calling the pause() method in the pause state .
- Stopped state: When you use the stop() method from the prepared , started , paused or playback completed state then the MediaPlayer object will go into the stopped state and in order to play the audio/video again, you need to send the object in the prepared state by calling the prepare() or prepareAsync() method. There is no effect of calling the stop() method in the stopped state .
- PlaybackCompleted state: If the looping is set to true i.e. you want to play the media file again and again, then the object shall remain in the started state . If the looping is set to false , then OnCompletion.onCompletion() will be called after the completion of the media file and the object will move to the PlaybackCompleted state. In order to start the playback again, you can call the start() method.
The following figure is a summary of what we have discussed in the above section of this blog. It is very important to learn the state of a MediaPlayer before using it because there are some methods that must be called in a particular state only, otherwise, it will through some exception. So, it is better to have an idea of all the states.
prepare() vs prepareAsync()
In the above section, we have seen that to bring the MediaPlayer object from the initialized state to the prepared state , we have two options i.e. either we can use the prepare() method and the object will directly come into the prepared state or we can use an intermediate state i.e. the preparing state to send the object to the prepared state . To go to the preparing state from the initialized state , we can use the prepareAsync() method. So, what is the difference between the prepare() and prepareAsync() methods?
If you are calling the prepare() method then it will fetch and decode your media data and this process may take time. So, if you are calling this prepare() method from the application's UI thread, then this may result in a delay in your application and you will end up loosing your users. So, instead of running the prepare() method on the UI thread, you can run it onto some other thread and when the fetching and decoding of your media data is done then that thread should notify the main thread and the main thread will do the rest. So, this process is done with the help of prepareAsync() method.
Release MediaPlayer
In the previous section, we have seen all the states of a MediaPlayer. Before moving forward, I want to mention one important point that we all should follow i.e. releasing the MediaPlayer object after using it.
Whenever we are using MediaPlayer then there are various system resources that are acquired by the MediaPlayer. So, when you are done with the MediaPlayer then you should release all the resources acquired by the MediaPlayer by calling the release() method. Also, if you are not running your media application in the background then you should release all the resource when the application is in onPause() state. Releasing the resources is an important step because if you are not performing this then your app can lead to bad user experience.
Two-liner MediaPlayer example
In this section of the blog, I will discuss a basic example of MediaPlayer i.e. how to play a media file just by opening an activity. Here, I will not be dealing with any states of MediaPlayer or will not be using any advanced methods associated with MediaPlayer i.e. seekTo(), getCurrentPosition(), getDuration(), etc. So, let's see the two-liner example of MediaPlayer.
Create a new project in Android Studio by using the EmptyActivity template. Here, in this example, we will be having one audio file and we will use this file in our application. So, in the app/res directory, create a raw directory by right-clicking on the res directory and then click on new and then on Android Resource Directory . Select the Resource Type as raw and then click on OK . In the raw directory that you have created, put your audio files and we will use this audio file later.
If you want to stream an audio file then you have to allow internet permission in the AndroidManifest.xml file.
<uses-permission android:name="android.permission.INTERNET" />Now, to play an audio file from your resource directory( raw ), just add the below two lines of code and you are good to go with your two-liner music app.
var mediaPlayer: MediaPlayer? = MediaPlayer.create(context, R.raw.sample_media)
mediaPlayer?.start() // no need to call prepare(); create() does that for you
Run your application and enjoy the music:)
In the case of playing music from the file system, you can use the getDataSource() method and pass your URI as a parameter to it.
val sampleUri: Uri = .... // your uri here
val mediaPlayer: MediaPlayer? = MediaPlayer().apply {
    setAudioStreamType(AudioManager.STREAM_MUSIC)
    setDataSource(applicationContext, sampleUri) //to set media source and send the object to the initialized state
    prepare() //to send the object to prepared state
    start() //to start the music and send the object to the started state
}
Also, to play some media file from an URL, you can do so by using the above procedure of URI and in the place of URI you can put the URL of the audio file.
val sampleUrl = "http://........" // your URL here
val mediaPlayer: MediaPlayer? = MediaPlayer().apply {
    setAudioStreamType(AudioManager.STREAM_MUSIC) //to send the object to the initialized state
    setDataSource(sampleUrl) //to set media source and send the object to the initialized state
    prepare() //to send the object to the prepared state, this may take time for fetching and decoding
    start() //to start the music and send the object to started state
}
In the above example, we are lacking some of the recommended steps i.e. we are not releasing the object after using it. Also, we are not taking care of all the states of the MediaPlayer. So, let's look at some advanced example of MediaPlayer by using all the functionalities.
More advanced example
In this example, we will be building one media player and in that media player, we can play, pause, and stop the media file. Also, we can move the seek bar to a certain position to play music from that position. In this example, I will be focusing on the logic part only. So, let's get started.
In your app/res/raw directory, paste your audio file.
Now, make three buttons for Play, Pause, and Stop. At the same time, you can add one seek bar to show the timer of the audio file(this is an optional step).
Now, in the MainActivity.kt file, you need to make the object of the MediaPlayer.
private lateinit var mediaPlayer: MediaPlayerNow, for the play button, there are two cases:
- The audio is in the paused state : When the audio is in the paused state , then you have to find the current position of the audio by using the getC urrentPosition and then start the media player.
- The audio is in the prepared state: When the audio is in the prepared state, then you can start the audio by using the start() method.
Following is the code for the same:
// Start the media player
playBtn.setOnClickListener{
    if(pause){ //initially, pause is set to false
        mediaPlayer.seekTo(mediaPlayer.currentPosition)
        mediaPlayer.start()
        pause = false
        //playing audio when in paused state
    }else{
        mediaPlayer = MediaPlayer.create(applicationContext,R.raw.demo)
        mediaPlayer.start()
        //playing audio when in prepared state
    }
}
For the pause button, there is only one case i.e. if the audio is playing, then you just have to pause the audio by using the pause() method. Following is the code for the same:
if(mediaPlayer.isPlaying){
    mediaPlayer.pause()
    pause = true
    //audio is paused here
}
For the stop button, you have to check if the audio is still playing or in the paused state because before going to the stopped state the audio might be in the started or in the paused state . If it is so, then stop() , reset() , and finally release() the player. Following is the code for the same:
if(mediaPlayer.isPlaying || pause.equals(true)){
    pause = false
    mediaPlayer.stop()
    mediaPlayer.reset()
    mediaPlayer.release()
    //audio is stopped here
}
That's it. You are good to go with MediaPlayer.
Closing note
In this blog, we learned about MediaPlayer and how to use it. We saw the lifecycle of a MediaPlayer object. We saw the difference between prepare() and prepareAsync(). At last, we saw some examples of MediaPlayer.
Hope you learned something new today.
Have a look at our Android tutorials here .
Do share this blog with your fellow developers to spread the knowledge. You can read more blogs on Android on our blogging website .
Apply Now: MindOrks Android Online Course and Learn Advanced Android
Happy Learning :)
Team MindOrks!
Also, Let’s connect on Twitter , Linkedin , Github , and Facebook