Using Android Sensors: Android Tutorial
You all must have played some Android games that includes the supports of sensors i.e. by tilting the phone some actions might happen in the game. For example, in the Temple Run game, by tilting the phone to left or right, the position of the runner changes. So, all these games are using the sensors present in your Android device. Other examples can be shaking your phone to lock the screen, finding the direction with the help of a compass, etc. All these are examples of Android sensors. Have you used any of these sensors present in the Android device? If not, then don’t worry, you are in the right place.
In this blog, we will learn how to use Android Sensors. To understand the same in a very easy way, we have divided the whole blog into the following parts:
- Introduction to Sensors
- Categories of Sensors
- Android Sensor Framework
- Identify Sensor and its capabilities
- Sensor Event Listener
- Last Moment Tips
- Closing Notes
So, let’s get started.
Introduction to Sensors
In Android devices, there are various built-in sensors that can be used to measure the orientation, motions, and various other kinds of environmental conditions. In general, there are two types of sensors in Android devices:
- Hardware Sensors: Hardware sensors are physical components that are present in Android devices. They can directly measure various properties like field strength, acceleration, etc according to the types of the sensors and after measuring the environment properties they can send the data to Software Sensors.
- Software Sensors: Software sensors also know as virtual sensors are those sensors that take the help of one or more Hardware sensors and based on the data collected by various Hardware sensors, they can derive some result.
It is not necessary that all Android devices must have all the sensors. Some devices may have all sensors and some may lack one or two of them. At the same time, a particular device may have more than one sensors of the same type but with different configurations and capabilities.
To express data values or to collect data, the sensors in Android devices uses a 3-axis coordinate system i.e. you will be having X, Y, and Z-axis. The following figure depicts the position of various axis used in sensors.
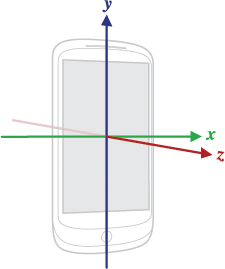
In default orientation, the horizontal axis is represented by X-axis, the vertical axis is represented by Y-axis and the Z-axis points towards the outside of the screen face i.e towards the user.
Categories of Sensors
Following are the three broad categories of sensors in Android:
- Motion Sensors: The sensors that are responsible for measuring or identifying the shakes and tilts of your Android devices are called Motion sensors. These sensors measure the rotational forces along the three-axis. Gravity sensors, accelerometers, etc are some of the examples of Motion sensors.
- Position Sensors: As the name suggests, the Position sensors are used to determine the position of an Android device. Magnetometers, Proximity sensors are some of the examples of Position sensors.
- Environmental Sensors: Environmental properties like temperature, pressure, humidity, etc are identified with the help of Environmental sensors. Some of the examples of Environmental sensors are thermometer, photometer, barometer, etc.
Android Sensor Framework
Everything related to sensors in Android device is managed or controlled by Android Sensor Framework. By using Android Sensor Framework you can collect raw sensor data. It is a part of android.hardware package and includes various classes and interface:
- SensorManager: This is used to get access to various sensors present in the device to use it according to need.
- Sensor: This class is used to create an instance of a specific sensor.
- SensorEvent: This class is used to find the details of the sensor events.
- SensorEventListener: This interface can be used to trigger or perform some action when there is a change in the sensor values.
Following are the usages of the Android Sensor Framework:
- You can register or unregister sensor events.
- You can collect data from various sensors.
- You can find the sensors that are active on a device and determine its capabilities.
Let’s see how we can identify various sensors present in a device and how to determine its capabilities.
Identify Sensor and its capabilities
It is not necessary that two Android devices must have the same number of sensors or the same type of sensors. The availability of sensors varies from device to device and from one Android version to other. So, you can not guarantee that two Android versions or two Android devices must have the same sensors. It becomes a necessary task to identify which sensors are present in a particular Android device.
As seen earlier, we can take the help of the Android Sensor Framework to find the sensors that are present in a particular Android device. Not only that, with the help of various methods of the sensor framework, we can determine the capabilities of a sensor like its resolution, its maximum range, and its power requirements.
Following are the steps that need to be followed to get the list of available sensors in a device:
- Create an instance of the SensorManager .
- Call the getSystemService() method and pass SENSOR_SERVICE as an argument. This SENSOR_SERVICE is used to retrieve a SensorManager to access sensors.
- Call the getSensorList() method to get the names of all the sensors present in the device. The parameter of this method is sensor type. Either you can use TYPE_ALL to get all the sensors available in the device or you can use a particular sensor, for example, TYPE_GRAVITY or TYPE_GYROSCOPE to get the list of sensors of that type only(you can have more than one sensors of the same type).
- If you are not using TYPE_ALL i.e. you want to get all the types of sensors of a particular type then you can do so by using the getDefaultSensor() method. This method returns null if there is no sensor of that type in the Android device.
//Step 1
private lateinit var sensorManager: SensorManager

//Step 2
sensorManager = getSystemService(Context.SENSOR_SERVICE) as SensorManager

//Step 3
//To get a list of all sensors, use TYPE_ALL
val deviceSensors: List<Sensor> = sensorManager.getSensorList(Sensor.TYPE_ALL)
//Or you can use TYPE_GRAVITY, TYPE_GYROSCOPE or some other sensor
//val deviceSensors: List<Sensor> = sensorManager.getSensorList(Sensor.TYPE_GRAVITY)

//Step 4
if (sensorManager.getDefaultSensor(Sensor.TYPE_GRAVITY) != null) {
    //There's a gravity sensor.
} else {
    //No gravity sensor.
}
Apart from finding the list of available sensors, we can also check the capability of a particular sensor i.e. we can check the resolution, power, range, etc of a particular sensor.
Sensor.getResolution() //returns a float value which is the resolution of the sensor

Sensor.getMaximumRange() //returns a float value which is the maximum range of the sensor

Sensor.getPower() //returns a float value which is the power in mA used by sensor
Sensor Event Listener
Just like an onClickListener(), the SensorEventListener is used to listen to the sensor events and perform various operations based on that. The SensorEventListener interface has two callback method:
- onAccuracyChanged(): This is called when there is a change in the accuracy of measurement of the sensor. This method will provide the Sensor object that has changed and the new accuracy. There are four statuses of accuracy i.e. SENSOR_STATUS_ACCURACY_LOW, SENSOR_STATUS_ACCURACY_MEDIUM, SENSOR_STATUS_ACCURACY_HIGH, SENSOR_STATUS_UNRELIABLE.
- onSensorChanged(): This is called when there is an availability of new sensor data. This method will provide you with a SensorEvent object that contains new sensor data.
Apart from these two callback methods, it becomes necessary to release the sensor when not in use. This can be done by using the onPause() and onResume() method. So, we can register and unregister the sensor listener in onResume() and onPause() respectively.
class SensorActivity : Activity(), SensorEventListener {
    private lateinit var sensorManager: SensorManager
    private lateinit var mGravity: Sensor

    public override fun onCreate(savedInstanceState: Bundle?) {
        super.onCreate(savedInstanceState)
        setContentView(R.layout.activity_main)

        sensorManager = getSystemService(Context.SENSOR_SERVICE) as SensorManager

        //gravity sensor
        mGravity = sensorManager.getDefaultSensor(Sensor.TYPE_GRAVITY)
    }

    override fun onAccuracyChanged(sensor: Sensor, accuracy: Int) {
        //If sensor accuracy changes.
    }

    override fun onSensorChanged(event: SensorEvent) {
        //If there is a new sensor data
    }

    //register
    override fun onResume() {
        super.onResume()
        mGravity?.also { gravity ->
            sensorManager.registerListener(this, gravity, SensorManager.SENSOR_DELAY_NORMAL)
        }
    }

    //unregister
    override fun onPause() {
        super.onPause()
        sensorManager.unregisterListener(this)
    }
}
Last Moment Tips
Before using a sensor in your Android application, make sure to use the below tips:
- Always gather sensor data in the foreground.
- When the sensor is not in use then unregister the sensor listener as shown in the example present in the previous section.
- As sensor data may change anytime. So, don’t block the onSensorChanged() method.
- Before collecting data from a sensor, check if that sensor is present in the device or not because it is not necessary that every Android device has all the sensors.
Closing Notes
In this blog, we learned about sensors that are present in Android devices. We learned about the Hardware and the Software sensors. We saw how the Android Sensor Framework can be used to determine the sensors present in the Android device. At last, we saw how to use Sensor Event Listener.
Hope you learned something new today.
Do share this blog with your fellow developers to spread the knowledge. You can read more blogs on Android on our blogging website .
Apply Now: MindOrks Android Online Course and Learn Advanced Android
Happy Learning :)
Team MindOrks!