Spannable String: Text Styling with Spans

Text styling is one of the important aspects when it comes to enhancing the UI of an Android application. In Android, we can change the size, color, weight, style, etc of a text and make the text more attractive and appealing.
But think of a situation, when you want different colors for different parts of a TextView. For example, if the text is "Hello Android" and you want to have the color of "Hello" as green and "Android" as red. How can you achieve this? You can make two TextViews and set the textColor to green and red respectively. But it is not a good way of doing this. So, here comes the role of Styling the texts with the help of Spans.
In this blog, we are going to learn how to use Spans for styling our text used in our application. We are going to cover the following topics:
- What are Spans?
- Change different colors for different words in a TextView
- Spannable Flags
- Change the background color of some part of a TextView
- Multiple Spans to the same text
- Different font size of the string in the same TextView
- Underline a part of the text in TextView
- Set some part of the TextView Clickable
- Add a Bulleted list in Android
What are Spans?
Spans are markup objects that are used to style a text either at the character level(for example, changing colors of different words) or at the paragraph level(for example, making a bullet list).
In order to style a text with the help of Spans, you can use the following three classes:
- SpannedString: This is used when there is no need to modify the text or the markup after its creation.
- SpannableString: This is used when there is no need to modify the text but you need to modify the markup i.e. you need to add some spans to your text.
- SpannableStringBuilder: This is used when you need to modify the text as well as the markup.
This is a quick intro about the Spans in Android. Now, let's see some of the use-cases of it. In all of our example, we are going to use the following TextView having id as
tvMessage
:
<TextView
    android:id="@+id/tvMessage"
    android:layout_width="wrap_content"
    android:layout_height="wrap_content"
    android:layout_margin="8dp"
    android:gravity="center"
    android:textColor="@color/black"
    android:textSize="24sp"
    app:layout_constraintBottom_toBottomOf="parent"
    app:layout_constraintLeft_toLeftOf="parent"
    app:layout_constraintRight_toRightOf="parent"
    app:layout_constraintTop_toTopOf="parent"
    tools:text="Hello World!" />
Change different colors for different words in a TextView
There may be situations when you want to have different colors for a different part of the same textview. So, here you can use the
ForegroundColorSpan
.
val spannable = SpannableString("You can start learning Android from MindOrks")
spannable.setSpan(
    ForegroundColorSpan(Color.RED),
    36, // start
    44, // end
    Spannable.SPAN_EXCLUSIVE_INCLUSIVE
)
tvMessage.text = spannable
Here, we are changing the color of "MindOrks" to Red. The output of the above code will be:

If you look at the code, then you will find that we are using the
SpannableString
class because we are having a fixed text. Also, we are using the
setSpan
method to set the foreground color of text starting from the 36th position and ending at the 44th position in the string. Also, we are passing some flags with it i.e. the
Spannable.
SPAN_EXCLUSIVE_INCLUSIVE
.
Let's learn about these flags.
Spannable Flags
There are many flags that can be used with Spans but the most commonly used flags are:
- SPAN_EXCLUSIVE_EXCLUSIVE
- SPAN_EXCLUSIVE_INCLUSIVE
- SPAN_INCLUSIVE_EXCLUSIVE
- SPAN_INCLUSIVE_INCLUSIVE
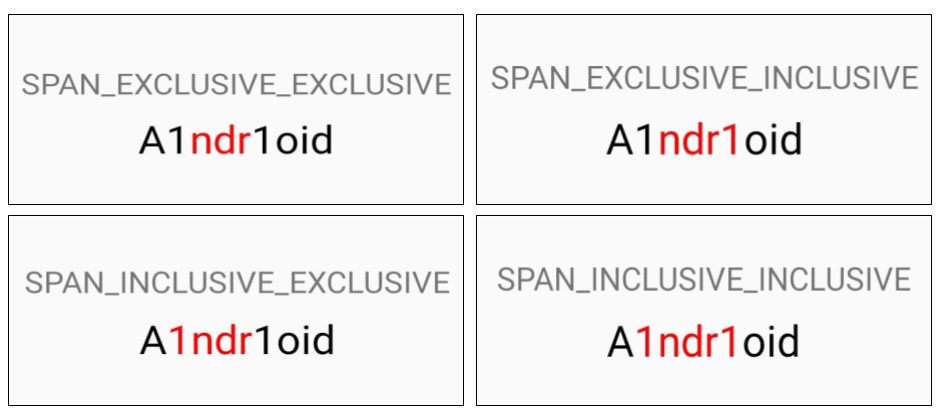
These flags are used to tell the Spans whether or not the Span should include the text that is inserted at the start or the end position. Inclusive means add it to the Span and exclusive means remove it from the Span.
If you are using an immutable string i.e. if you are not adding other strings with your original string then all the four flags will work the same. But if you are using a mutable string, then the role of these four flags will come into play. Let's understand this with the help of an example.
Here, we are going to insert some text in our original string. So, as discussed earlier, for mutable string, we need to use the
SpannableStringBuilder
.
val spannableStringBuilder = SpannableStringBuilder("Android")
spannableStringBuilder.setSpan(
    ForegroundColorSpan(Color.RED),
    1, // start
    4, // end
    Spannable.SPAN_INCLUSIVE_INCLUSIVE
)
spannableStringBuilder.insert(4, "1")
spannableStringBuilder.insert(1, "1")
tvMessage.text = spannableStringBuilder
The corresponding output for all the four flags are shown as below:
Multiple Spans to the same text
You can use the
setSpan
method as many times as you want on a single text also. For example, if you want to change the color of a text, make it bold and italic at the same time, then you can do this by:
val spannable = SpannableString("You can start learning Android from MindOrks")
spannable.setSpan(
    ForegroundColorSpan(Color.RED),
    36, // start
    44, // end
    Spannable.SPAN_EXCLUSIVE_INCLUSIVE
)
spannable.setSpan(
    StyleSpan(Typeface.BOLD_ITALIC),
    36, // start
    44, // end
    Spannable.SPAN_EXCLUSIVE_INCLUSIVE
)
tvMessage.text = spannable
Here, the color of the text is Red and it is bold and italic at the same time. The output of the above code will be:

You can use the
setSpan
method as many times as you want.
Change the background color of some part of a TextView
You can change the background color of some parts of the text in the TextView by using
BackgroundColorSpan
.
val spannable = SpannableString("You can start learning Android from MindOrks")
spannable.setSpan(
    BackgroundColorSpan(Color.RED),
    36, // start
    44, // end
    Spannable.SPAN_EXCLUSIVE_INCLUSIVE
)
tvMessage.text = spannable
Here, we are changing the background to Red. The output of the above code will be:

Different font size of the string in the same TextView
You can use
RelativeSizeSpan
to change the size of some parts of the TextView. The change in the size of the text will be relative i.e. with respect to other text in the string.
val spannable = SpannableString("You can start learning Android from MindOrks")
spannable.setSpan(
    RelativeSizeSpan(2f),
    36, // start
    44, // end
    Spannable.SPAN_EXCLUSIVE_INCLUSIVE
)
tvMessage.text = spannable
Here, the size of "MindOrks" is
2f
than other text. The output of the above code will be:

Underline a part of the text in TextView
You can underline a part of the text by using the
UnderlineSpan
as below:
val spannable = SpannableString("You can start learning Android from MindOrks")
spannable.setSpan(
    UnderlineSpan(),
    36, // start
    44, // end
    Spannable.SPAN_EXCLUSIVE_INCLUSIVE
)
tvMessage.text = spannable
The output of the above code will be:

Set some part of the TextView Clickable
You can set some parts of the TextView clickable using the
ClickableSpan
. For example:
val spanText = SpannableStringBuilder("MindOrks")

val clickableMindOrks = object : ClickableSpan() {
    override fun onClick(view: View) {
        Toast.makeText(view.context, "MindOrks Clicked!", Toast.LENGTH_SHORT).show()
    }
}
spanText.setSpan(
    clickableMindOrks,
    0,
    spanText.length,
    0
)
spanText.setSpan(
    ForegroundColorSpan(Color.RED),
    0, // start
    8, // end
    Spannable.SPAN_EXCLUSIVE_EXCLUSIVE
)
tvMessage.setText(spanText, TextView.BufferType.SPANNABLE)
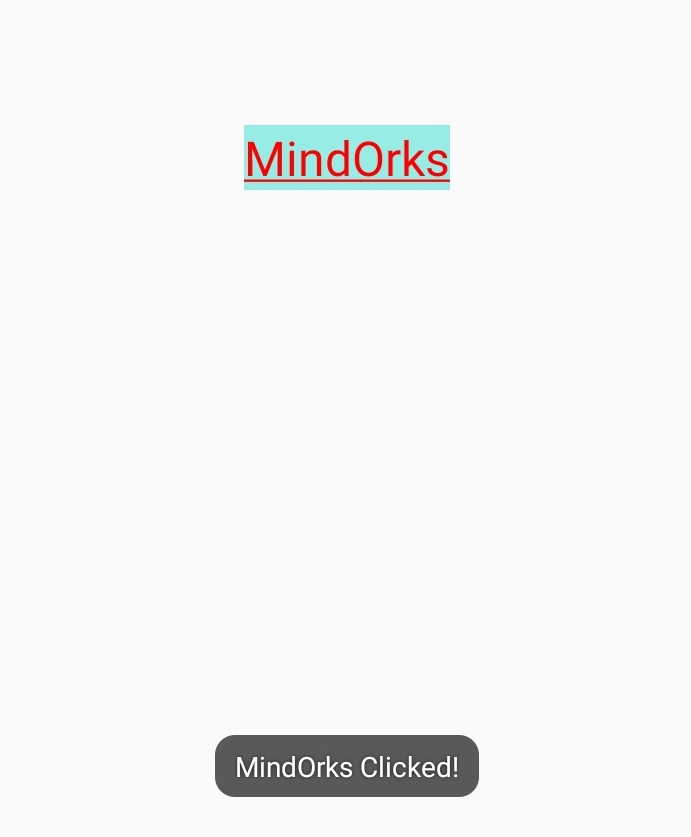
Here, on clicking "MindOrks" a toast is displayed. The output of the above code will be:
Add a Bulleted list in Android
With the help of
BulletSpan
, you can create a bullet list in your application to display some information in a short and simple way.
// function to covert a list into bullet list
fun convertToBulletList(stringList: List<String>): CharSequence {
    val spannableStringBuilder = SpannableStringBuilder("Learn Android from\n")
    stringList.forEachIndexed { index, text ->
        val line: CharSequence = text + if (index < stringList.size - 1) "\n" else ""
        val spannable: Spannable = SpannableString(line)
        spannable.setSpan(
            BulletSpan(15, Color.RED),
            0,
            spannable.length,
            Spanned.SPAN_INCLUSIVE_EXCLUSIVE
        )
        spannableStringBuilder.append(spannable)
    }
    return spannableStringBuilder
}
val androidResourceList = listOf("MindOrks Course", "MindOrks Blog", "MindOrks OpenSource", "MindOrks YouTube")
tvMessage.text = convertToBulletList(androidResourceList)
The output of the above code will be:

So, in this way, we can use Spans to style the texts present in our application.
Hope you learned something new today and I am sure that you are going to use these awesome features in your app very soon.
Do share this blog with other developers to spread the knowledge.
Keep Learning!
Also, Let’s connect on Twitter , Linkedin , Github , and Facebook
