Paging 3 Android Tutorial

When working with RecyclerViews in our Android project, we display a list with a lot of items in it. Sometimes we have use-case like fetching a contact list from the phone and displaying it on the list. Loading a lot of data at once in a list is not a very efficient task to do. To get over this, we have paging in Android.
By using the Paging library, we can load a lot of data efficiently, and only we will load the data when needed. In this blog, we will be learning about the Paging 3 library in Android and how we can use it to load our large set of data in our RecyclerView efficiently.
In this blog, we are going to learn,
- Introduction to Paging 3 library
- Understanding and Implementing Paging 3 library.
- Getting the States of the data
- Adding the Header and Footer view.
- Using it with RxJava.
Introduction to Paging 3 library
Google launched Paging 3 as a part of the Jetpack series. It is still in the early stages. Paging 3 is written entirely using Kotlin Coroutines. It has support for requesting the next page to load more data automatically. It supports Flow, LiveData, and RxJava along with Kotlin Coroutine.
Paging 3 also adds support for caching and handles the state efficiently like loading and failed states while loading the items on ti the list. It also keeps track for the keys to get data from the next and previous pages.
Understanding and Implementing Paging 3 library
In this, we are going to learn implementing Paging 3 library by fetching the list from an API and displaying it in the list. We are going to use the following API for displaying the list,
https://reqres.in/api/users?page=1Our project structure looks like,
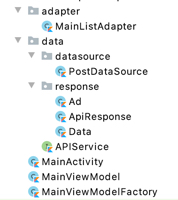
Here, we have an adapter package which is responsible for displaying the list in the RecyclerView. data package is responsible for fetching data from the API. We also have MainActivity in which we are going to display the list.
So, now let's get started.
Step 01.
Let's first setup the dependencies for Paging 3 in our app's build.gradle like,
implementation "androidx.paging:paging-runtime:{latest-version}"Note: At the time of writing the blog, its version is 3.0.0-alpha04
and we will also add the support for Retrofit and Moshi as we are going to use Moshi as convertor factory for Retrofit like,
implementation "com.squareup.retrofit2:retrofit:{latest-version}"
implementation "com.squareup.retrofit2:converter-moshi:{latest-version}"
implementation "com.squareup.moshi:moshi-kotlin:{latest-version}"
implementation "androidx.lifecycle:lifecycle-viewmodel-ktx:{latest-version}"Step 02.
Now, we are going to setup APIService and Retrofit client like,
interface APIService {

    @GET("api/users")
    suspend fun getListData(@Query("page") pageNumber: Int): Response<ApiResponse>

    companion object {

        private val moshi = Moshi.Builder()
            .add(KotlinJsonAdapterFactory())
            .build()

        fun getApiService() = Retrofit.Builder()
            .baseUrl("https://reqres.in/")
            .addConverterFactory(MoshiConverterFactory.create(moshi))
            .build()
            .create(APIService::class.java)
    }
}
Here, we have created an APIService interface with getListData function which takes a query parameter which will take the page number from which we have to fetch the data from.
We also setup the Retrofit client, by adding the base URL and the convertor factory of Moshi.
Step 03.
Now, we have to create the data class for the following JSON output which we get as the response,
{
    "page": 1,
    "per_page": 6,
    "total": 12,
    "total_pages": 2,
    "data": [
    {
        "id": 1,
        "email": "george.bluth@reqres.in",
        "first_name": "George",
        "last_name": "Bluth",
        "avatar": "https://s3.amazonaws.com/uifaces/faces/twitter/calebogden/128.jpg"
    },
    {
        "id": 2,
        "email": "janet.weaver@reqres.in",
        "first_name": "Janet",
        "last_name": "Weaver",
        "avatar": "https://s3.amazonaws.com/uifaces/faces/twitter/josephstein/128.jpg"
    }
    ],
    "ad": {
    "company": "StatusCode Weekly",
    "url": "http://statuscode.org/",
    "text": "A weekly newsletter focusing on software development, infrastructure, the server, performance, and the stack end of things."
}}
and we create the corresponding data classes for the above JSON response. Our ApiResponse data class looks like,
data class ApiResponse(
    @Json(name = "ad")
    val ad: Ad,
    @Json(name = "data")
    val myData: List<Data>,
    @Json(name = "page")
    val page: Int,
    @Json(name = "per_page")
    val perPage: Int,
    @Json(name = "total")
    val total: Int,
    @Json(name = "total_pages")
    val totalPages: Int
)
The Ad data class looks like,
data class Ad(
    @Json(name = "company")
    val company: String,
    @Json(name = "text")
    val text: String,
    @Json(name = "url")
    val url: String
)
and Data data class looks like,
data class Data(
    @Json(name = "avatar")
    val avatar: String,
    @Json(name = "email")
    val email: String,
    @Json(name = "first_name")
    val firstName: String,
    @Json(name = "id")
    val id: Int,
    @Json(name = "last_name")
    val lastName: String
)
Step 04.
Now, since we have setup the data class and APIService, let's setup the paging library. In PostDataSource we will update the code as,
class PostDataSource(private val apiService: APIService) : PagingSource<Int, Data>() {

    override suspend fun load(params: LoadParams<Int>): LoadResult<Int, Data> {

    }

}
Here, we have extended PostDataSource with PagingSource which will implement a suspend load function which will help us to load the data.
PostDataSource also takes a primary constructor parameter APIService . PostDataSource acts here as a repository and the load function gets the data from the API.
Since the load function is a suspend function, we can call other suspend functions inside it without any issues which we created in APIService .
In the PostDataSource , we take two parameters one of integer type and other of the data type we have to load on the list item. The integer parameter represents the page number here.
Now, we update the load function like,
override suspend fun load(params: LoadParams<Int>): LoadResult<Int, Data> {
    try {
        val currentLoadingPageKey = params.key ?: 1
        val response = apiService.getListData(currentLoadingPageKey)
        val responseData = mutableListOf<Data>()
        val data = response.body()?.myData ?: emptyList()
        responseData.addAll(data)

        val prevKey = if (currentLoadingPageKey == 1) null else currentLoadingPageKey - 1

        return LoadResult.Page(
            data = responseData,
            prevKey = prevKey,
            nextKey = currentLoadingPageKey.plus(1)
        )
    } catch (e: Exception) {
        return LoadResult.Error(e)
    }
}
Here, we get the page number from params and assign it to nextPage variable using param.key and if it returns null , we set a default value 1.
We also do the API call and get assign the response to the response variable using APIService which we passed as a constructor parameter to PostDataSource class.
After doing all the operations with the successful response, we return the LoadResult.Page object here with the required data and it something went wrong we use LoadResult.Error .
We are also passing null as the next key if there is no corresponding data in that direction.
Here, the PostDataSource is responsible to keep track of the page which has to be requested next which we get from the APIService.
Step 05.
Now, since we have the DataSource setup we will now get the data in the MainViewModel. We will create the MainViewModel by adding the APIService as a parameter to the primary constructor. So, we will update the ViewModel like,
class MainViewModel(private val apiService: APIService) : ViewModel() {

}
Now, inside the ViewModel, we will create a variable called listData and assign it to the Pager instance.
val listData = Pager(PagingConfig(pageSize = 6)) {
    PostDataSource(apiService)
}.flow.cachedIn(viewModelScope)
Here, the Pager will call the load function from the PostDataSource and we will pass the apiService as well in the object of PostDataSource .
In the Pager object, we also pass the configuration which is used to configure the behavior of Paging and how it should load its data. We are passing the PagingConfig with the pageSize .
PageSize specifics the number of items loaded at once from the PostDataSource . Recommended is to always keep the page size to more than the visible items on the screen.
And lastly, we will convert the listData as flow by adding .flow .
It will convert the stream of data into a Flow. If we want to return LiveData we can replace .flow with .liveData .
And at last, we cache the data in viewModelScope , and the data will be alive until the scope is active. Here, we are using viewModelScope and since we are caching the data in the ViewModel it would not be impacted on any configuration changes.
Step 06.
Now, since we are getting the data in ViewModel, we now need to pass the data in the RecyclerView of MainActivity. We will update the activity_main.xml like,
<LinearLayout xmlns:android="http://schemas.android.com/apk/res/android"
    xmlns:tools="http://schemas.android.com/tools"
    android:layout_width="match_parent"
    android:layout_height="match_parent"
    tools:context=".MainActivity">

    <androidx.recyclerview.widget.RecyclerView
        android:id="@+id/recyclerView"
        android:layout_width="match_parent"
        android:layout_height="match_parent" />

</LinearLayout>
Now, we will update the MainActivity like,
class MainActivity : AppCompatActivity() {

    lateinit var viewModel: MainViewModel
    lateinit var mainListAdapter: MainListAdapter

    override fun onCreate(savedInstanceState: Bundle?) {
        super.onCreate(savedInstanceState)
        setContentView(R.layout.activity_main)
        setupViewModel()
        setupList()
        setupView()
    }

    private fun setupView() {
        lifecycleScope.launch {
            viewModel.listData.collect {
                mainListAdapter.submitData(it)
            }
        }
    }

    private fun setupList() {
        mainListAdapter = MainListAdapter()
        recyclerView.apply {
            layoutManager = LinearLayoutManager(this)
            adapter = mainListAdapter
        }
    }

    private fun setupViewModel() {
        viewModel =
            ViewModelProvider(
                this,
             MainViewModelFactory(APIService.getApiService())
            )[MainViewModel::class.java]
    }
}
Here, we have setup our ViewModel by passing the MainViewModelFactory with the instance of APIService.
The MainViewModelFactory looks like,
class MainViewModelFactory(private val apiService: APIService) : ViewModelProvider.Factory {

    override fun <T : ViewModel?> create(modelClass: Class<T>): T {
        if (modelClass.isAssignableFrom(MainViewModel::class.java)) {
            return MainViewModel(apiService) as T
        }
        throw IllegalArgumentException("Unknown ViewModel class")
    }
}
And then we have to setup the RecyclerView in the setupList function and lastly, in the setupView function, we will collect the data from listData variable from ViewModel inside the lifecycleScope and then pass it to the submitData function which is part of PagingDataAdapter which helps us to update the data we fetched from the API and display in the UI.
Step 07.
Now, we will update the MainListAdapter. We will extend the MainListAdapter with PagingDataAdapter and the PagingDataAdapter will take the type of data we need to display in the list and the ViewHolder.
It also takes a DiffUtil callback, as a parameter to its primary constructor which helps the PagingDataAdapter to update the items if they are changed or updated. And DiffUtil callback is used because they are more performant.
Now, the MainListAdapter looks like,
class MainListAdapter : PagingDataAdapter<Data, MainListAdapter.ViewHolder>(DataDifferntiator) {

    class ViewHolder(view: View) : RecyclerView.ViewHolder(view)

    override fun onBindViewHolder(holder: ViewHolder, position: Int) {
        holder.itemView.textViewName.text =
            "${getItem(position)?.firstName} ${getItem(position)?.lastName}"
        holder.itemView.textViewEmail.text = getItem(position)?.email

    }


    override fun onCreateViewHolder(parent: ViewGroup, viewType: Int): ViewHolder {
        return ViewHolder(
            LayoutInflater
                .from(parent.context)
                .inflate(R.layout.list_item, parent, false)
        )
    }

    object DataDifferntiator : DiffUtil.ItemCallback<Data>() {

        override fun areItemsTheSame(oldItem: Data, newItem: Data): Boolean {
            return oldItem.id == newItem.id
        }

        override fun areContentsTheSame(oldItem: Data, newItem: Data): Boolean {
            return oldItem == newItem
        }
    }

}
Here, in the MainListAdapter, inside the onCreateViewHolder we are returning the ViewHolder by inflating the R.layout.list_item.
Here, the list_item layout file looks like,
<LinearLayout xmlns:android="http://schemas.android.com/apk/res/android"
    android:layout_width="match_parent"
    android:layout_height="wrap_content"
    android:orientation="vertical"
    android:padding="4dp">

    <TextView
        android:id="@+id/textViewName"
        android:layout_width="match_parent"
        android:layout_height="wrap_content"
        android:layout_marginTop="4dp"
        android:layout_marginBottom="4dp"
        android:textAppearance="@android:style/TextAppearance.DeviceDefault.Large" />

    <TextView
        android:id="@+id/textViewEmail"
        android:layout_width="match_parent"
        android:layout_height="wrap_content"
        android:layout_marginTop="4dp"
        android:layout_marginBottom="4dp" />
</LinearLayout>
and inside the onBindViewHolder we will assign the full name and email to both the TextViews.
And when we run the app, we will see the desired output on the screen and when we scroll the list to the bottom it will load the item from the second page and so on.
Getting the States of the data
Now, while loading the data we might also want to show progress view, and when we have loaded the data we should hide the progress view.
To react to the states of data we use addLoadStateListener like,
mainListAdapter.addLoadStateListener {
    if (it.refresh == LoadState.Loading) {
        // show progress view
    } else {
        //hide progress view
    }

}
Here, we get the CombinedLoadState in addLoadStateListener and we use this to show or hide the progress views.
We can also react to errors inside the addLoadStateListener if all the state methods like refresh , append , and prepend are instance of LoadState.Error .
Adding the Header and Footer view
Now, since we have successfully integrated the Paging 3 library, now we will see how we can setup a footer view and header view.
FooterView is the one that when we go the last item of the list and the data is getting loaded from the next page, the footer view gets displayed. And as soon as the data is loaded the footer view is hidden.
For creating these views we will create a RecyclerViewAdapter similar to how we do in general use of RecyclerViews.
But in this case, we will extend the RecyclerView with LoadStateAdapter and pass the ViewHolder to it like,
class HeaderFooterAdapter() : LoadStateAdapter<HeaderFooterAdapter.ViewHolder>() {

    override fun onBindViewHolder(holder: LoadStateViewHolder, loadState: LoadState) {

        if (loadState == LoadState.Loading) {
            //show progress viewe
        } else //hide the view

    }

    override fun onCreateViewHolder(parent: ViewGroup, loadState: LoadState): LoadStateViewHolder {
        return LoadStateViewHolder(
           //layout file
        )
    }

    class ViewHolder(private val view: View) : RecyclerView.ViewHolder(view)
}
Here, inside the onBindViewHolder, we get an additional parameter now of LoadState which we can use to show or hide the loading view based on if the data is getting loaded or not and add it to the adapter we use withLoadStateHeaderAndFooter like,
mainListAdapter.withLoadStateHeaderAndFooter(
    header = HeaderFooterAdapter(),
    footer = HeaderFooterAdapter()
)
If we want to just add a footer we will use,
mainListAdapter.withLoadStateFooter(
    HeaderFooterAdapter()
}
and to use with header we use,
mainListAdapter.withLoadStateHeader(
   HeaderFooterAdapter()
)
And now, if the data is getting loaded from the paging library, the footer/header is displayed based on which one or both are attached to the RecyclerView adapter.
Using it with RxJava
If we don't want to use it with Coroutines and Flow and want to go ahead and use RxJava, we still need to follow the above steps but with few changes.
Let me list them down.
Step 01.
First, we need to add the dependencies for Paging 3 Rx support,
implementation "androidx.paging:paging-rxjava2:{latest-version}"and we will also add the dependency for RxJava2 adapter factory,
implementation "com.squareup.retrofit2:adapter-rxjava2:{latest-version}"Step 02.
Now, as a next step, we need to update the PostDataSource and extend it using RxPagingSource in place of PagingSource like,
class PostDataSource(private val apiService: APIService) : RxPagingSource<Int, Data>() {

}
Now, the PostDataSource will implement the loadSingle function of return type Single like,
override fun loadSingle(params: LoadParams<Int>): Single<LoadResult<Int, Data>> {

}
Step 03.
Now, we will update the APIService interface like,
interface APIService {

    @GET("api/users")
     fun getListData(@Query("page") pageNumber: Int): Single<ApiResponse>

    companion object {

        private val moshi = Moshi.Builder()
            .add(KotlinJsonAdapterFactory())
            .build()

        fun getApiService() = Retrofit.Builder()
            .baseUrl("https://reqres.in/")
            .addCallAdapterFactory(RxJava2CallAdapterFactory.create())
            .addConverterFactory(MoshiConverterFactory.create(moshi))
            .build()
            .create(APIService::class.java)
    }
}
Here, the getListData returns a Single and is not a suspend function anymore. And we have added another adapter factory to support RxJava2 to the Retrofit builder.
Step 04.
Now, inside the loadSingle function, we can do our tasks and return LoadResult.Page object if the output is successful or LoadResult.Error if it isn't.
And to get the data from the PostDataSource to ViewModel we will update the listData variable in MainViewModel like,
val listData = Pager(PagingConfig(pageSize = 6)) {
    PostDataSource(apiService)
}.flowable.cachedIn(viewModelScope)
This will return a Flowable of PagingData and their rest remains the same as above.
We can also pass make listData of type Observable of PagingData like,
val listData = Pager(PagingConfig(pageSize = 6)) {
    PostDataSource(apiService)
}.observable.cachedIn(viewModelScope)
The MainListAdapter remains untouched and in the setupView function in MainActivity gets updated like,
viewModel.listData.subscribe {
    mainListAdapter.submitData(lifecycle,it)
}
Here, we are passing the lifecycle of the View and the paging data to submit data to inflate the list.
This is how you can use the Paging 3 library with RxJava as well.
Conclusion
Paging 3 library is still in its early stage and it is completely re-written using Kotlin coroutines but it can be used with Flow and RxJava both.
You can find the complete project here.
Happy learning.
Team MindOrks :)