Mastering Design Patterns in Android with Kotlin
Before starting this blog, I would like to ask one question. What makes your code good? Is it the code size or something else? Just think over it for a while and then continue reading this blog.
There are certain factors that are used to differentiate between a good Android code and a bad Android code. It may be the code structure or the comments used or the variable names or something else. So, in Android, every developer should follow some Design Pattern while writing the code of an Android application. The following are some of the benefits of using Design Pattern in Android:
- Understandable code: By using Design Pattern, you can make your code understandable to everyone i.e. for writing code, you can follow certain guidelines and anyone can understand why you have written that code. For example , if you are using singleton pattern, then anyone viewing your code can understand that here you want to make only one object of a class and you want to access the same object throughout the application.
- Code reusability: By following the Design Pattern, you can make your code reusable i.e. for performing a certain task at more than one place, you need not write the same code again and again at various places.
- Cleaner code: You can make your code cleaner by decoupling the code and it will make the code easier to understand by using Design Pattern.
So, in order to achieve the above-mentioned things, certain Design Patterns are defined that every Android Developer or every developer should follow while writing any code. In this blog, we will be learning about these Design Patterns in Android. So, let's get started.
What is a Design Pattern?
As Wikipedia says:
A Design Pattern is a general, reusable solution to a commonly occurring problem within a given context.
So, it is basically a pattern that can be followed to solve a particular feature. These are the best practices that can be used by any programmer to build an application.
In Android also, we use some Design Pattern that is used to make our code easier to understand and more reusable.
There are a number of Design Patterns that can be used in Software Development and all these can be classified into the following three categories:
- Creational Pattern
- Structural Pattern
- Behavioural Pattern
Let's understand one by one.
Creational Pattern
The Creational Pattern is used to create some object without showing the logic or the steps that are involved in creating the object. So, every time you want an object, you need not instantiate the object by using the new operator . So, this makes the creation of object easier and can be easily created again and again. Some of the examples of Creational Pattern are Builder, Singleton, and Dependency Injection.
Builder pattern
In a builder pattern, you are only concerned about what you need from a class and not everything that a class has. For example , when you go to buy some laptop, then you have a list of important features that you want in your laptop like processors, ram, storage, etc. Apart from these features, all the other features like the speaker, battery, etc are some of the optional features for you. So, based on the important features, the shopkeeper will provide you with a laptop that contains all your important features.
Similarly, when we have a model class and that class is having a number of parameter out of which some are important and some are not important then we can use the Builder pattern. By using the Builder pattern, the user need not call all the methods(as in the case of constructors) present in the class. The user can call only the required methods and even the order of calling of the method is not fixed i.e you can call any method before and after any method. There is no need for new keyword here(for java) . Let's understand this with the help of an example.
In this example, we will be having one Laptop class with four properties i.e. processor, ram, battery, and screen size. The processor is important, so you need to pass it every time and the rest of the properties are not important. So, if you are not setting the value then the default value will be used. Our model class for Laptop looks like:
class Laptop(builder: Builder) {
    private val processor: String = builder.processor
    private val ram: String = builder.ram
    private val battery: String = builder.battery
    private val screenSize: String = builder.screenSize

    // Builder class
    class Builder(processor: String) {
        var processor: String = processor // this is necessary

        // optional features
        var ram: String = "2GB"
        var battery: String = "5000MAH"
        var screenSize: String = "15inch"

        fun setRam(ram: String): Builder {
            this.ram = ram
            return this
        }

        fun setBattery(battery: String): Builder {
            this.battery = battery
            return this
        }

        fun setScreenSize(screenSize: String): Builder {
            this.screenSize = screenSize
            return this
        }

        fun create(): Laptop {
            return Laptop(this)
        }
    }
}
Now, you need not create the object every time . Just use the below code:
Laptop.Builder("i7") // processor is compulsory
    .setRam("8GB")            // this is optional
    .setBattery("6000MAH")    // this is optional
    .create()
In the above code, we have to pass the processor because this is a necessary component and rest are optional. Here, we are not passing the screen size, so the default value of the screen size will be used.
One of the common examples of Builder pattern that we all use in our daily life is that of AlertDialog. In AleartDialog, we call only the required methods like:
AlertDialog.Builder(this)
    .setTitle("This is a title")
    .setMessage("This is some message")
    .show()
There are other methods available in AlertDialog, but you can use it according to your need.
Singleton pattern
There are cases when you need only one instance of a class . So, whenever you call the object of the class, then the new object should not be created(only one-time object creation will be there). This design pattern provides a global point of access to a class. For example , the network connection in an application should be done once and not every time because it is a very expensive process. So in these cases, we can use a singleton.
Following is an example of a singleton class in Kotlin:
object DataManager{
    init {
        println("Singleton class invoked.")
    }
    fun getUserData(): User{
        // some code
    }

}
// to user singleton class
fun main(args: Array<String>) {
    DataManager.getUserData()
    // more code
}
In Kotlin, there is no need for using private construction or static method to create a singleton class. Learn more about a singleton class in Kotin .
Dependency Injection pattern
Most of the classes have some dependency that is needed for the proper functioning of the class. In the general case, we hard-code all the dependencies needed in the class inside the class itself. But this is a very wrong way of providing dependency to a class because in future if the class requires some more dependency or you want to add more dependency, then you have to update the new dependency in all the classes that will be using that dependency. You have to update the code at many places and you should avoid this in your project.
For example , a car needs an engine to run. So, instead of providing the engine inside the same car class, we should provide the engine from outside the car class.
So, in the Dependency Injection pattern, we provide the dependency of a class from outside the class and no dependency will be provided in the same class .
For example , if a class "DataManager" is dependent on "DatabaseHelper" and "NetworkHelper" then we should not provide these two dependencies in the same "DataManager" class because there may be cases when these two dependencies are the dependencies of some other classes also. So, if there is a change in these dependencies, then you have to change the code of these two dependencies in all the classes that are dependent on these two.
Let's understand how to implement Dependency Injection in our code.
If we don't use the concept of Dependency Injection in our code, then our code will look like:
class DataManager {
    private val databaseHelper: DatabaseHelper = DatabaseHelper() // dependent on DatabaseHelper
    private val networkHelper: NetworkHelper = NetworkHelper()    // dependent on NetworkHelper

    fun someTask() {
        // do some operation with DatabaseHelper and NetworkHelper
    }
}
To use the dependency you have to use the below code:
val dataManager: DataManager = DataManager()
dataManager.someTask()
But here, it is very difficult to test each class separately and also if there is a change in dependency, then you have to change the code of the DataManager class again and again.
So, if we provide dependency from outside the class then the code looks something like this:
class DataManager(databaseHelper: DatabaseHelper, networkHelper: NetworkHelper) {
    private val databaseHelper: DatabaseHelper = databaseHelper
    private val networkHelper: NetworkHelper = networkHelper

    fun someTask() {
         // do some operation with DatabaseHelper and NetworkHelper
    }
}
Now, you can use the DatabaseHelper and NetworkHelper by using the below code:
val databaseHelper: DatabaseHelper = DatabaseHelper()
val networkHelper: NetworkHelper = NetworkHelper()
val dataManager: DataManager = DataManager(databaseHelper, networkHelper)
dataManager.someTask()
So by using the DependencyInjection pattern, you will get the ability to test each class in isolation. But every time you want to use the DatabaseHelper and NetworkHelper, you need to write all these codes. So, to make things easier, we make use of a framework called Dagger . The Dagger will do all these things for you and make your coding life easier :)
Structural Pattern
In this Design Pattern, we are concerned about the structure of the code. Here we follow some particular structural pattern that will help in understanding the code and the working of code just by looking at the structure of the code. Some of the common Structural Pattern used are Adapter, Bridge, Facade, Proxy, etc.
Adapter pattern
An Adapter is something like a connector that is used to connect two or more incompatible interface. This pattern lets the classes work together. Let's look at one example:
Consider that you are having an airline app that shows the flight details. This application is used in India. So, all the details such as flight price and flight time are according to Indian currency and Indian time respectively. So, for this, you can have one view class called " FlightView " that is having the view that shows the flight time and flight price. In this class, you can have a " ShowDetails() " methods that provide the flight time and flight price and then sets these value on some textview.
The problem arises when we have the details of two airlines of different countries let's say AirIndia and UnitedAirlines. The time and price of the AirIndia will be shown correctly because it is according to Indian standards. But the UnitedAirlines will be having timings and pricing according to the American time and currency. Both the classes have different time zone and currency. So, these two classes i.e. the "AirIndia" and "UnitedAirlines" are totally incompatible and here we need one Adapter to have communication between these two otherwise, we will end up having the price of UnitedAirlines in rupees(without any conversion from the dollar).
So let's create an interface Adapter named " FlightDetailAdapter ". This interface is having two methods that will return the time according to IST(Indian Standard Time) and the price will be in INR(i.e. Indian currency). The basic idea is we will implement this interface in various Airlines to get the details according to Indian standards. By using these methods we can have the timings and price of all the airlines according to the Indian time and Indian currency.
interface FlightDetailAdapter {
    // get price in indian rupees
    fun getPriceInINR()

    // get time in Indian Standard Time
    fun getTimeInIST()
}
After creating the interface, now we have to make two classes i.e. " AirIndiaFlightDetailAdapter " and " UnitedAirlinesFlightDetailAdapter ". Both of these classes will implement the same interface i.e. "FlightDetailAdapter".
The code for the "AirIndiaFlightDetailAdapter" will be:
class AirIndiaFlightDetailsAdapter: FlightDetailAdapter {

    // some AirIndiaApi that gives the time and price according to Indian standards
    var api:AirIndianApi = AirIndiaAPI()

    override fun getPriceInINR(): Int {
        // returns the price in INR
        return api.price
    }

    override fun getTimeInIST(): String {
        //returns the time in IST
        return api.time
    }
}
The code for the "UnitedAirlinesFlightDetailAdapter" will be:
class UnitedAirlinesFlightDetailAdapter: FlightDetailAdapter {
    // some UnitedAirlinesAPI that gives the time and price according to American standards
    var api:UnitedAirlinesAPI = UnitedAirlinesAPI()

    override fun getPriceInINR(): Int {
        // returns the price in INR
        return convertUSDToINR(api.price)
    }

    override fun getTimeInIST(): String {
        //returns the time in IST
        return convertESTToIST(api.time)
    }

    fun convertUSDToINR(price: Int): Int {
        // some logic
    }

    fun convertESTToIST(time: String): String {
        // some logic
    }
}
Now, we can write the code of our "FlightView" class that will show the time and price of the flights on the application:
class FlightView(context: Context) : View(context) {
    // showing flight details according to Indian time and price
    fun showFlightData(fda: FlightDetailAdapter) {
        priceTextView.text = fda.getPriceInINR()
        timeTextView.text = fda.getTimeInIST()
    }
}
Finally, you can call for the desired flight details i.e. you can call the AirIndia classes and the UnitedAirlines classes according to your need and show the correct output in the view. For showing the AirIndia flight details, just use:
val flightView: FlightView = FlightView()

// for showing AirIndia flight details
flightView.showFlightData(AirIndiaFlightDetailsAdapter())
And for showing the UnitedAirlines flight details, just use:
val flightView: FlightView = FlightView()

// for showing UnitedAirlines flight details
flightView.showFlightData(UnitedAirlinesFlightDetailAdapter())
In Android, RecyclerView and PagerAdapter are some of the good examples of the Adapter pattern.
This is how we can use the Adapter in Android that will help us in creating a connection between two incompatible classes.
Facade pattern
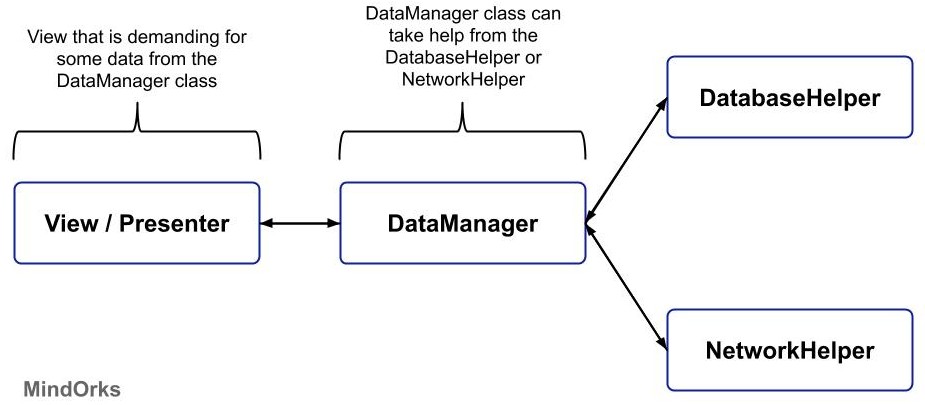
In the Facade pattern, a complicated system is wrapped into a simpler system that will help us in getting the values from the complicated system without having knowledge of how the data is being fetched and returned to the view or the presenter.
For example , We have one Presenter or View that shows us the users that are stored in the Database. So, the presenter demands the list of users by some DataManager class. The DataManager class deals with various data related things. It can have one NetworkHelper and one DatabaseHelper class. Internally, the DataManager may use the NetworkHelper or DatabaseHelper class to fetch the details, but our view or presenter is less bothered about that. It only needs the list of available users and nothing else. Even the view or presenter is unaware of the fact that there is some NerworkHelper or DatabaseHelper class.
Behavioural Pattern
Behavioural Pattern mainly tells how the objects of the classes will communicate with each other. These patterns help us in understanding the code in a better way because by viewing the code we can identify the pattern and then we can understand the code in a better way. Some of the behavioural patterns are Chain of Responsibility, Interpreter, Mediator, Observer, Command, Model View Controler, Model View ViewModel, etc.
Observer pattern
The observer pattern is like one-to-many(or one) dependencies between objects. For example , on YouTube, you can subscribe to a particular channel and if some video is uploaded on that channel then all its subscriber will be notified about the change or about the new video.
So, in Android also, when there is a change in some object, then the dependents of that object will be notified about the change and the possible update will be made accordingly in the dependents. This is called an Observer pattern because here we are observing for some change in the object.
For example , In Android, LiveData is an observable data holder class that enables the use of an observer pattern.
Learn how to use LiveData in Android.
Also, RxJava enables the use of an observer pattern in Android.
Command pattern
In the Command pattern, we give commands and we want our output and nothing else. We are not bothered about who will do our operation to give the desired result. All we want is our things to be done at the right time.
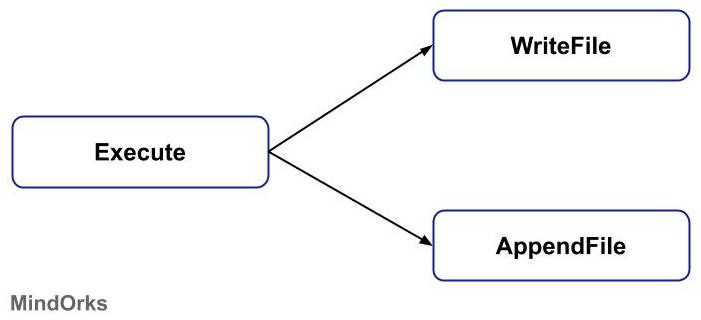
For example , You have an "Execute" interface and there are two classes that are implementing this "Execute" interface. One class is responsible for writing something in the file and the other class is responsible for appending the contents of a file. So, you can call any of these two classes i.e. the "WriteFile" and "AppendClass" with the help of "Execute" interface.
Model View Controller pattern
Model View Controller or MVC is an Architectural Design pattern this is used to write an organised code for Android applications. Code following the MVC pattern is divided into three parts:
- Model: It is the place where you write all your Business logic and data state. So, all the data classes of your application are considered as Model.
- View: It is the user interface that a user sees. In Android, the user interface is built with the help of XML. So, all the views that the user sees come under this category.
- Controller: A controller is simply a communication medium between the Model and the View. It takes the user input from the view. It processes the request and it sends the data from the Model to the view.
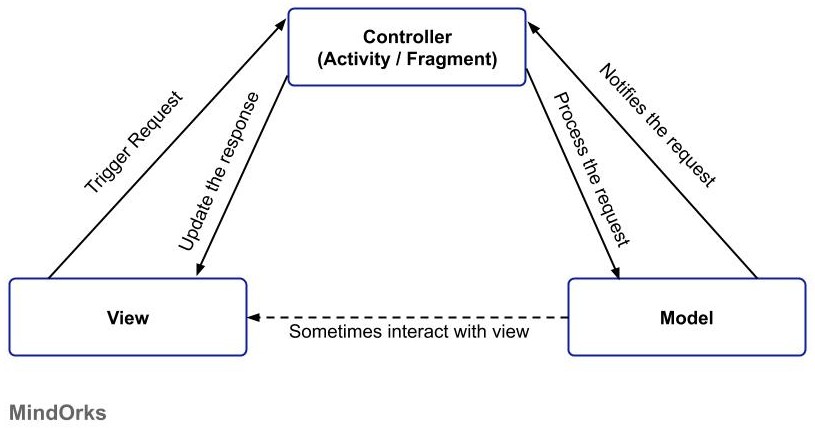
Nowadays, we don't use this pattern because it is declared as " Massive View Controller " for Android. Instead of MVC, we use MVP and MVVM.
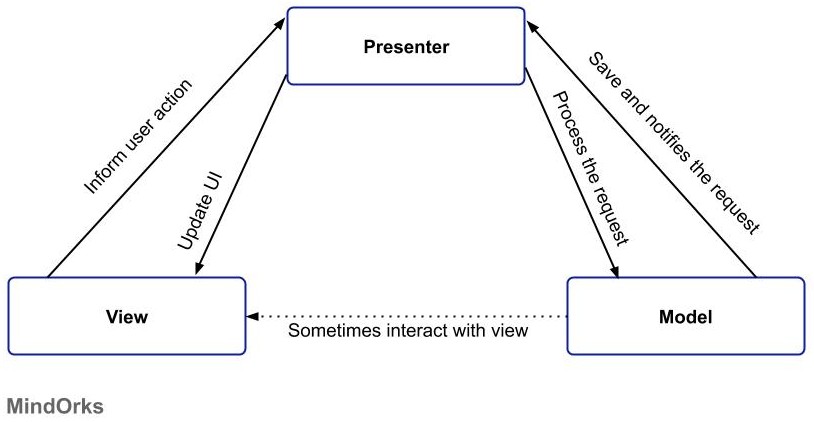
Model View Presenter
Model View Presenter or MVP is a set of guidelines that are followed to make the code reusable and testable because it decouples the whole code. MVP divides the application into three parts:
- Model: It is the place where you write all your Business logic and data state. So, all the data classes of your application are considered as Model.
- View: It is the user interface that a user sees. In Android, the user interface is built with the help of XML. So, all the views that the user sees come under this category.
- Presenter: The presenter is responsible for giving the data to the view. If view demands some data from the Model, then it is the presenter that will fetch the data from the Model and provide the data to the view to display the required details.
Model View ViewModel pattern
The Model View ViewModel or MVVC is similar to that of MVC but here the controller is replaced by the ViewModel. The three components of the Model View ViewModel are:
- Model: It is the place where you write all your Business logic and data state. So, all the data classes of your application are considered as Model.
- View: It is the user interface that a user sees. In Android, the user interface is built with the help of XML. So, all the views that the user sees come under this category.
- ViewModel: It is a bridge between the Model and the View. Here most of the user interface logic is stored. This is mainly used to store and manage the UI-related and it resolves one of the biggest problems of data loss that was faced due to screen rotation.
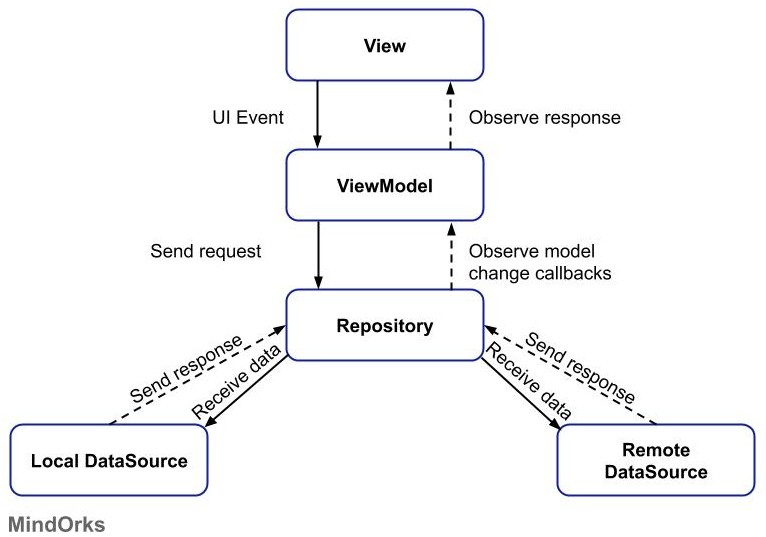
Have a look at our MVVM blog to have a better understanding of the same.
Clean Architecture
Clean Architecture defines the way in which the various layers of an app i.e. presentation, use case, domain, data, and framework layer interact with each other. The Clean Architecture produce a system that is testable, UI-independent, and independent of external agencies and libraries. The following image is a popular clean architecture image:
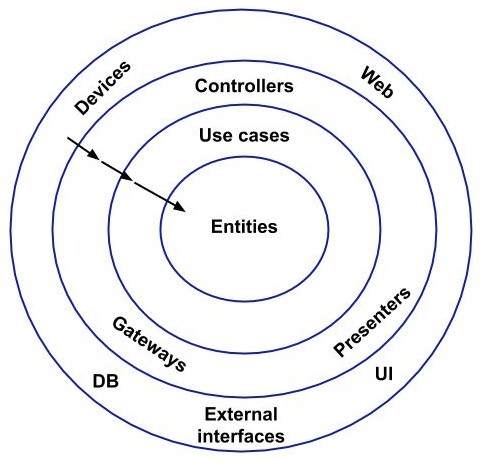
These circles represent the various levels in our application. As we move inward in the circle, each circle is more abstract and higher-level. The inner circle is not dependent on any outer circle and the most inner circle denotes the business logic of the application.
Conclusion
So in this blog, we learned about some of the Design Patterns that are used in Android to write a cleaner and understandable code. We learn about Builder pattern, Singleton pattern, Dependency Injection pattern, Adapter pattern, Facade pattern, Observer pattern, Command pattern, MVC, MVP, and MVVM pattern.
Hope you will apply these Design Patterns in your next Android Project :)
Have a look at our Interview Kit for company preparation.
Do share this blog with your fellow developers to spread the knowledge. You can read more blogs on Android on our blogging website .
Apply Now: MindOrks Android Online Course and Learn Advanced Android
Happy Learning :)
Team MindOrks!
Also, Let’s connect on Twitter , Linkedin , Github , and Facebook