Implementing Preferences Settings Screen in Android
There are certain situations when you want to have some kind of Settings in your application apart from the Android default Settings. For example, if you want to increase the text size of the text present in your application and not to increase the text size of all the applications present in the mobile device. Other examples include taking the current address of the user or setting the notification sound to a particular ringtone of your own choice. In order to use this functionality in our application, we can use the feature of Settings which is a part of Android Jetpack .
Settings allow the users to change the behavior and functionality of a particular application instead of changing the behavior and functionality of all the applications present in the mobile device. Also, the users don’t access the Settings frequently, because they change the Settings once and they rarely need to go back and change it again.
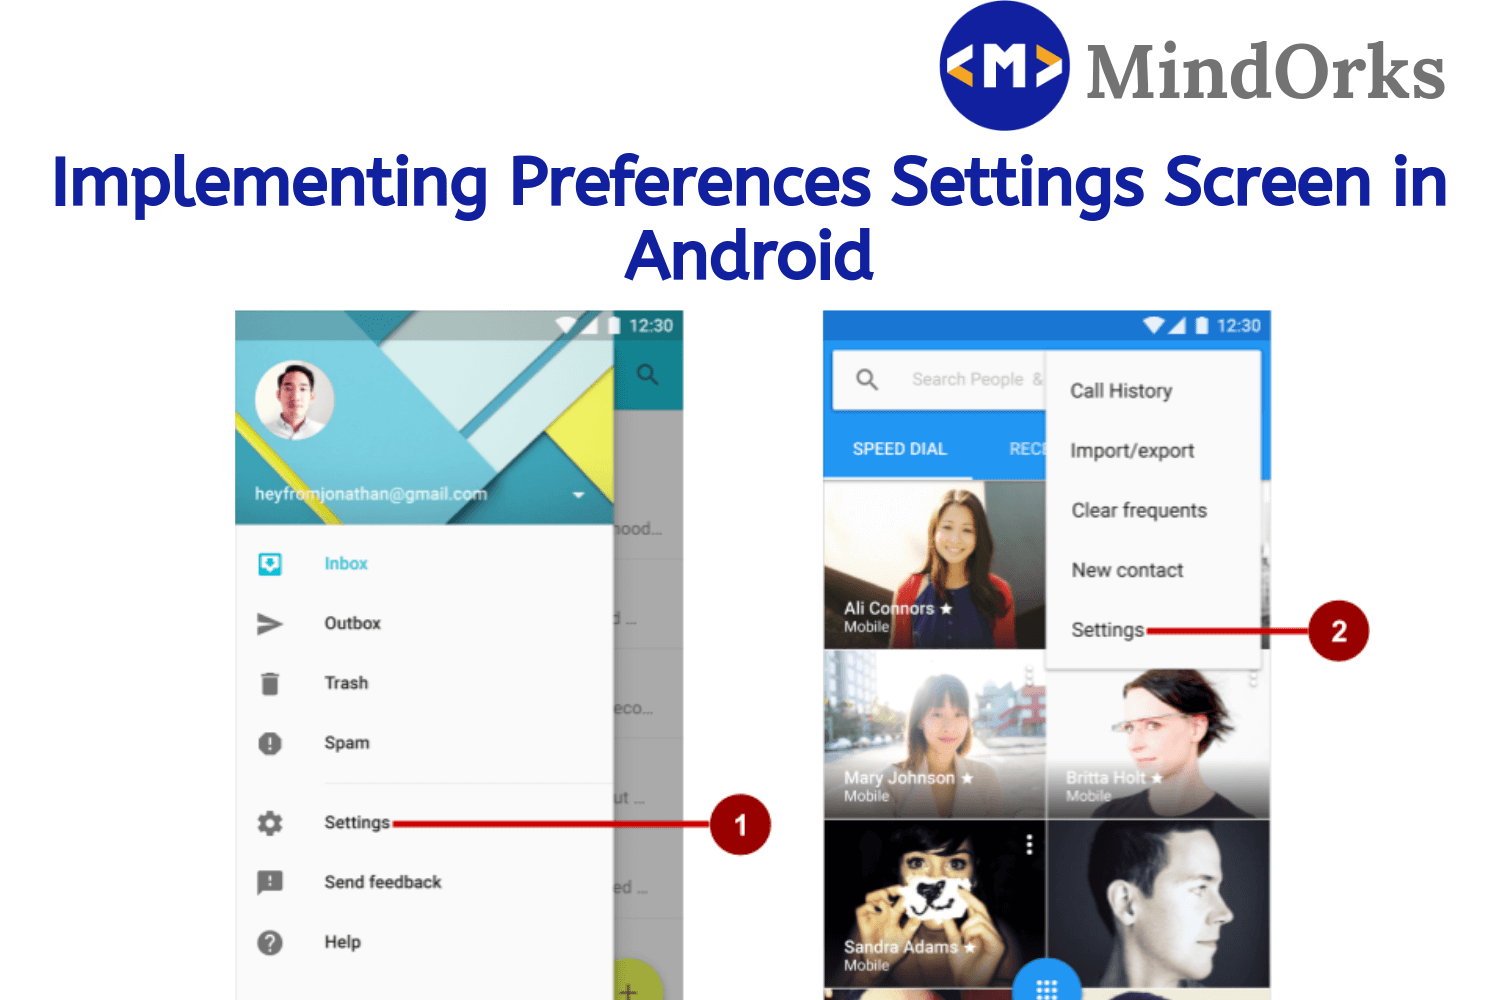
Also, the user prefers to change the settings of the application by clicking on the Settings present inside navigation or is present in the menu item like below:
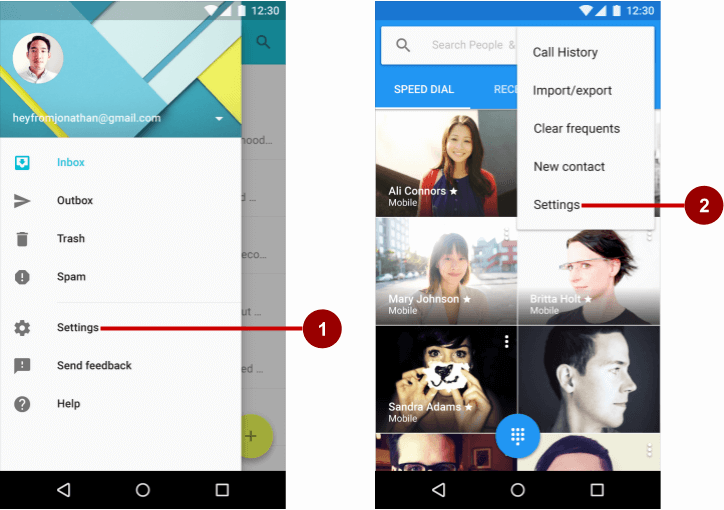
Image Courtesy: Android Codelabs
If you are putting this Setting option anywhere in the application apart from the above mentioned two places, then it will result in bad user experience.
In this blog, we will learn how to implement Preference Settings in our application to change the behavior of our application. So, let’s get started.
Creating a project with the Settings option
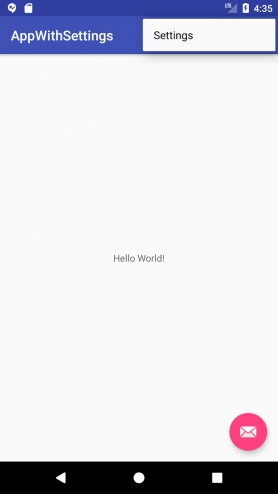
Android Studio provides a shortcut for using the Settings feature in the menu item of your application. All you have to do is create a new project in Android Studio with Basic Activity template (not Empty Activity). The Basic Activity template includes a Setting option in the menu and a floating action button as shown below:
Another way of creating a Setting Activity is to go to your Java/Kotlin code folder in your Android project and then right click > new > Activity > Settings Activity . By adding a Settings Activity, you will be given three options as below:
Here you will get options like:
- General: You can change the Display name. Other options available here are: Enable social recommendations and Add friends to messages.
- Notification: Here you will we give with options to change the Ringtone of the notification along with vibrate option.
- Data & sync: Here you will find an option to set the sync frequency of your application.
If your application needs one or all the above three mentioned features, then you can add a Settings Activity, but if you want some customized settings in your application, then you should be using the first option of using the Settings option in your application by creating a Basic Activity. In this blog, we will look at how to implement the Settings by using the Basic Activity.
Adding xml for Settings
Till now, we have added the Settings options in our application by using the Basic Activity. You can manually add the Settings option in the menu item in your application. Now, our next step is to add the UI for the Settings i.e. the UI of the page that will be opened after clicking on the Settings option.
Navigate to the res folder and add an XML directory if not present with name xml . Now, in the res/xml folder, create an xml file named preference_main.xml . Here in the preference_main.xml , we will add the options that will be shown to us when we click on the Settings option.
In the preference_main.xml file, we can add the below properties:
- EditTextPreference: This is same as a normal EditText that can be used to collect some data from the user. It can be the name of the user or the name of the directory of the application where the user is storing some data of the app.
- CheckBoxPreference: This is used to select more than one option at a time. One example of this can be checking the option of file uploading using wifi as well as the cellular data.
- RingtonePreference: This can be used to change the ringtone of the notification that comes from the application. This option is also present in the default Settings Activity.
- SwitchPreference: This is used to turn on or turn off a certain service in the application. One example of this can be turning the vibration on and off.
- Preference: To add some TextView that is not clickable or to use the TextView to open into the browser, then you can use preference.
- List Preference: This can be used to display a list of items and you can choose one of them.
Before moving on to the xml code, you should know the concept of PreferenceScreen and PreferenceCategory.
In the PreferenceScreen tag, all the preferences will be present i.e. it holds all the preferences that you are having in your application.
In the PrefernceCategory tag, you divide your preferences in a certain category and then display them together. For example, you can put the preferences for altering the media of an application in one category and about section in another category. This is the same as using categories in Navigation Drawer. This will help the user to have a clear vision of the functionality of the application.
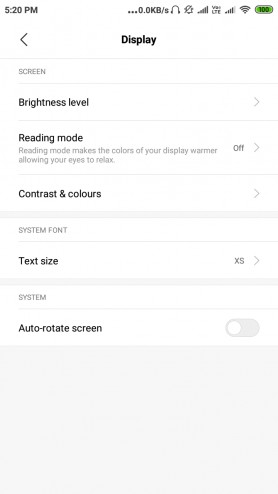
In the above image, the Screen related settings are put in one category and the System Font and System are put into some other category.
Now, let’s add the Preferences in our application:
<?xml version="1.0" encoding="utf-8"?>
<PreferenceScreen xmlns:android="http://schemas.android.com/apk/res/android">
    <PreferenceCategory android:title="General">
        <EditTextPreference
            android:defaultValue="@string/default_gallery_storage"
            android:key="@string/key_gallery_name"
            android:summary="@string/default_gallery_storage"
            android:title="@string/title_gallery_storage" />

        <CheckBoxPreference
            android:defaultValue="true"
            android:key="@string/key_upload_over_wifi"
            android:summary="@string/summary_upload_over_wifi"
            android:title="@string/title_auto_upload" />

        <ListPreference
            android:defaultValue="3"
            android:dialogTitle="@string/title_upload_quality"
            android:entries="@array/pref_upload_quality_entries"
            android:entryValues="@array/pref_upload_quality_values"
            android:key="@string/key_upload_quality"
            android:summary="@string/summary_upload_video_quality"
            android:title="@string/title_upload_quality" />

    </PreferenceCategory>

    <PreferenceCategory android:title="@string/pref_title_notifications">

        <SwitchPreference
            android:defaultValue="true"
            android:key="@string/notifications_new_message"
            android:title="@string/title_new_notification_sound" />

        <RingtonePreference
            android:defaultValue="content://settings/system/notification_sound"
            android:dependency="notifications_new_message"
            android:key="@string/key_notifications_new_message_ringtone"
            android:ringtoneType="notification"
            android:summary="@string/summary_choose_ringtone"
            android:title="@string/pref_title_ringtone" />

        <SwitchPreference
            android:defaultValue="true"
            android:key="@string/key_vibrate"
            android:summary="@string/summary_vibrate"
            android:title="@string/title_vibrate" />
    </PreferenceCategory>

    <PreferenceCategory android:title="@string/pref_header_about">

        <Preference
            android:summary="@string/app_version"
            android:title="@string/title_version" />

        <!-- preference opens url in browser -->
        <Preference
            android:summary="View Website"
            android:title="Website">
            <intent
                android:action="android.intent.action.VIEW"
                android:data="@string/url_faq" />
        </Preference>

    </PreferenceCategory>

</PreferenceScreen>
In order to add the ListPrefernce in your activity, you have to declare an array that can be displayed in the list.
Now to have the same UI for devices of different screen size and to have proper functioning of Settings in our application, make a class called AppCompatPreference.kt:
abstract class AppCompatPreferenceActivity : PreferenceActivity() {

    private var mDelegate: AppCompatDelegate? = null

    val supportActionBar: ActionBar?
        get() = delegate?.supportActionBar

    private val delegate: AppCompatDelegate?
        get() {
            if (mDelegate == null) {
                mDelegate = AppCompatDelegate.create(this, null)
            }
            return mDelegate
        }

    override fun onCreate(savedInstanceState: Bundle?) {
        delegate?.installViewFactory()
        delegate?.onCreate(savedInstanceState)
        super.onCreate(savedInstanceState)
    }

    override fun onPostCreate(savedInstanceState: Bundle?) {
        super.onPostCreate(savedInstanceState)
        delegate?.onPostCreate(savedInstanceState)
    }

    fun setSupportActionBar(toolbar: Toolbar?) {
        delegate?.setSupportActionBar(toolbar)
    }

    override fun getMenuInflater(): MenuInflater? {
        return delegate?.menuInflater
    }

    override fun setContentView(@LayoutRes layoutResID: Int) {
        delegate?.setContentView(layoutResID)
    }

    override fun setContentView(view: View) {
        delegate?.setContentView(view)
    }

    override fun setContentView(view: View, params: ViewGroup.LayoutParams) {
        delegate?.setContentView(view, params)
    }

    override fun addContentView(view: View, params: ViewGroup.LayoutParams) {
        delegate?.addContentView(view, params)
    }

    override fun onPostResume() {
        super.onPostResume()
        delegate?.onPostResume()
    }

    override fun onTitleChanged(title: CharSequence, color: Int) {
        super.onTitleChanged(title, color)
        delegate?.setTitle(title)
    }

    override fun onConfigurationChanged(newConfig: Configuration) {
        super.onConfigurationChanged(newConfig)
        delegate?.onConfigurationChanged(newConfig)
    }

    override fun onStop() {
        super.onStop()
        delegate?.onStop()
    }

    override fun onDestroy() {
        super.onDestroy()
        delegate?.onDestroy()
    }

    override fun invalidateOptionsMenu() {
        delegate?.invalidateOptionsMenu()
    }
}
Now we have to write the code to handle all the activities of Settings activity. Write the below code that corresponds to various activities of teh Settings Activity:
class SettingsActivity : AppCompatPreference() {

    override fun onCreate(savedInstanceState: Bundle?) {
        super.onCreate(savedInstanceState)
        supportActionBar!!.setDisplayHomeAsUpEnabled(true)

        // load settings fragment
        fragmentManager.beginTransaction().replace(android.R.id.content, MainPreferenceFragment()).commit()
    }

    class MainPreferenceFragment : PreferenceFragment() {
        override fun onCreate(savedInstanceState: Bundle?) {
            super.onCreate(savedInstanceState)
            addPreferencesFromResource(R.xml.pref_main)

            // gallery EditText change listener
            bindPreferenceSummaryToValue(findPreference(getString(R.string.key_gallery_name)))

            // notification preference change listener
            bindPreferenceSummaryToValue(findPreference(getString(R.string.key_notifications_new_message_ringtone)))
        }
    }

    override fun onOptionsItemSelected(item: MenuItem): Boolean {
        if (item.itemId == android.R.id.home) {
            onBackPressed()
        }
        return super.onOptionsItemSelected(item)
    }

    companion object {
        private val TAG = SettingsActivity::class.java!!.getSimpleName()

        private fun bindPreferenceSummaryToValue(preference: Preference) {
            preference.onPreferenceChangeListener = sBindPreferenceSummaryToValueListener

            sBindPreferenceSummaryToValueListener.onPreferenceChange(preference,
                    PreferenceManager
                            .getDefaultSharedPreferences(preference.context)
                            .getString(preference.key, ""))
        }

        private val sBindPreferenceSummaryToValueListener = Preference.OnPreferenceChangeListener { preference, newValue ->
            val stringValue = newValue.toString()

            if (preference is ListPreference) {
                // For list preferences, look up the correct display value in
                // the preference's 'entries' list.
                val index = preference.findIndexOfValue(stringValue)

                // Set the summary to reflect the new value.
                preference.setSummary(
                        if (index >= 0)
                            preference.entries[index]
                        else
                            null)

            } else if (preference is RingtonePreference) {
                // For ringtone preferences, look up the correct display value
                // using RingtoneManager.
                if (TextUtils.isEmpty(stringValue)) {
                    // Empty values correspond to 'silent' (no ringtone).
                    preference.setSummary(R.string.pref_ringtone_silent)

                } else {
                    val ringtone = RingtoneManager.getRingtone(
                            preference.getContext(), Uri.parse(stringValue))

                    if (ringtone == null) {
                        // Clear the summary if there was a lookup error.
                        preference.setSummary(R.string.summary_choose_ringtone)
                    } else {
                        // Set the summary to reflect the new ringtone display
                        // name.
                        val name = ringtone.getTitle(preference.getContext())
                        preference.setSummary(name)
                    }
                }

            } else if (preference is EditTextPreference) {
                if (preference.getKey() == "key_gallery_name") {
                    // update the changed gallery name to summary filed
                    preference.setSummary(stringValue)
                }
            } else {
                preference.summary = stringValue
            }
            true
        }
    }
}
Finally connect your Settings Activity with the Settings option present in the menu item of MainActivity. Use the below code:
override fun onOptionsItemSelected(item: MenuItem): Boolean {
    val id = item.itemId

    if (id == R.id.action_settings) {
        // launch settings activity
        startActivity(Intent(this@MainActivity, SettingsActivity::class.java))
        return true
    }

    return super.onOptionsItemSelected(item)
}
Run the application and try to explore the various options present on the Settings options. Also, try to add some more functionalities to the Settings Activity.
To learn more about the Settings Preferences in Android, go to the official website of Android Developer .
Also, you can perform some codelabs i.e. hands-on experience with the Preference Settings at Google Codelabs .
That’s it for this blog. Keep Learning :)
Team MindOrks!