Implementing Android Jetpack Preferences
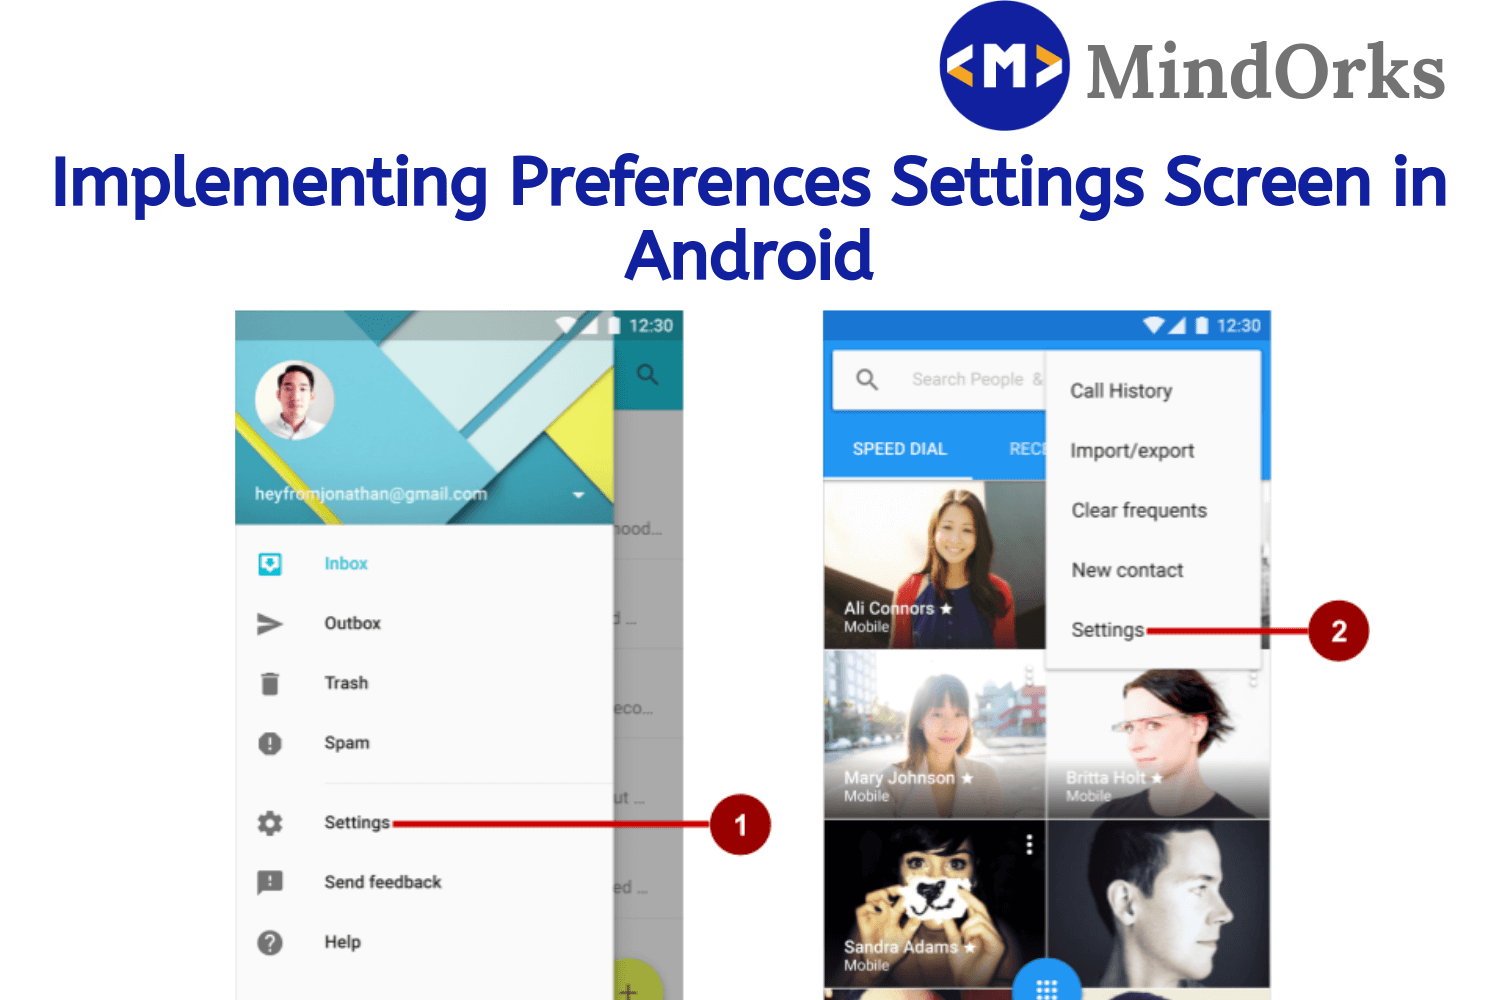
Implementing a Settings screen in your application is the best way to provide a better user experience by giving users various options to use the application according to the way they want. For example, your application can let the user select the tone for the notification received from the application. One of the live examples of these preferences in android can be the YouTube application, where you can change the theme of the application by just selecting the theme option available in the app. You can find this Settings option in almost each and every application that you use. So, to go with the trend, you should learn how to implement the Preferences in your application by using the best possible and easiest way.
If you are looking for "Jetpack DataStore Preferences". Check here.
If you have used the Preferences in your application then you must be thinking that how is this task easy? Yeah, using Preferences is very easy because we can use the Preference Library which is a part of Android Jetpack . This will reduce your time of writing the code for the same. So, without wasting any time, let’s get started.
Before getting started
Before getting started with Preferences, we should know the ways that can be used to use Preferences in our application. There are two ways of using the preferences in our application. They are:
- The XML way: Here, you declare all your preferences in an XML file and use this file in your activity.
- The coding way: Apart from XML, you can also write codes for the Preferences in your activity. If you want to build an Android app without writing so many lines of code, then you shouldn’t use this.
After knowing the ways of using Preferences in our application, the next thing that should be taken care of is the library that is used for using the Preferences. Add the below line in your app-level build.gradle file to use the Preferences Library:
implementation 'androidx.preference:preference:1.1.0-alpha05'Also, in order to add the Preferences in your app, you have to add an XML directory. In this directory, you can write the XML code for your preferences. So, in the res directory create an XML directory.
You can add a Preference Screen by adding the PreferenceScreen tag in your XML file. Inside this tag, you can add your preferences using the Preference tag. So, the basic structure of the Preference XML file will be:
<PreferenceScreen>
    <Preference>
        <!-- preference1 -->
    </Preference>
    <Preference>
        <!-- preference2 -->
    </Preference>
</PreferenceScreen>
Also, you can use the PreferenceCategory tag to put your preferences in a category. For example, you can group together the UI Preferences in one group and the sounds Preferences in the other category.
After having the basic idea of the Preferences, let’s learn all the Preferences one by one.
Basic Preferences
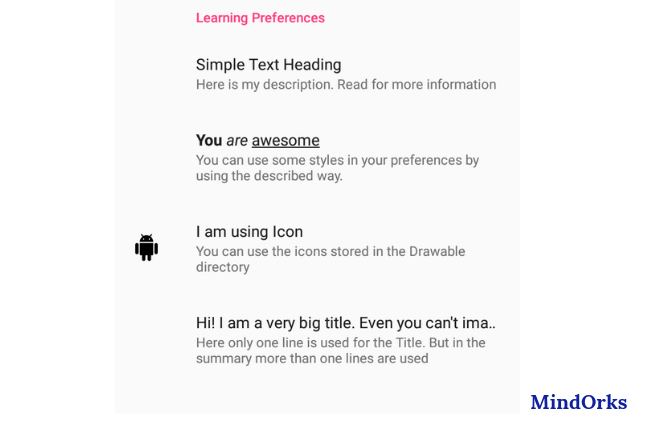
You can perform a number of tasks using the Settings option of your application, but the easiest and the most common ones are Simple Text , Simple Text with some summary , Simple Text with icon and Simple Text with some styles or text decoration .
In order to use a simple text Preference, add the below code in your XML file under PreferenceScreen:
<Preference
    app:key="preference_example"
    app:title="@string/title_preference"
    app:summary="@string/summary_preference"/>
Here, app:key is used to uniquely identify a preference. By doing so, you can easily retrieve the value of a particular Preference. app:title is used to add the title of the Preference and app:summary is used to provide some summary to the preferences. This is generally used to describe what the preference is all about.
To style your simple text Preference you can add styles in your string and use the same string in your XML. For example, add the below string in your res/values/strings.xml :
<string name="title_preference"><b>You</b> <i>are</i> <u>awesome</u></string>
<string name="summary_preference">You can use some styles in your preferences by using the described way.</string>
After that, all you need to do is just add the title and summary in your XML file:
<Preference
    app:key="stylized_example"
    app:title="@string/title_preference"
    app:summary="@string/summary_preference"/>
You can add some icons to your Preferences by using the app:icon attribute.
<Preference
    app:key="icon_example"
    app:title="@string/title_preference"
    app:summary="@string/summary_preference"
    app:icon="@drawable/ic_android"/>
If the texts used in your Preferences are not fitting in one line due to screen size or larger font size or any other reason, you can use the app:singleLineTitle attribute to display only that amount of text that is fitted in the screen.
<Preference
    app:key="single_line_title"
    app:title="@string/title_single_line_title_preference"
    app:summary="@string/summary_single_line_title_preference"
    app:singleLineTitle="true"/>
So, the following is the output of all the above Basic Preferences:
In order to use Preferences by writing codes, you can use the below code:
val simplePreference = Preference(context).apply {
    key = "simple_preference" //to set the KEY
    title = "Titie of Preference" //to set the TITLE
    summary = "Summary of Preference" //to set the SUMMARY
    icon = ContextCompat.getDrawable(context, R.drawable.ic_android) //to add ICON
    isSingleLineTitle = true //to set one line title
}
Dialogs
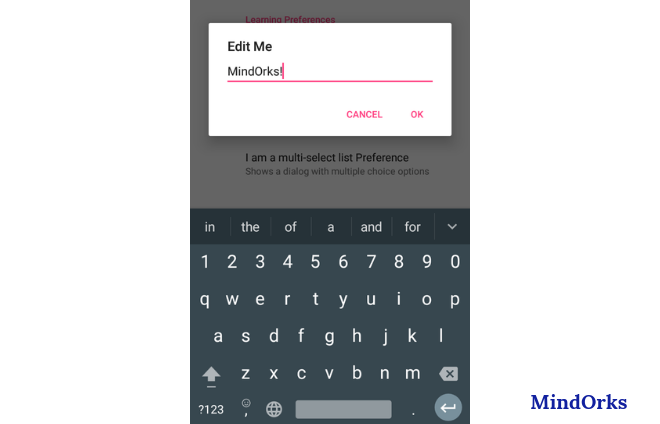
You can use Dialogs in your Preferences. That dialog can be of any type i.e. you can use some Alert dialog or an EditText dialog or some dialog having single or multi-select list Preference.
In order to use an EditText Preference, just use the EditTextPrefernce tag and the best part of it is, by using the app:useSimpleSummaryProvider attribute, you can set your summary to the text entered in the EditText.
<EditTextPreference
    app:key="edittext_example"
    app:title="@string/title_preference"
    app:useSimpleSummaryProvider="true"
    app:dialogTitle="@string/dialog_title_preference"/>
If you don’t want to use the XML file, then you can use the EditText preference by using the below code:
val editTextPreference = EditTextPreference(context).apply {
    key = "edittext_example"
    ...
}
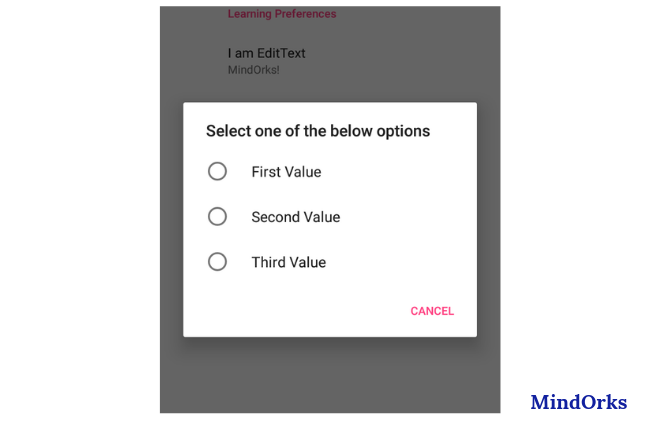
To use a ListPrefernce , use the ListPrefernce tag and put your entries in the list by using the app:entries tag. Also, you define the values that are associated with each entry of the list by using the app:entryValues . So, add the below entries and values in your res/arrays.xml file:
<string-array name="entries">
    <item>First Value</item>
    <item>Second Value</item>
    <item>Third Value</item>
</string-array>

<string-array name="entry_values">
    <item>1</item>
    <item>2</item>
    <item>3</item>
</string-array>
After adding entries, use the ListPreference tag to add the List Preference:
<ListPreference
    app:key="list_example"
    app:title="@string/title_preference"
    app:useSimpleSummaryProvider="true"
    app:entries="@array/entries"
    app:entryValues="@array/entry_values"
    app:dialogTitle="@string/dialog_title_preference"/>
To use a ListPreference programmatically, you can use the below code:
val listPreference = ListPreference(context).apply {
    key = "list_example"
    title = "@string/title_preference"
    entries = arrayOf("First Value", "Second Value", "Third Value")
    entryValues = arrayOf("1", "2", "3")
}
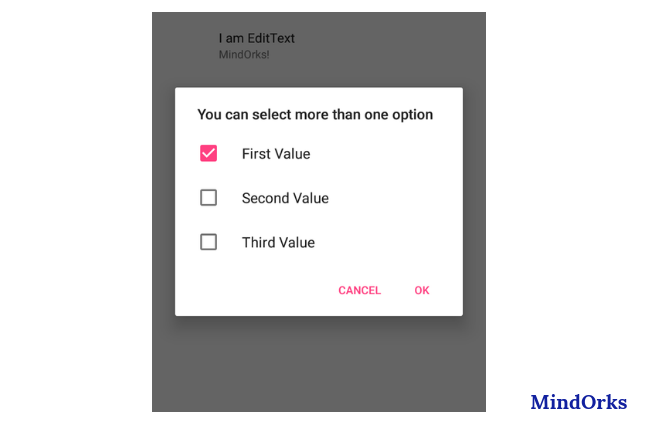
Finally, if you want to use the Multi-Select ListPreference, you can use the MultiSelectListPreference tag like below:
<MultiSelectListPreference
    app:key="multi_select_list"
    app:title="@string/title_preference"
    app:summary="@string/summary_preference"
    app:entries="@array/entries"
    app:entryValues="@array/entry_values"
    app:dialogTitle="@string/dialog_title_preference"/>
To use the MultiSelectListPreference programmatically, you can use the below code:
val multiSelectListPreference = MultiSelectListPreference(context).apply {
    key = "multi_select_list"
    title = "@string/title_preference"
    summary = "@string/summary_preference"
    entries = arrayOf("First Value", "Second Value", "Third Value")
    entryValues = arrayOf("1", "2", "3")
}
Widgets
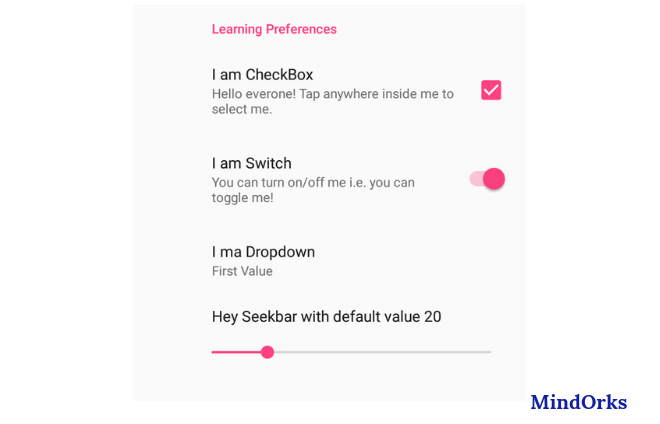
You can use various widgets such as Checkbox , Switch , Dropdown, and Seekbar in our Preference.
To use a Checkbox in your Preference, you can use the CheckBoxPreference in your XML file:
<CheckBoxPreference
    app:key="checkbox_example"
    app:title="@string/title_preference"
    app:summary="@string/summary_preference"/>
To implement programmatically, you can use:
val checkBoxPreference = CheckBoxPreference(context).apply {
    key = "checkbox_example"
    ...//other attributes
}
To use the Switch Preference, you can use the SwitchPreferenceCompat in your XML file:
<SwitchPreferenceCompat
    app:key="switch_example"
    app:title="@string/title_preference"
    app:summary="@string/summary_preference"/>
To implement programmatically, you can use:
val switchPreference = SwitchPreferenceCompat(context).apply {
    key = "checkbox_example"
    ...//other attributes
}
You can use the Drop Down Preference in the same way as used for the ListPreference, but here, you have to use the DropDownPreference tag:
<DropDownPreference
    app:key="dropdown_example"
    app:title="@string/title_preference"
    app:useSimpleSummaryProvider="true"
    app:entries="@array/entries"
    app:entryValues="@array/entry_values"/>
To implement Drop Down programmatically, you can use:
val dropDownPreference = DropDownPreference(context).apply {
    key = "dropdown_example"
    title = "@string/title_preference"
    ...//entries and entries values same as ListPrefernces
}
To use a Seek bar Preference, you can use the SeekBarPrefernce tag in your XML file:
<SeekBarPreference
    app:key="seekbar_example"
    app:title="@string/title_preference"
    app:defaultValue="20"/>
The app:defaultValue is used to set the default value of the SeekBar out of 100. Also, you can change the maximum value i.e. instead of 100, you can set your maximum value by using app:max attribute.
To use the SeekBar programmatically, use the below code:
val seekBarPreference = SeekBarPreference(context).apply {
    key = "seekbar_example"
    title = "@string/title_preference"
    setDefaultValue(20)
}
Following is the example of Widgets used as Preferences:
Expandable Preferences
Sometimes, we just need not show all the preferences present in a category. So, instead of showing all the Preferences, just show some or none of them and if the user clicks on the Expandable Preference, then the Preference will be expanded and you will see the whole Preference list.
So, to use an Expandable Preference, all you need to do is just add the app:initialExpandedChildrenCount attribute in your PreferenceCategory and set the value to the number of Preferences that you want to show when the Preference is not expanded.
<PreferenceScreen
    xmlns:app="http://schemas.android.com/apk/res-auto"
    xmlns:android="http://schemas.android.com/apk/res/android">

    <PreferenceCategory
        app:key="advanced"
        app:title="Learning Preferences"
        app:initialExpandedChildrenCount="1">

        <Preference
            app:key="expandable_example"
            app:title="Hello I am Simple text"
            app:summary="I am the preference that will be showed when the preference is not expanded"/>

        <Preference
            app:title="MindOrks"
            app:summary="Click me to open the MindOrks website">

            <intent android:action="android.intent.action.VIEW"
                    android:data="https://mindorks.com/"/>

        </Preference>

        <SwitchPreferenceCompat
            app:key="parent"
            app:title="I am Switch"
            app:summary="You can turn me on/off i.e. you can toggle me!"/>

    </PreferenceCategory>

</PreferenceScreen>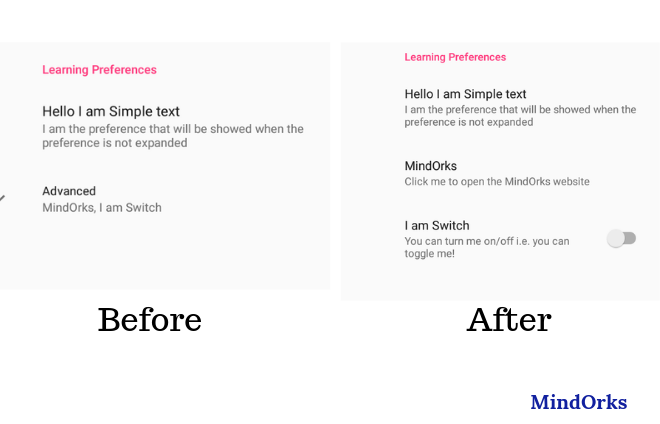
Using Preferences in our Project
After looking at various types of Preferences that can be used in Settings, let’s look at how we can display this on our Activity or simply let’s look at how to connect these XML files with our Activity.
To display your Preference’s XML file, all you need to do is just use the setPreferencesFromResource() . For example:
class PreferencesExample : PreferenceFragmentCompat() {
    override fun onCreatePreferences(savedInstanceState: Bundle?, rootKey: String?) {
        setPreferencesFromResource(R.xml.mainfile, rootKey)
    }
}
So, let’s look at one example.
Create a project in Android Studio and add the dependency of the Preferences Library in your app level build.gradle file.
After adding the dependency, add the below code for the activity_main.xml file:
<LinearLayout
    xmlns:android="http://schemas.android.com/apk/res/android"
    android:layout_width="match_parent"
    android:layout_height="match_parent">
    <FrameLayout
        android:id="@+id/preferences"
        android:layout_width="match_parent"
        android:layout_height="match_parent"/>
</LinearLayout>
Now in the res/xml directory, create an XML file named mainfile.xml and add the below code:
<PreferenceScreen
    xmlns:app="http://schemas.android.com/apk/res-auto">

    <Preference
        app:title="Basic Preferences"
        app:summary="Here you will find some of the Basic Preferences"
        app:fragment="com.example.androidx.preference.sample.MainActivity$BasicPreferences"/>

    <Preference
        app:title="Widget Preferences"
        app:summary="Here you will find some of the Widget Preferences"
        app:fragment="com.example.androidx.preference.sample.MainActivity$WidgetPreferences"/>

    <Preference
        app:title="Dialog Preferences"
        app:summary="Here you will find some of the Dialog Preferences"
        app:fragment="com.example.androidx.preference.sample.MainActivity$DialogPreferences"/>

    <Preference
        app:title="@string/advanced_attributes"
        app:summary="Here you will find Expandable Preferences"
        app:fragment="com.example.androidx.preference.sample.MainActivity$ExpandablePreferences"/>

</PreferenceScreen>
The above file is used to link various Preferences with the help of basic simple text Preferences.
Now in the same res/xml directory, add four more files for Basic Preference (name: basic_preferences.xml ), Widgets Preferences (name: widgets.xml ), Dialog Preferences (name: dialogs.xml ) and for Expandable Preferences (name: expandable.xml ). Add the codes of the respective preferences that we have learned in the blog. For example, the code for the basic_preferences.xml looks like:
<PreferenceScreen
    xmlns:app="http://schemas.android.com/apk/res-auto">

    <PreferenceCategory
        app:title="Learning Preferences">

        <Preference
            app:key="preference"
            app:title="Simple Text Heading"
            app:summary="Here is my description. Read for more information"/>

        <Preference
            app:key="stylized"
            app:title="@string/title_stylish_preference"
            app:summary="@string/summary_stylish_preference"/>

        <Preference
            app:key="icon"
            app:title="I am using Icon"
            app:summary="You can use the icons stored in the Drawable directory"
            app:icon="@drawable/ic_android"/>

        <Preference
            app:key="single_line_title"
            app:title="Hi! I am a very big title. Even you can't imagin how bif I am "
            app:summary="Here only one line is used for the Title. But in the summary more than one lines are used"
            app:singleLineTitle="true" />
    </PreferenceCategory>

</PreferenceScreen>
After adding the XML codes for the rest of the Preference files, add the below code for the MainActivity.kt file:
private const val TITLE_TAG = "preferencesActivityTitle"

class MainActivity : AppCompatActivity(),
        PreferenceFragmentCompat.OnPreferenceStartFragmentCallback {

    override fun onCreate(savedInstanceState: Bundle?) {
        super.onCreate(savedInstanceState)
        setContentView(R.layout.activity_main)
        if (savedInstanceState == null) {
            supportFragmentManager
                    .beginTransaction()
                    .replace(R.id.preferences, PreferencesExample())
                    .commit()
        } else {
            title = savedInstanceState.getCharSequence(TITLE_TAG)
        }
        supportFragmentManager.addOnBackStackChangedListener {
            if (supportFragmentManager.backStackEntryCount == 0) {
                setTitle(R.string.title)
            }
        }
        supportActionBar?.setDisplayHomeAsUpEnabled(true)
    }

    override fun onSaveInstanceState(outState: Bundle) {
        super.onSaveInstanceState(outState)
        // Save current activity title so we can set it again after a configuration change
        outState.putCharSequence(TITLE_TAG, title)
    }

    override fun onSupportNavigateUp(): Boolean {
        if (supportFragmentManager.popBackStackImmediate()) {
            return true
        }
        return super.onSupportNavigateUp()
    }

    override fun onPreferenceStartFragment(
            caller: PreferenceFragmentCompat,
            pref: Preference
    ): Boolean {
        // Instantiate the new Fragment
        val args = pref.extras
        val fragment = supportFragmentManager.fragmentFactory.instantiate(
                classLoader,
                pref.fragment
        ).apply {
            arguments = args
            setTargetFragment(caller, 0)
        }
        // Replace the existing Fragment with the new Fragment
        supportFragmentManager.beginTransaction()
                .replace(R.id.preferences, fragment)
                .addToBackStack(null)
                .commit()
        title = pref.title
        return true
    }

    /**
     * The mainfile preference fragment that displays preferences that link to the other preference
     * fragments below.
     */
    class PreferencesExample : PreferenceFragmentCompat() {
        override fun onCreatePreferences(savedInstanceState: Bundle?, rootKey: String?) {
            setPreferencesFromResource(R.xml.mainfile, rootKey)
        }
    }

    /**
     * A preference fragment that demonstrates commonly used preference attributes.
     */
    class BasicPreferences : PreferenceFragmentCompat() {
        override fun onCreatePreferences(savedInstanceState: Bundle?, rootKey: String?) {
            setPreferencesFromResource(R.xml.basic_preferences, rootKey)
        }
    }

    /**
     * A preference fragment that demonstrates preferences which contain dynamic widgets.
     */
    class WidgetPreferences : PreferenceFragmentCompat() {
        override fun onCreatePreferences(savedInstanceState: Bundle?, rootKey: String?) {
            setPreferencesFromResource(R.xml.widgets, rootKey)
        }
    }

    /**
     * A preference fragment that demonstrates preferences that launch a dialog when tapped.
     */
    class DialogPreferences : PreferenceFragmentCompat() {
        override fun onCreatePreferences(savedInstanceState: Bundle?, rootKey: String?) {
            setPreferencesFromResource(R.xml.dialogs, rootKey)
        }
    }

    /**
     * A preference fragment that demonstrates more expandable attributes and functionality.
     */
    class ExpandablePreferences : PreferenceFragmentCompat() {
        override fun onCreatePreferences(savedInstanceState: Bundle?, rootKey: String?) {
            setPreferencesFromResource(R.xml.expandable, rootKey)
        }
    }
}
Finally, run your application on your mobile phone. You can use these Preference settings in your application.
Conclusion
In this blog, we learned how to use the Preferences in our Application. Preferences are the part of Android Jetpack and are used to apply some settings preferences to our application that helps in better user experience.
That’s it for this blog. Keep Learning :)
Team MindOrks!

