Implementing Easy Permissions in Android: Android Tutorial

While building or developing an Android application, you come across a situation where you need to use the feature of some other system applications present in every mobile device. For example, if you are making an Image Gallery application, then apart from your application’s feature, you will also need to use the functionality of system applications like Camera and File Storage for the proper working of your application. One way of achieving the same is by making your own Camera or File storage app. Will you do it? Yeah, definitely you can do it but is this a wise step to write so many lines of codes for the thing that you can achieve by just writing 4–5 lines of code?
In Android, whenever you install an application in your mobile, then the Android System will install that app with a unique user ID and each and every file associated with that application will only be visible to that app only and not to any other application present in the device. So, in order to use the functionality of system apps, you have to explicitly take permission from the user to allow access to that particular thing.
So, in this blog, we will learn how to use Implement Permissions using Easy Permission . So far so good, let’s get started.
Android Permission
In order to protect the privacy of an Android User, Android introduces the concept of permission . In order to use some data or some feature of the system(camera, storage, etc), you have to explicitly request for that permission. The user may or may not give that permission to a particular application demanding for particular permission.
The idea is to prevent the applications to perform any operations of its choice, as doing so will affect the performance of other applications present in the device and this will also result in less user privacy.
Before the Android API level 23, all the permissions required by the application must be taken at the time of installation of the application in the mobile device. If the user has granted the permission, then the app will work normally. But if permission is not granted, then the user will not be able to perform that task whose permission is not granted. For example, if the app is requesting permission for Camera and Wifi, and the user has given the Wifi permission only, then the user will not be able to use the Camera feature.
For API level 23 or higher, Android introduces the concept of Runtime Permission to take permissions from the users.
Runtime Permission
In the API level 23 or higher, there is a feature called the Runtime Permission. By using the Runtime Permission, you need not ask for all the permissions for the application at the time of app installation. You can request for permission at runtime also. For example, suppose your app contains a feature to upload some image. But this feature is very less used by users. So, instead of taking permission at the runtime for Camera, take the permission for Camera if the user wants to upload the image.
Let’s look for another example, uninstall your Instagram app and then install it. Use it as normal i.e. see the feeds and all other feature. Now, try to post some image, here you will be asked to grant Permission for Camera. This permission is asked at the Runtime and is called Runtime Permission .
Protection levels in Permissions
There are various protection levels in Permissions and these levels are useful to identify if the Runtime Permission is actually needed or not. Because without using the Runtime Permission, we can implicitly grant the permissions in the AndroidManifest.xml file. So, knowing the protection levels is very important. Following are the protection levels in Permissions:
- Normal Permission: These are permissions that are required by the app to access some data from outside the app but this data has nothing to do with user privacy. Some of the examples include ACCESS_NETWORK_STATE , ACCESS_WIFI_STATE , BLUETOOTH , INTERNET , etc. For normal permission, just grant the permissions in AndroidManifest.xml file.
- Signature Permission: This is used at the installation time but only when the app that attempts to use permission is signed by the same certificate as the app that defines the permission. Some examples are WRITE_SETTINGS , WRITE_VOICEMAIL , READ_VOICEMAIL , etc.
- Dangerous Permission: These are that permission that demands some sensitive data of the user that is responsible for user’s privacy. These permissions must be granted explicitly. The user may or may not grant permission. Some examples are CAMERA , CONTACTS , LOCATION , MICROPHONE , etc.
- Special Permission: There are some permissions that are neither Normal nor Dangerous. These are Special Permissions that are only needed by some applications. You can write this permission in your AndroidManifest.xml file. Some examples are SYSTEM_ALERT_WINDOW , WRITE_SETTINGS , etc.
To have a full list of Permissions that come under various protection levels, you can visit here .
Implementing Easy Permission
There are “n” number of ways to implement the Permissions in Android. One of these is using Easy Permission .
EasyPermissions is a wrapper library to simplify basic system permissions logic when targeting Android M or higher.
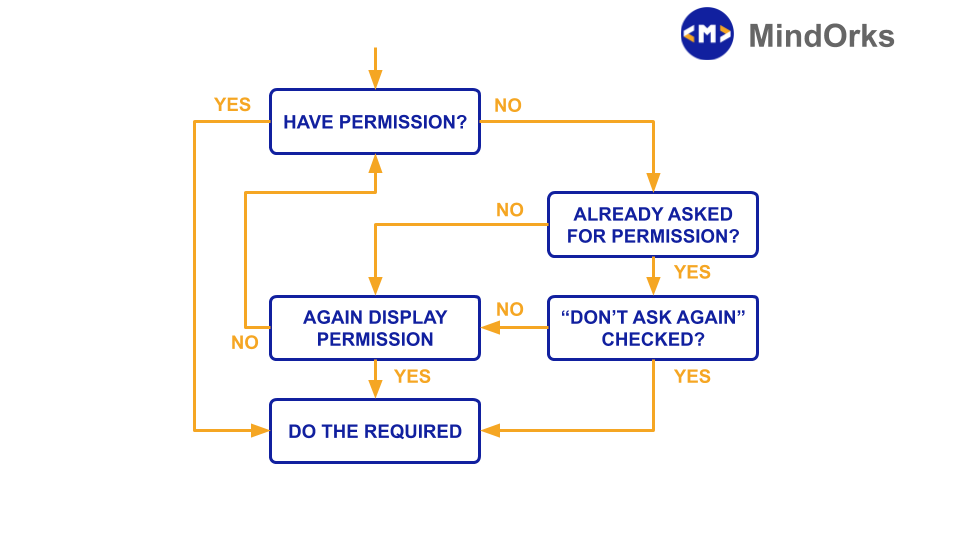
As the name specifies, using EasyPermissions will make our task easy to implement the permission alert box in any Android Application. This is used to handle each and every aspect of permissions. Various things might happen during granting permissions. The whole scenario is depicted in the below image:
So, let’s do an example to understand the working of Easy Permission.
Project Creation and adding the dependency
Open the Android Studio and create a project with Empty Activity template.
After creating the project, our next step is to add the dependency of EasyPermissions in our app level build.gradle file. Add the below line in the build.gradle file to have the dependency of EasyPermissions and after that sync your project.
// For developers using AndroidX in their applications
implementation 'pub.devrel:easypermissions:3.0.0'

// For developers using the Android Support Library
implementation 'pub.devrel:easypermissions:2.0.1'
Making the UI
Our next step is make the UI for our application. Here we are adding four Buttons for different permissions. Following is the code for the activity_main.xml file:
<?xml version="1.0" encoding="utf-8"?>
<androidx.constraintlayout.widget.ConstraintLayout
        xmlns:android="http://schemas.android.com/apk/res/android"
        xmlns:tools="http://schemas.android.com/tools"
        xmlns:app="http://schemas.android.com/apk/res-auto"
        android:layout_width="match_parent"
        android:layout_height="match_parent"
        tools:context=".MainActivity">

    <Button
            android:layout_width="320dp"
            android:layout_height="56dp"
            app:layout_constraintEnd_toEndOf="parent"
            android:layout_marginEnd="8dp"
            app:layout_constraintStart_toStartOf="parent"
            android:layout_marginStart="8dp"
            android:text="Camera Permission"
            app:layout_constraintTop_toTopOf="parent"
            android:layout_marginTop="8dp"
            android:id="@+id/btn_camera"/>

    <Button
            android:layout_width="320dp"
            android:layout_height="56dp"
            app:layout_constraintEnd_toEndOf="parent"
            android:layout_marginEnd="8dp"
            android:layout_marginTop="8dp"
            android:text="Location Permission"
        app:layout_constraintTop_toBottomOf="@+id/btn_camera"
            app:layout_constraintStart_toStartOf="parent"
            android:layout_marginStart="8dp"
            android:id="@+id/btn_location"/>

    <Button
            android:id="@+id/btn_sms"
            android:layout_width="320dp"
            android:layout_height="56dp"
            app:layout_constraintEnd_toEndOf="parent"
            android:layout_marginEnd="8dp"
            android:text="SMS Permission"
      app:layout_constraintTop_toBottomOf="@+id/btn_location"
            app:layout_constraintStart_toStartOf="parent"
            android:layout_marginStart="8dp"    android:layout_marginTop="8dp"/>
    <Button
            android:id="@+id/btn_contact"
            android:layout_width="320dp"
            android:layout_height="56dp"
            android:layout_marginTop="8dp"
            app:layout_constraintTop_toBottomOf="@+id/btn_sms" app:layout_constraintEnd_toEndOf="parent"
            android:layout_marginEnd="8dp"
            android:text="Contact Permission"
            app:layout_constraintStart_toStartOf="parent"
            android:layout_marginStart="8dp"/>

</androidx.constraintlayout.widget.ConstraintLayout>
Adding Permission in AndroiManifest.xml file
In order to take Dangerous Permission in our application, we have to display an alert to ask for permission. So, these permissions must be added in the AndroidManifest.xml file. By doing so, if the permission is granted by the user, the app can use that permission. Add the below lines:
<uses-permission android:name="android.permission.CAMERA" />
<uses-permission android:name="android.permission.ACCESS_FINE_LOCATION" />
<uses-permission android:name="android.permission.READ_SMS" />
<uses-permission android:name="android.permission.READ_CONTACTS" />
Add Strings in values/strings.xml
Add some Strings in the values/strings.xml :
<resources>
    <string name="app_name">MindOrks</string>
    <string name="yes">Yes</string>
    <string name="no">No</string>

    <string name="rationale_camera">This app needs access to your camera so you can take pictures.</string>
    <string name="rationale_location">This app needs access to your location to know where you are.</string>
    <string name="rationale_sms">This app needs access to your sms to read all your great messages.</string>
    <string name="rationale_contact">This app needs access to your contact to know you better</string>
    <string name="returned_from_app_settings_to_activity">
        Returned from app settings to MainActivity with the following permissions:
        \n\nCamera: %s
        \nLocation: %s
        \nSMS: %s
        \nContacts: %s
    </string>
    <string name="camera">Camera</string>
    <string name="location">Location</string>
    <string name="sms">SMS</string>
    <string name="contacts">Contacts</string>
</resources>
Code for MainActivity.kt
Now, our next step is to write the code for permission handling. Here, we are using EasyPermission.hasPermissions() to check if the permission is granted or not. If the permission is not granted then we request for permission by using EasyPermission.requestPermissions().
Following is the code for MainActivity.kt :
class MainActivity:AppCompatActivity(),
    EasyPermissions.PermissionCallbacks,
    EasyPermissions.RationaleCallbacks{

    private val TAG = "MainActivity"
    private val RC_CAMERA_PERM = 123
    private val RC_LOCATION_PERM = 124
    private val RC_SMS_PERM = 125
    private val RC_CONTACTS_PERM = 126

    override fun onCreate(savedInstanceState: Bundle?) {
        super.onCreate(savedInstanceState)
        setContentView(R.layout.activity_main)

        val camera_btn_click = findViewById(R.id.btn_camera) as Button
        val location_btn_click = findViewById(R.id.btn_location) as Button
        val sms_btn_click = findViewById(R.id.btn_sms) as Button
        val contact_brn_click = findViewById(R.id.btn_contact) as Button

        camera_btn_click.setOnClickListener{
            cameraTask()
        }

        location_btn_click.setOnClickListener {
            locationTask()
        }

        sms_btn_click.setOnClickListener {
            smsTask()
        }

        contact_brn_click.setOnClickListener {
            contactTask()
        }
    }

    private fun hasCameraPermission():Boolean {
        return EasyPermissions.hasPermissions(this, Manifest.permission.CAMERA)
    }
    private fun hasLocationPermissions():Boolean {
        return EasyPermissions.hasPermissions(this, Manifest.permission.ACCESS_FINE_LOCATION)
    }
    private fun hasSmsPermission():Boolean {
        return EasyPermissions.hasPermissions(this, Manifest.permission.READ_SMS)
    }
    private fun hasContactPermission():Boolean {
        return EasyPermissions.hasPermissions(this, Manifest.permission.READ_CONTACTS)
    }

    fun cameraTask() {
        if (hasCameraPermission())
        {
            // Have permission, do the thing!
            Toast.makeText(this, "TODO: Camera things", Toast.LENGTH_LONG).show()
        }
        else
        {
            // Ask for one permission
            EasyPermissions.requestPermissions(
                this,
                getString(R.string.rationale_camera),
                RC_CAMERA_PERM,
                Manifest.permission.CAMERA)
        }
    }

    fun locationTask() {
        if (hasLocationPermissions())
        {
            // Have permission, do the thing!
            Toast.makeText(this, "TODO: Location things", Toast.LENGTH_LONG).show()
        }
        else
        {
            // Ask for one permission
            EasyPermissions.requestPermissions(
                this,
                getString(R.string.rationale_location),
                RC_LOCATION_PERM,
                Manifest.permission.ACCESS_FINE_LOCATION)
        }
    }

    fun smsTask() {
        if (hasSmsPermission())
        {
            Toast.makeText(this, "TODO: SMS things", Toast.LENGTH_LONG).show()
        }
        else
        {
            // Ask for one permission
            EasyPermissions.requestPermissions(
                this,
                getString(R.string.rationale_sms),
                RC_SMS_PERM,
                Manifest.permission.READ_SMS)
        }
    }

    fun contactTask() {
        if (hasContactPermission())
        {
            Toast.makeText(this, "TODO: Contact things", Toast.LENGTH_LONG).show()
        }
        else
        {
            // Ask for one permission
            EasyPermissions.requestPermissions(
                this,
                getString(R.string.rationale_contact),
                RC_CONTACTS_PERM,
                Manifest.permission.READ_CONTACTS)
        }
    }
    override fun onRequestPermissionsResult(requestCode:Int,
                                   permissions:Array<String>,
                                   grantResults:IntArray) {
        super.onRequestPermissionsResult(requestCode, permissions, grantResults)
        // EasyPermissions handles the request result.
        EasyPermissions.onRequestPermissionsResult(requestCode, permissions, grantResults, this)
    }

    override fun onPermissionsDenied(requestCode: Int, perms: MutableList<String>) {
        Log.d(TAG, "onPermissionsDenied:" + requestCode + ":" + perms.size)

        if (EasyPermissions.somePermissionPermanentlyDenied(this, perms))
        {
            AppSettingsDialog.Builder(this).build().show()
        }
    }

    override fun onPermissionsGranted(requestCode: Int, perms: MutableList<String>) {
        Log.d(TAG, "onPermissionsGranted:" + requestCode + ":" + perms.size)
    }

    @SuppressLint("StringFormatMatches")
    override fun onActivityResult(requestCode: Int, resultCode: Int, data: Intent?) {
        super.onActivityResult(requestCode, resultCode, data)
        if (requestCode == AppSettingsDialog.DEFAULT_SETTINGS_REQ_CODE)
        {
            val yes = getString(R.string.yes)
            val no = getString(R.string.no)
            // Do something after user returned from app settings screen, like showing a Toast.
            Toast.makeText(
                this,
                getString(R.string.returned_from_app_settings_to_activity,
                    if (hasCameraPermission()) yes else no,
                    if (hasLocationPermissions()) yes else no,
                    if (hasSmsPermission()) yes else no),
                Toast.LENGTH_LONG)
                .show()
        }
    }
    override fun onRationaleAccepted(requestCode:Int) {
        Log.d(TAG, "onRationaleAccepted:" + requestCode)
    }
    override fun onRationaleDenied(requestCode:Int) {
        Log.d(TAG, "onRationaleDenied:" + requestCode)
    }
}
Run your app and try to apply various conditions as mentioned in the description image.
Conclusion
In this blog, we learned how to grant permissions in our application explicitly. We learned that there are mainly two types of Permissions i.e. Normal Permission and Dangerous Permission . Normal Permissions are used when there is not a risk of user privacy. While Dangerous Permission is used when you deal with some data that may involve some type of user privacy. At last, we did one example using the EasyPermissions .
Keep Learning :)
Team MindOrks!