Implementing ConcatAdapter In Android - Tutorial

Let's say If I show you a UI like the following and ask you to design it, what would be the first thought process would come into your mind?
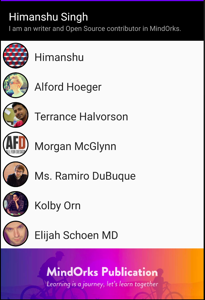
You might come up with a different set of ideas to do it. But the most common idea to do this would be using RecyclerView with multiple view types inside one recyclerView.
But with the above given the solution, the major problem comes up is managing a lot of view types. In the above example, we have three types of views, one with a container to contain name and description of the user, second is a list of user and third is a banner. But in a real-life example, there can be a lot of different views and not just three.
So how can we design a view in an easy way without having to manage different view types?
Concat Adapter is the solution for it.
In this, let us understand the ConcatAdapter by building the above screen.
Step 01.
First, let us add the dependency required by the concat adapter. It is a part of recyclerView. In the app's
build.gradle
add,
implementation "androidx.recyclerview:recyclerview:1.2.0-alpha04"PS: The current build is in the alpha02 version.
Step 02.
For the above screen, we have three different types of Views. So, for that to structure the data we need to create three different data classes namely - User, MyDetail, Banner, inside the model package. Where User is used for structuring the data for a list of users.
MyDetail
is used for displaying the used for my user data and
Banner
is used for displaying the banner.
User
looks like,
data class User(
     val id: Int = 0,
     val name: String = "",
     val avatar: String = ""
)
MyDetail
data class looks like,
data class MyDetail(
     val id: Int = 0,
     val name: String = "",
     val aboutMe: String = ""
)
and
Banner
looks like,
data class Banner(
     val bannerImage: Int = 0
)
Step 03:
In this, we will create a data source for a list of users to display the list. For that, we will create an object of
DataSource
and in that,
object DataSource {

    fun getUser() = ArrayList<User>().apply {
        add(User(1, "Himanshu", "https://s3.amazonaws.com/uifaces/faces/twitter/sunlandictwin/128.jpg"))
        add(User(2, "Alford Hoeger", "https://s3.amazonaws.com/uifaces/faces/twitter/mufaddal_mw/128.jpg"))
        add(User(3, "Terrance Halvorson", "https://s3.amazonaws.com/uifaces/faces/twitter/mufaddal_mw/128.jpg"))
        add(User(3, "Morgan McGlynn", "https://s3.amazonaws.com/uifaces/faces/twitter/allfordesign/128.jpg"))
        add(User(4, "Ms. Ramiro DuBuque", "https://s3.amazonaws.com/uifaces/faces/twitter/shaneIxD/128.jpg"))
        add(User(5, "Kolby Orn", "https://s3.amazonaws.com/uifaces/faces/twitter/johnsmithagency/128.jpg"))
        add(User(6, "Elijah Schoen MD", "https://s3.amazonaws.com/uifaces/faces/twitter/alxndrustinov/128.jpg"))

    }

    fun getBanner() = Banner(R.drawable.publication_site_cover)
}
Where
getUser
() will be used to get a list of User type, and
getBanner
() is used for getting the banner image from the drawable folder.
Step 04.
In RecyclerView, what happens is, Concat Adapter helps to display the RecyclerView Adapters in sequential order. So, now in our use-case first we will define three different adapters,
To display MyDetails, will create MyDetailAdapter,
class MyDetailAdapter(
        private val myDetail: MyDetail
) : RecyclerView.Adapter<MyDetailAdapter.DataViewHolder>() {

    class DataViewHolder(itemView: View) : RecyclerView.ViewHolder(itemView) {
        fun bind(user: MyDetail) {

            itemView.textViewUser.text = user.name
            itemView.textViewAboutMe.text = user.aboutMe
        }
    }

    override fun onCreateViewHolder(parent: ViewGroup, viewType: Int) =
            DataViewHolder(
                    LayoutInflater.from(parent.context).inflate(
                            R.layout.item_layout_my_detail, parent,
                            false
                    )
            )

    override fun getItemCount(): Int = 1

    override fun onBindViewHolder(holder: DataViewHolder, position: Int) =
            holder.bind(myDetail)

}
This adapter will be used for displaying MyUserDetails, basically the first section of the list. Where,
R.layout.item_layout_my_detail
looks like,
<?xml version="1.0" encoding="utf-8"?>
<LinearLayout xmlns:android="http://schemas.android.com/apk/res/android"
    xmlns:app="http://schemas.android.com/apk/res-auto"
    xmlns:tools="http://schemas.android.com/tools"
    android:id="@+id/container"
    android:layout_width="match_parent"
    android:layout_height="wrap_content"
    android:background="@android:color/black"
    android:orientation="vertical"
    android:paddingStart="16dp"
    android:paddingTop="16dp"
    android:paddingEnd="16dp"
    android:paddingBottom="16dp">


    <androidx.appcompat.widget.AppCompatTextView
        android:id="@+id/textViewUser"
        style="@style/TextAppearance.AppCompat.Large"
        android:layout_width="match_parent"
        android:layout_height="wrap_content"
        android:textColor="@android:color/white"
        tools:text="MindOrks" />

    <androidx.appcompat.widget.AppCompatTextView
        android:id="@+id/textViewAboutMe"
        style="@style/TextAppearance.AppCompat.Small"
        android:layout_width="match_parent"
        android:layout_height="wrap_content"
        android:textColor="@android:color/darker_gray" />
</LinearLayout>
Then to display the list of user, we will create another adapter UsersAdapter,
class UsersAdapter(
        private val users: ArrayList<User>
) : RecyclerView.Adapter<UsersAdapter.DataViewHolder>() {

    class DataViewHolder(itemView: View) : RecyclerView.ViewHolder(itemView) {
        fun bind(user: User) {
            itemView.textViewUserName.text = user.name
            Glide.with(itemView.imageViewAvatar.context)
                    .load(user.avatar)
                    .into(itemView.imageViewAvatar)
        }
    }

    override fun onCreateViewHolder(parent: ViewGroup, viewType: Int) =
            DataViewHolder(
                    LayoutInflater.from(parent.context).inflate(
                            R.layout.item_layout, parent,
                            false
                    )
            )

    override fun getItemCount(): Int = users.size

    override fun onBindViewHolder(holder: DataViewHolder, position: Int) =
            holder.bind(users[position])

}
This adapter will be used to display the list of the user, where
R.layout.item_layout
looks like,
<androidx.constraintlayout.widget.ConstraintLayout xmlns:android="http://schemas.android.com/apk/res/android"
    xmlns:app="http://schemas.android.com/apk/res-auto"
    xmlns:tools="http://schemas.android.com/tools"
    android:id="@+id/container"
    android:layout_width="match_parent"
    android:layout_height="60dp">

    <de.hdodenhof.circleimageview.CircleImageView
        android:id="@+id/imageViewAvatar"
        android:layout_width="60dp"
        android:layout_height="0dp"
        android:padding="4dp"
        app:civ_border_color="@android:color/black"
        app:civ_border_width="2dp"
        app:layout_constraintBottom_toBottomOf="parent"
        app:layout_constraintStart_toStartOf="parent"
        app:layout_constraintTop_toTopOf="parent" />

    <androidx.appcompat.widget.AppCompatTextView
        android:id="@+id/textViewUserName"
        style="@style/TextAppearance.AppCompat.Large"
        android:layout_width="0dp"
        android:layout_height="wrap_content"
        android:layout_marginStart="8dp"
        android:layout_marginLeft="8dp"
        android:layout_marginTop="4dp"
        app:layout_constraintEnd_toEndOf="parent"
        app:layout_constraintStart_toEndOf="@+id/imageViewAvatar"
        app:layout_constraintTop_toTopOf="parent"
        app:layout_constraintBottom_toBottomOf="parent"
        tools:text="MindOrks" />


</androidx.constraintlayout.widget.ConstraintLayout>
and at last, will create another Adapter to show the banner at the end of User's list. For that will create
BannerAdapter
, which looks like
class BannerAdapter(
        private val banner: Banner
) : RecyclerView.Adapter<BannerAdapter.DataViewHolder>() {

    class DataViewHolder(itemView: View) : RecyclerView.ViewHolder(itemView) {
        fun bind(banner: Banner) {
            Glide.with(itemView.imageViewBanner.context)
                    .load(user.bannerImage)
                    .into(itemView.imageViewBanner)
        }
    }

    override fun onCreateViewHolder(parent: ViewGroup, viewType: Int) =
            DataViewHolder(
                    LayoutInflater.from(parent.context).inflate(
                            R.layout.item_layout_banner, parent,
                            false
                    )
            )

    override fun getItemCount(): Int = 1

    override fun onBindViewHolder(holder: DataViewHolder, position: Int) =
            holder.bind(banner)

}
and the
R.layout.item_layout_banner
looks like,
<?xml version="1.0" encoding="utf-8"?>
<ImageView xmlns:android="http://schemas.android.com/apk/res/android"
    android:id="@+id/imageViewBanner"
    android:layout_width="match_parent"
    android:layout_height="wrap_content" />
Now, we are done designing three different types of adapters, which are responsible for displaying the three types of views in a recyclerView.
Step05.
Now, to use the adapters we create in ConcatAdapter, first, we will create an activity called
MainActivity
which will be our launcher activity as well.
class MainActivity : AppCompatActivity() {

    override fun onCreate(savedInstanceState: Bundle?) {
        super.onCreate(savedInstanceState)
        setContentView(R.layout.activity_main)
    }
}
Now, in the
R.layout.activity_main
, First, we will add a recyclerView. It will look like,
<androidx.constraintlayout.widget.ConstraintLayout
    xmlns:android="http://schemas.android.com/apk/res/android"
    xmlns:app="http://schemas.android.com/apk/res-auto"
    xmlns:tools="http://schemas.android.com/tools"
    android:layout_width="match_parent"
    android:layout_height="match_parent"
    tools:context=".MainActivity">

    <androidx.recyclerview.widget.RecyclerView
        android:id="@+id/recyclerView"
        android:layout_width="0dp"
        android:layout_height="0dp"
        app:layout_constraintBottom_toBottomOf="parent"
        app:layout_constraintEnd_toEndOf="parent"
        app:layout_constraintStart_toStartOf="parent"
        app:layout_constraintTop_toTopOf="parent" />

</androidx.constraintlayout.widget.ConstraintLayout>
Now, we will add four variables in MainActivity,
lateinit var adapter: ConcatAdapter
lateinit var myDetailAdapter: MyDetailAdapter
lateinit var userVerticalAdapter: UsersAdapter
lateinit var bannerAdapter: BannerAdapter
we will also create another variable which will be structured according to MyDetail data class and contain my details,
val myDetail = MyDetail(1, "Himanshu Singh", "I am an writer and Open Source contributor in MindOrks.")
and lastly, we will create, a function called,
setupDataInRecyclerView()
and will call this in
onCreate
of Activity. Now, in the function, we will initialize the variables and set them to
adapter
.
private fun setupDataInRecyclerView() {
    recyclerView.layoutManager = LinearLayoutManager(this)
    userVerticalAdapter = UsersAdapter(DataSource.getUser())
    bannerAdapter = BannerAdapter(DataSource.getBanner())
    myDetailAdapter = MyDetailAdapter(myDetail)
    adapter = ConcatAdapter(myDetailAdapter,  userVerticalAdapter,bannerAdapter)
    recyclerView.adapter = adapter
}
Here, we will initialize the adapters,
UserAdapter
,
BannerAdapter,
and
MyDetailAdapter
and pass the data from the
DataSource
object.
Now, we will initialize the layout manager for the recyclerView using,
recyclerView.layoutManager = LinearLayoutManager(this)
and, at last, we will create a
ConcatAdapter
and pass the adapters in its constructor.
Note: The Sequence on which we will pass the adapter, the ConcatAdapter will draw the list in the same sequence in the recyclerView.
And when we run the app, we will get the desired output on the screen.
This is how you can design a recyclerView with multiple view types in sequential order by using data from individual adapters.
Point to remember:
-
For example, let us say that we need to use the same recyclerView adapter multiple times in a recyclerView, then we can create
multiple instancesfor the same adapter and add it in the constructor of ConcatAdapter. - We should implement the logic in individual adapters.
-
When we update data in any adapter using the
notifyDataSetChanged()then, concat adapter will also call itsnotifyDataSetChanged() - In place of passing the adapters individually, we can pass the list of adapters in the constructor of ConcatAdapter. So, here in our example, we can create a list of adapter like,
val listOfAdapters = listOf<RecyclerView.Adapter<out RecyclerView.ViewHolder>>(myDetailAdapter, userVerticalAdapter, bannerAdapter)and then in the constructor, we can pass like,
adapter = ConcatAdapter(listOfAdapters)Now, let's talk about a use case
- In general, we basically use one view holder for one RecyclerView Adapter. But in some cases when we need to re-use the view holder for multiple adapters then,
we need to pass a config in the constructor where we need to set the
isolateViewTypes
to
false
To create a config we use,
val configBuilder = ConcatAdapter.Config.Builder()
configBuilder.setIsolateViewTypes(false)
and then in ConcatAdapter, we pass it like,
val adapter = ConcatAdapter(configBuilder.build(),myDetailAdapter, userVerticalAdapter, bannerAdapter)Similarly, here as well we can pass the list of adapter like,
val adapter = ConcatAdapter(configBuilder.build(),listOfAdapters)2. Let say, we don't want to pass the adapter in the constructor and want to add it later in the Concat Adapter. To add an adapter we use,
val adapter = ConcatAdapter(listOfAdapters)
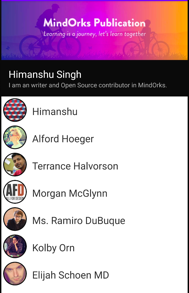
adapter.addAdapter(bannerAdapter)This will add the adapter at the last position in the list. Now, let's say that we want to add the adapter at a specific position then we will pass the position alongside it,
adapter.addAdapter(0,bannerAdapter)Here, we have added an adapter at the 0th position i.e the start of the list. Now, the recyclerView looks like,
3. Similarly to remove an adapter we call,
adapter.removeAdapter(//adapter)4. To get the number of items in the recyclerView combining all the adapters we use,
adapter.itemCount5. To get the list of adapters added in Concat Adapter wee call,
adapter.adaptersThis is how you can get started with ConcatAdapter and build a recyclerView with multiple different views.
You can find the project here.
Happy learning.
Team MindOrks :)