How to access SQLite Database in Android for Debugging?
As an Android developer, we all must have used the SQLite database for storing some data on our local device i.e. on our Android phone. But the biggest problem that we all must have faced is debugging the SQLite Database and we all know that debugging our application is an important part of the Android development.
So, how to access the SQLite database in Android for debugging? How to see the schema of the table that you have created for your application? Can you change the data of your SQLite table from your PC? Can you add/edit/delete some records from the table and that too with the help of a simple Add or Edit or Delete button?
What if someone says that you can perform all the above operations just by clicking some buttons? Yes, you heard it right.
We have got you covered.
We have created one library( Android Debug Database ) that will help you in debugging your SQLite databases and your shared preferences in the easiest possible way.
The Android Debug Database can do the following tasks for you:
- See all the databases.
- See all the data in the shared preferences used in your application.
- Run any SQL query on the given database to update and delete your data.
- Directly edit the database values.
- Directly edit shared preferences.
- Directly add a row in the database.
- Directly add a key-value in the shared preferences.
- Delete database rows and shared preferences.
- Search in your data.
- Sort data.
- Export Database.
- Check Database version.
- Download database
The best part of using this library is, all these features work without rooting your device. So, no need for rooted device.
Sounds interesting? Let's see how to use this in your application.
Prerequisite
Before implementing the Android Debug Database librar y in your application, there are some prerequisites that you need to do before using the library:
- Your Android phone and laptop should be connected to the same Network (Wifi or LAN).
- If you are using your mobile over USB, then run the following command in the terminal:
adb forward tcp:8080 tcp:8080Note: If you want to use a different port other than 8080, then in the app's build.gradle file, do the following change under buildType:
debug {
    resValue("string", "PORT_NUMBER", "8081")
}
So, you are done with the prerequisite part, let's see how to use the Android Debug library in your application.
Using Android Debug Database library
To use the Android Debug Database library in your application, all you need to do is just add the below dependency in your app's build.gradle file:
dependencies {
    ...
    debugImplementation 'com.amitshekhar.android:debug-db:1.0.6'
    ...
}
That's it, run your application and you will see an entry like below in the logcat(when you choose the debug option):
D/DebugDB: Open http://XXX.XXX.X.XXX:8080 in your browserTo get the debug address URL from your code, just call the below method:
DebugDB.getAddressLog();Open the URL in your browser and you will see an interface showing all the details related to your databases and shared preferences.
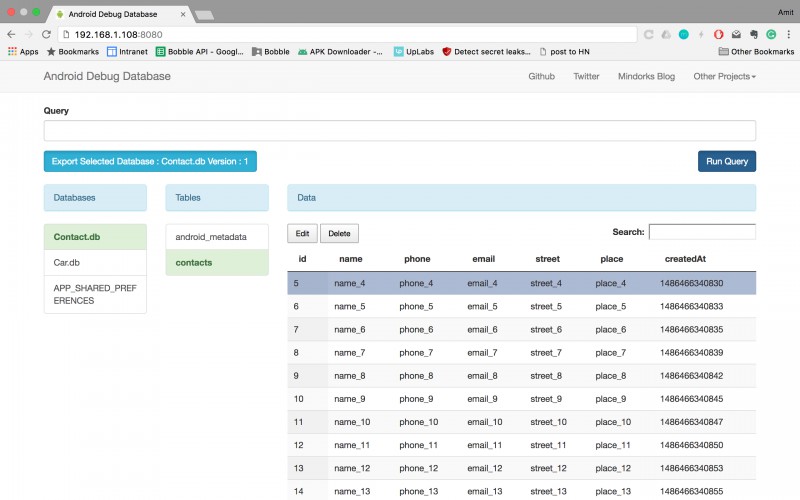
You can add, delete or edit the values present in the table by just clicking on the Add, Edit, and Delete button respectively and then providing the required details for the same.

Also, if you want to do some database operations by running a query, then just write the query in the query section and the Android Debug Database library will do the rest for you.
Working with Emulator
If you are using Emulator to run your application, then do the following:
- For Android Default Emulator: If you are using the default emulator of Android, then run the following command in the terminal and then open http://localhost:8080
adb forward tcp:8080 tcp:8080- For Genymotion Emulator: If you are using the Genymotion emulator, then enable the bridge from " configure virtual device "(option available in Genymotion).
Getting the debug address URL with Toast
If you are finding it difficult to get the debug address URL from the logcat, then you can get the URL displayed with a toast by adding the following method and call using reflection:
public static void showDebugDBAddressLogToast(Context context) {
    if (BuildConfig.DEBUG) {
       try {
            Class<?> debugDB = Class.forName("com.amitshekhar.DebugDB");
            Method getAddressLog = debugDB.getMethod("getAddressLog");
            Object value = getAddressLog.invoke(null);
            Toast.makeText(context, (String) value, Toast.LENGTH_LONG).show();
       } catch (Exception ignore) {

       }
    }
}
Adding custom database files
The Android Database Library is auto-initialized, so if you want to debug a custom database file, then add the below method and call it.
public static void setCustomDatabaseFiles(Context context) {
    if (BuildConfig.DEBUG) {
        try {
            Class<?> debugDB = Class.forName("com.amitshekhar.DebugDB");
            Class[] argTypes = new Class[]{HashMap.class};
            Method setCustomDatabaseFiles = debugDB.getMethod("setCustomDatabaseFiles", argTypes);
            HashMap<String, Pair<File, String>> customDatabaseFiles = new HashMap<>();
            // set your custom database files
            customDatabaseFiles.put(ExtTestDBHelper.DATABASE_NAME,
                    new Pair<>(new File(context.getFilesDir() + "/" + ExtTestDBHelper.DIR_NAME +
                                                    "/" + ExtTestDBHelper.DATABASE_NAME), ""));
            setCustomDatabaseFiles.invoke(null, customDatabaseFiles);
        } catch (Exception ignore) {

        }
    }
}
Adding InMemory Room databases
The Android Database Library is auto-initialized, so if you want to debug InMemory Room databases, then add the below method and call it.
public static void setInMemoryRoomDatabases(SupportSQLiteDatabase... database) {
    if (BuildConfig.DEBUG) {
        try {
            Class<?> debugDB = Class.forName("com.amitshekhar.DebugDB");
            Class[] argTypes = new Class[]{HashMap.class};
            HashMap<String, SupportSQLiteDatabase> inMemoryDatabases = new HashMap<>();
            // set your inMemory databases
            inMemoryDatabases.put("InMemoryOne.db", database[0]);
            Method setRoomInMemoryDatabase = debugDB.getMethod("setInMemoryRoomDatabases", argTypes);
            setRoomInMemoryDatabase.invoke(null, inMemoryDatabases);
        } catch (Exception ignore) {

        }
    }
}
We know that you are in love with this library and you will be using this library in your next applications to make the SQLite database debugging very easy.
Show your love by clicking the ⭐ button on the upper right side of the Android Debug Database library page.
Have a look at our Android tutorials here .
Do share this blog with your fellow developers to spread the knowledge. You can read more blogs on Android on our blogging website .
Apply Now: MindOrks Android Online Course and Learn Advanced Android
Happy Debugging :)
Team MindOrks!