Understanding ExifInterface

We use Images in our apps extensively. For some of the Image Related Applications, all the details of the images are required. But we cannot read the details of the images always directly from the image. There might be needs to know the image details like GPS location, date/time, settings at the time of capture, orientation, etc.
Previously we were struggling to get image info, for which we had to separately extract metadata from different methods and read it to understand the Image properties. Even though when we read, the changes to the images like removing GPS tags or changing the orientation would be challenging tasks.
The solution for these is Exif files and ExifInterface.
Let us understand what EXIF is?
What is Exif?
Exif stands for Exchangeable Image File Format. This is a standard that defines specific information related to an image or other media captured by a camera. It is capable of storing such important data as camera exposure, date/time the image was captured, and even GPS location. The Sample Exif file looks like,
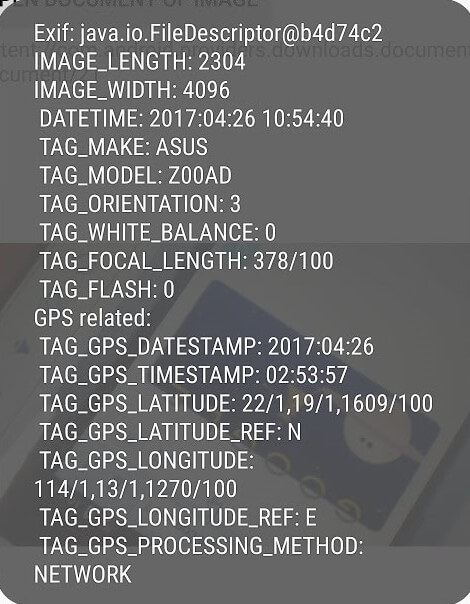
If you look at the above image, We have attributes like Image length and width, date and time of the image taken, From which device this image was taken, Orientation code, and some of the images attribute like light, white balance, focal length, if the flash was on or not, GPS information of the image i.e lat long of the image where it was taken. By looking at this we can get the complete details of the image. Now you may get a fair idea of EXIF files.
ExifInterface in Android
We understood what is Exif and what it contains. Let’s see how can we extract Exif data from images in Android. ExifInterface has been introduced in the android support library since 25.1.0. Even though this has been existing since 7.1, It made sense from android 9+ with all the capabilities provided to the interface. This has been added with 100+ attributes to read the Exif tags of the images including information about the camera itself, the camera settings, orientation, and GPS coordinates. For now, it can only read the Exif of JPEG files or a RAW image file. The supported formats are JPEG, DNG, CR2, NEF, NRW, ARW, RW2, ORF, PEF, SRW, RAF, and HEIF.
If you want to use ExifInterface you need to add the below dependency to your build.gradle.
implementation "androidx.exifinterface:exifinterface:1.3.1"One thing that is important to understand with Exif data is that there are no required tags: every tag is optional - some services even specifically strip Exif data. Therefore throughout your code, you should always handle cases where there is no Exif data, either due to no data for a specific attribute or an image format that doesn't support Exif data at all (say, the ubiquitous PNGs or WebP images).
How to Read Exif Attributes?
Now let us understand how can we read EXIF attributes for different sources and some of the use cases using ExifInterface. For most attributes, you'd simply use the getAttributeInt(), getAttributeDouble(), or getAttribute() (for Strings) methods as appropriate.
Extracting info from content Uri
Uri uri; // the URI you've received from the other app
InputStream in;
try {
    in = getContentResolver().openInputStream(uri);
    ExifInterface exifInterface = new ExifInterface(in);
    // Now you can extract any Exif tag you want
    // Assuming the image is a JPEG or supported raw format
} catch (IOException e) {
    // Handle any errors
} finally {
    if (in != null) {
        try {
            in.close();
        } catch (IOException ignored) {}
    }
}
Note: ExifInterface will not work with remote InputStreams, such as those returned from a HttpURLConnection. It is strongly recommended to only use them with content:// or file:// URIs.
For Camera Apps
For Camera apps, after capturing the image writing attributes is more important. As of now, it's still limited to JPEG images. Using ExifInterface we can easily alter the already set JPEG_ORIENTATION, JPEG_GPS_LOCATION, or the equivalent. We can also remove these attributes based on the user's request.
var  exif  : ExifInterface  = ExifInterface(pictureFile.getAbsolutePath())
exif.setAttribute(ExifInterface.TAG_ORIENTATION, "" + getPhotoOrientation(configurationProvider.getSensorPosition()))
exif.saveAttributes()
Handling Orientation
One of the most important attributes when it comes to displaying images is the image orientation, stored in the aptly-named TAG_ORIENTATION , which returns one of the ORIENTATION_ constants. To convert this to a rotation angle, you can post-process the value.
int rotation = 0;
int orientation = exifInterface.getAttributeInt(
ExifInterface.TAG_ORIENTATION,
ExifInterface.ORIENTATION_UNDEFINED);
switch (orientation) {
    case ExifInterface.ORIENTATION_ROTATE_90:
    rotation = 90;
    break;
    case ExifInterface.ORIENTATION_ROTATE_180:
    rotation = 180;
    break;
    case ExifInterface.ORIENTATION_ROTATE_270:
    rotation = 270;
    break;
}
Bitmap rotation using the Exif rotation angle
First, create the ExifInterface:
ExifInterface exif = new ExifInterface(uri.getPath());Next, find the current rotation:
int rotation = exif.getAttributeInt(ExifInterface.TAG_ORIENTATION, ExifInterface.ORIENTATION_UNDEFINED);Convert Exif rotation to degrees:
int rotationInDegrees = exifToDegrees(rotation);where
private fun exifToDegrees(exifOrientation: Int): Int {
    if (exifOrientation == ExifInterface.ORIENTATION_ROTATE_90) {
        return 90
    } else if (exifOrientation ==   ExifInterface.ORIENTATION_ROTATE_180) {
        return 180
    } else if (exifOrientation == ExifInterface.ORIENTATION_ROTATE_270) {
        return 270
    }
    return 0
}
Then use the image's actual rotation as a reference point to rotate the image using a Matrix.
Matrix matrix = new Matrix();
if (rotation != 0) {
    matrix.postRotate(rotationInDegrees);
}
You create the new rotated image with the Bitmap.createBitmap method that takes a Matrix as a parameter:
Bitmap.createBitmap(Bitmap source, int x, int y, int width, int height, Matrix m, boolean filter)
where
matrix
holds the new rotation:
Bitmap adjustedBitmap = Bitmap.createBitmap(sourceBitmap, 0, 0, width, height, matrix, true)Some of the use cases for how we can use ExifInterface.
- ExifInterface is used in writing the image information when the picture is taken. It is also helpful to handle orientation while saving the image to phone storage.
- We may need to decrease the image size and update the Exif info, for this, we will have to fetch the Exif info and save the updated info back on to the image.
- ExifInterface is also used to fetch and parse the image headers.
- Keeping view orientation of the device constant when the device is rotated.
- Fetching image from the gallery and displaying it with the proper orientation and other attributes with which the image was saved.
This was all about the ExifInterface. We have learned about ExifInterface today. Hoping to have given some light on the topic.
Keep Learning, Keep Exploring, Keep Growing
Thank you.