Create your own Custom View
Custom Views is just a way to make an android developer a painter.
When you need to create some custom and reuse the views when it is not provided by the Android Ecosystem. Custom Views can be used as widgets like TextView, EditText etc. In this blog we will talk about the aspect of how can we create our own Custom View.Custom Views can be of few types,
- Custom Views: Where we draw everything
- Custom View Groups: Where we use existing widgets to form an inflatable xml file
So, before all of these Why should we use Custom Views?
- To make the UI component re-usable
- Add new interaction which is not provided by the Android Ecosystem.
PS : Custom Views can also be a pain to make as it can be difficult to make.
How does Android Draw the UI?
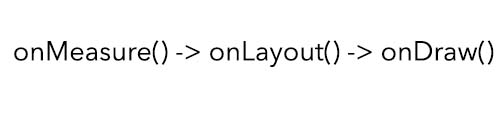
Here,1. At first onMeasure() gets called where Android measures the UI from top to bottom. First, it takes the parents container. their children and so on. In onMeasure() children get the constraints provided by their parents. 2. Then, onLayout() is called to plot the positions of the Widgets3.and finally in onDraw() the UI gets rendered.
Steps to Create a Custom View
- By Extending an Existing Widget Class (eg. Button, TextView)
- By Extending the View Class (eg. View)
To start with a custom view, we will create a class
class MyCustomView :Viewand to start with drawing your views we need to override atleast one constructor.
class MyCustomView(context: Context) : View(context)- The constructor needs the basic activity context to draw
class MyCustomView(context: Context, attrs: AttributeSet) : View(context, attrs)- The constructor creates a new view instance from XML
class MyCustomView(context: Context, attrs: AttributeSet, defstyleAttr:Int) : View(context, attrs, defstyeAttr)- The constructor also takes the design attribute
class MyCustomView(context: Context, attrs: AttributeSet, defstyleAttr:Int, defStyleRes:Int) : View(context, attrs, defstyeAttr,defStyleRes)- This constructor takes theme attribute as well
and we generally use,
class MyCustomView(context: Context, attrs: AttributeSet) : View(context, attrs)to start with.
and to use the view we have to add in the XML,
<com.yourpackagename.MyCustomView
   android:id="@+id/customview"
   android:layout_width="match_parent"
   android:layout_height="match_parent"
   android:layout_centerInParent="true"/>
We have succesfully create a custom view without doing anything on the UI. Now, to draw something on the UI, we need to over ride the onDraw() method
override fun onDraw(canvas: Canvas) {
  // call the super method to keep any drawing from the parent side.
  super.onDraw(canvas)
}
and all drawing of UI goes here.1. As we need paint to draw in real life in CustomView Drawing we need paint as well. (Paint object)2. A mobile Screen in Android should be considered as a big canvas where things are drawn based on coordinates and point system.
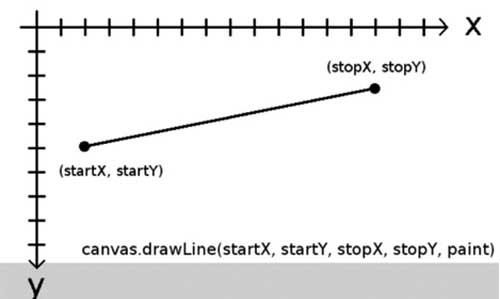
Let's first draw a line,
in Geometry to draw a line we need at least two points. Same is the case in CustomViews.
canvas.drawLine(x1, y1, x2, y2,paint)where, paint is an object which provides the required beautification of the View. Like color, width etc
val paint =  Paint(Paint.ANTI_ALIAS_FLAG);
paint.setColor(Color.BLACK);
paint.setStyle(Style.STROKE);
paint.setStrokeWidth(2);
and in OnDraw,
override fun onDraw(canvas: Canvas) {
  // call the super method to keep any drawing from the parent side.
  super.onDraw(canvas)
 canvas.drawLine(x1,y1,x2,y2,paint)
}
where, (x1,y1) and (x2,y2) are two points on canvas.
- In a mobile screen, top left corner is (0,0) and bottom right corner is (width, height) co-ordinates like mentioned below.
and now when we re-run the app we will see a line drawn in the screen. In the same way, we can create circles, rectangle, round rectangle, etc using,
- canvas.drawCircle(....)
- canvas.drawRect(....)
- canvas.drawRoundRect(....)
and lot more.Now, let' s say we have a use case where we have to change the position of the line on a button click. That means we have to change the current state of the View or Update the view.
To update the view or re-draw the view we have to use invalidate()
public void onClick() {
    //new position
    invalidate()
}
Here, invalidate() tells the view that we don't need the current view and we have to update the view by giving the new configuration.
PS: Call invalidate() only when needed. It is an expensive process.
Now, We have a complete CustomView which can be used in production. But when we create a more complex custom View like a progress bar or anything, we need to make it responsive. To make a view responsive we use onMeasure()
Let's talk about onMeasure() more in detail,
- To specify the whole measurement layout of the XML, child and parent container set the dimensions. The child uses LayoutParams() to update the parent that they want the required params and we set the parameter by setLayoutParams()
- Sometimes, parent container has to decide how big it wants the child to be it can be done in the following way,
override fun onMeasure(widthMeasureSpec: Int, heightMeasureSpec: Int) {
    super.onMeasure(widthMeasureSpec, heightMeasureSpec)
    size = Math.min(measuredWidth, measuredHeight)
    setMeasuredDimension(newsize, newsize)
}
Here, size is the minimum size of the device and setMeasuredDimension() calls and implements the new dimensions to the view.Now, in onMeasure() we get widthMeasureSpec and heightMeasureSpec as parameter. These parameters are made of Size and Mode of Measure Spec.
int mode = MeasureSpec.getMode(widthMeasureSpec);
int size = MeasureSpec.getSize(widthMeasureSpec);
Modes can be of the following type,
- MeasureSpec.Exactly : It specifies our view should be of Exact size specified in XML like layout_width = "100dp"
- MeasureSpec.AT_MOST : It specifies our view can be at max as possible while using wrap_content
- MeasureSpec.UNSPECIFIED : It can take as much space the view wants.
We have to specify the max size we want.
It is not mandatory to implement all onMeasure, onLayout, onDraw to draw your own customview.
Just Like CustomViews, we have CustomViewGroups
CustomViewGroups are XML UIs which in inflated in class file and not drawn from Scratch using,
val inflater =  context.getSystemService(Context.LAYOUT_INFLATER_SERVICE) as LayoutInflater
inflater.inflate(R.layout.view_color_options, this, true);
That's all in this blog. Using the above knowledge youc an make your own custom views. Refer here for an implementation of CustomView as open source library
Happy learning
Team MindOrks :)