RecyclerView Multiple View Types in Android
In order to display a list in your application, we all must have used RecyclerView in Android. For example, the emails in the Gmail app, the feeds on Facebook and Instagram, messages in WhatsApp, all are done with the help of RecyclerView.
But one thing that you might have noticed is that while using RecyclerView, we define a view and the list items are displayed according to that view only. But what if you want to add different view types in the RecyclerView, you can add Multiple Views in the same RecyclerView.
Welcome to MindOrks! In this blog, we are going to learn how to use Multiple Views in RecyclerView.
You can find the whole project used in this tutorial from here .
So, let's get started with the project setup.
RecyclerView Multiple View
We can add multiple views in a RecyclerView. For example, the feed page on Facebook is an example of Multiple View. You can add image, or video, or text or a combination of all in the same RecyclerView.
Another example can be WhatsApp chatting. The message that we send can be thought to be placed in a RecyclerView. So, when you send the message, it appears on the right-hand side of the screen. But if someone from the other side sends a message, then it appears on the left-hand side. So, there is a change in the view type.
In this blog, we will learn how to do this. We will create a RecyclerView and add two different views into it. You can create more view types according to your use-case.
Open AndroidStudio and create a project
- Project Name: RecyclerViewMultiTypeExample
- Language: Kotlin
Creating Views for the project
In our project, we are going to use two views i.e.
item_view_1.xml
and
item_view_2.xml
.
The code for the
item_view_1.xml
is:
<?xml version="1.0" encoding="utf-8"?>
<androidx.constraintlayout.widget.ConstraintLayout xmlns:android="http://schemas.android.com/apk/res/android"
    xmlns:app="http://schemas.android.com/apk/res-auto"
    android:layout_width="match_parent"
    android:layout_height="wrap_content"
    android:background="#0091ea"
    android:paddingLeft="24dp"
    android:paddingRight="24dp">

    <TextView
        android:id="@+id/textView"
        android:layout_width="wrap_content"
        android:layout_height="48dp"
        android:gravity="center_vertical"
        android:text="View 1 TextView"
        android:textColor="#FFFFFF"
        android:textSize="24sp"
        app:layout_constraintStart_toStartOf="parent"
        app:layout_constraintTop_toTopOf="parent" />

    <ImageView
        android:layout_width="48dp"
        android:layout_height="48dp"
        android:src="@drawable/link_on"
        app:layout_constraintEnd_toEndOf="parent"
        app:layout_constraintTop_toTopOf="parent" />

</androidx.constraintlayout.widget.ConstraintLayout>
The code for the
item_view_2.xml
is:
<?xml version="1.0" encoding="utf-8"?>
<androidx.constraintlayout.widget.ConstraintLayout
    xmlns:android="http://schemas.android.com/apk/res/android"
    xmlns:app="http://schemas.android.com/apk/res-auto"
    xmlns:tools="http://schemas.android.com/tools"
    android:layout_width="match_parent"
    android:layout_height="wrap_content"
    android:background="#00bfa5"
    android:paddingLeft="24dp"
    android:paddingRight="24dp">

    <TextView
        android:id="@+id/textView"
        android:layout_width="wrap_content"
        android:layout_height="48dp"
        android:gravity="center_vertical"
        android:textColor="#000000"
        android:text="View 2 TextView"
        android:textSize="24sp"
        app:layout_constraintEnd_toEndOf="parent"
        app:layout_constraintTop_toTopOf="parent" />

    <ImageView
        android:id="@+id/imageView"
        android:layout_width="48dp"
        android:layout_height="48dp"
        android:src="@drawable/link_off"
        app:layout_constraintStart_toStartOf="parent"
        app:layout_constraintTop_toTopOf="parent" />

</androidx.constraintlayout.widget.ConstraintLayout>
Data class
To store the data to be displayed on the views, we need a data class. Create a data class name
Data
and add the below code:
data class Data(val viewType: Int, val textData: String)
The
viewType
will tell which view we are using i.e. either
item_view_1
or
item_view_2
and
textData
will store the data that will be displayed on the TextView.
Adapter for RecyclerView
Now, for the RecyclerView, we need to create an Adapter class that will store all the logic of RecyclerView i.e. when to display which view.
Create an Adapter class named
RecyclerViewAdapter
.
In the RecyclerViewAdapter class, we will check if the desired view is
item_view_1
then the content of item_view_1 will be displayed otherwise we will display the content of
item_view_2
.
The following is the code for the
RecyclerViewAdapter
class:
class RecyclerViewAdapter(context: Context, list: ArrayList<Data>) :
    RecyclerView.Adapter<RecyclerView.ViewHolder>() {

    companion object {
        const val VIEW_TYPE_ONE = 1
        const val VIEW_TYPE_TWO = 2
    }

    private val context: Context = context
    var list: ArrayList<Data> = list

    private inner class View1ViewHolder(itemView: View) :
        RecyclerView.ViewHolder(itemView) {
        var message: TextView = itemView.findViewById(R.id.textView)
        fun bind(position: Int) {
            val recyclerViewModel = list[position]
            message.text = recyclerViewModel.textData
        }
    }

    private inner class View2ViewHolder(itemView: View) :
        RecyclerView.ViewHolder(itemView) {
        var message: TextView = itemView.findViewById(R.id.textView)
        fun bind(position: Int) {
            val recyclerViewModel = list[position]
            message.text = recyclerViewModel.textData
        }
    }

    override fun onCreateViewHolder(parent: ViewGroup, viewType: Int): RecyclerView.ViewHolder {
        if (viewType == VIEW_TYPE_ONE) {
            return View1ViewHolder(
                LayoutInflater.from(context).inflate(R.layout.item_view_1, parent, false)
            )
        }
        return View2ViewHolder(
            LayoutInflater.from(context).inflate(R.layout.item_view_2, parent, false)
        )
    }

    override fun getItemCount(): Int {
        return list.size
    }

    override fun onBindViewHolder(holder: RecyclerView.ViewHolder, position: Int) {
        if (list[position].viewType === VIEW_TYPE_ONE) {
            (holder as View1ViewHolder).bind(position)
        } else {
            (holder as View2ViewHolder).bind(position)
        }
    }

    override fun getItemViewType(position: Int): Int {
        return list[position].viewType
    }
}
Note:
In the
getItemViewType
, we are returning the id of the view which is always unique.
Adding RecyclerView in our project
Now, add RecyclerView in the
activity_main.xml
. The following is the code for
activity_main.xml
:
<?xml version="1.0" encoding="utf-8"?>
<androidx.constraintlayout.widget.ConstraintLayout xmlns:android="http://schemas.android.com/apk/res/android"
    xmlns:app="http://schemas.android.com/apk/res-auto"
    xmlns:tools="http://schemas.android.com/tools"
    android:layout_width="match_parent"
    android:layout_height="match_parent"
    tools:context=".MainActivity">

    <androidx.recyclerview.widget.RecyclerView
        android:id="@+id/recyclerView"
        android:layout_width="match_parent"
        android:layout_height="match_parent" />

</androidx.constraintlayout.widget.ConstraintLayout>
Now, the thing to do is just add the data to the views. The following is the code for
MainActivity
:
class MainActivity : AppCompatActivity() {
private lateinit var recyclerView: RecyclerView
override fun onCreate(savedInstanceState: Bundle?) {
super.onCreate(savedInstanceState)
setContentView(R.layout.activity_main)
val dataList = ArrayList<Data>()
dataList.add(Data(RecyclerViewAdapter.VIEW_TYPE_ONE, "1. Hi! I am in View 1"))
dataList.add(Data(RecyclerViewAdapter.VIEW_TYPE_TWO, "2. Hi! I am in View 2"))
dataList.add(Data(RecyclerViewAdapter.VIEW_TYPE_ONE, "3. Hi! I am in View 3"))
dataList.add(Data(RecyclerViewAdapter.VIEW_TYPE_TWO, "4. Hi! I am in View 4"))
dataList.add(Data(RecyclerViewAdapter.VIEW_TYPE_ONE, "5. Hi! I am in View 5"))
dataList.add(Data(RecyclerViewAdapter.VIEW_TYPE_TWO, "6. Hi! I am in View 6"))
dataList.add(Data(RecyclerViewAdapter.VIEW_TYPE_ONE, "7. Hi! I am in View 7"))
dataList.add(Data(RecyclerViewAdapter.VIEW_TYPE_TWO, "8. Hi! I am in View 8"))
dataList.add(Data(RecyclerViewAdapter.VIEW_TYPE_ONE, "9. Hi! I am in View 9"))
dataList.add(Data(RecyclerViewAdapter.VIEW_TYPE_TWO, "10. Hi! I am in View 10"))
dataList.add(Data(RecyclerViewAdapter.VIEW_TYPE_ONE, "11. Hi! I am in View 11"))
dataList.add(Data(RecyclerViewAdapter.VIEW_TYPE_TWO, "12. Hi! I am in View 12"))
val adapter = RecyclerViewAdapter(this, dataList)
recyclerView = findViewById(R.id.recyclerView)
recyclerView.layoutManager = LinearLayoutManager(this)
recyclerView.adapter = adapter
}
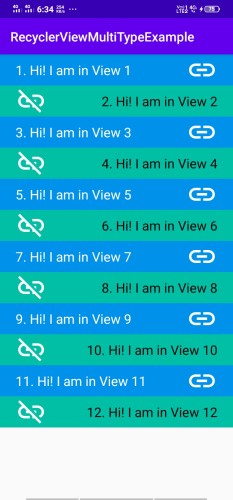
}Now, run the application on your device and you will see something like below:
This is how you can implement multiple views in a RecyclerView. You can find the whole project from here .
I hope you enjoyed this blog. Do share this blog with your fellow developers to spread the knowledge.
Happy Learning :)
Team MindOrks!
Also, Let’s connect on Twitter , Linkedin , Github , and Facebook