Android TextView Decoration Tutorial
TextViews are the first things that we learn when we start learning Android and due to this whenever we create an Empty Activity, then by default we will see one TextView on the screen with “Hello World!”. So, Hello World! Hope you are learning well. In this blog, we will learn TextView decoration in Android. This blog is going to be an interesting blog as we all use TextViews in our Android application to display some textual information. In this blog, we will learn how to decorate these TextViews in Android. In the beginning, we will learn some of the basic attributes of TextView and after that, we will be having some cool TextViews in our app. So, let’s get started.
TextView
A TextView is a user interface element that is used to display some text or some textual information in our application. Following is an XML code for using TextView in our application:
<LinearLayout
      xmlns:android="http://schemas.android.com/apk/res/android"
      android:layout_width="match_parent"
      android:layout_height="match_parent">
    <TextView
        android:id="@+id/text_view_id"
        android:layout_height="wrap_content"
        android:layout_width="wrap_content"
        android:text="Hello MindOrks!" />
 </LinearLayout>
By using the TextView tag in your application, you can insert a TextView to display the desired text by using android:text property. To decorate a TextView, there are various attributes that can be used. Let’s discuss one by one.
Typeface
By default, Android gives you four fonts that you can use in your application. They are:
- monospace
- normal
- sans
- serif
You can use these fonts in your TextView by using the android:typeface attribute.
<TextView
        android:id="@+id/tv1"
        android:layout_width="wrap_content"
        android:layout_height="wrap_content"
        android:text="Hello MindOrks! monospace"
        android:textSize="24sp"
        android:typeface="monospace"
        app:layout_constraintLeft_toLeftOf="parent"
        app:layout_constraintRight_toRightOf="parent"
        app:layout_constraintTop_toTopOf="parent"
        android:layout_marginTop="32dp"/>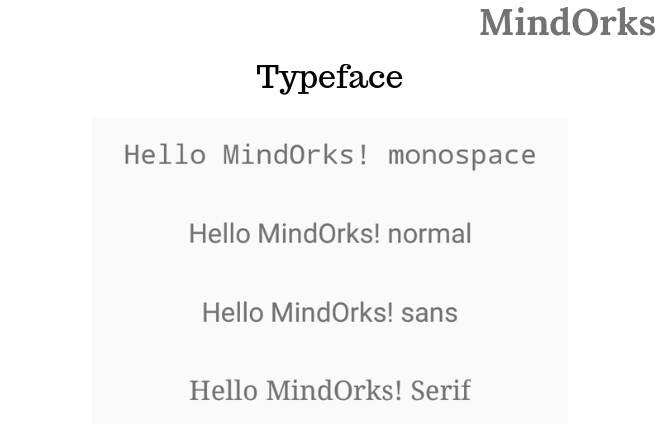
Textstyle
You can emphasize a text by using the android:textStyle attribute. Following are the three options that are available with android:textStyle :
- bold
- italic
- normal
<TextView
        android:id="@+id/tv1"
        android:layout_width="wrap_content"
        android:layout_height="wrap_content"
        android:text="Hello MindOrks! Bold"
        android:textSize="24sp"
        android:textStyle="bold"
        app:layout_constraintLeft_toLeftOf="parent"
        app:layout_constraintRight_toRightOf="parent"
        app:layout_constraintTop_toTopOf="parent"
        android:layout_marginTop="32dp"/>
Text size and Text Color
You can change the text size by using the android:textSize attribute and the color of the text can be change by using android:textColor attribute.
<TextView
        android:id="@+id/tv1"
        android:layout_width="wrap_content"
        android:layout_height="wrap_content"
        android:text="Hello MindOrks! 32sp"
        android:textSize="32sp"
        android:textColor="#11209F"
        app:layout_constraintLeft_toLeftOf="parent"
        app:layout_constraintRight_toRightOf="parent"
        app:layout_constraintTop_toTopOf="parent"
        android:layout_marginTop="32dp"/>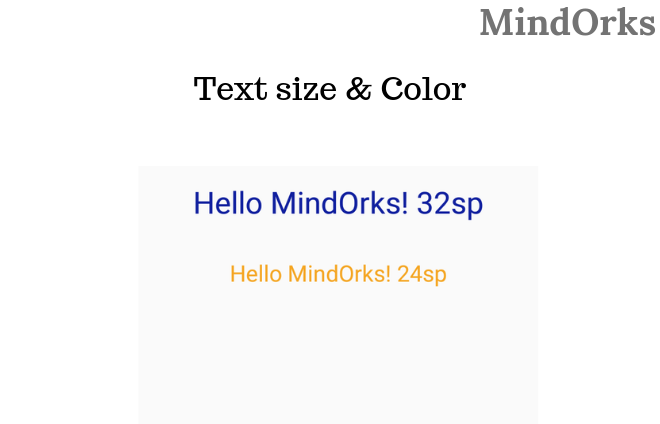
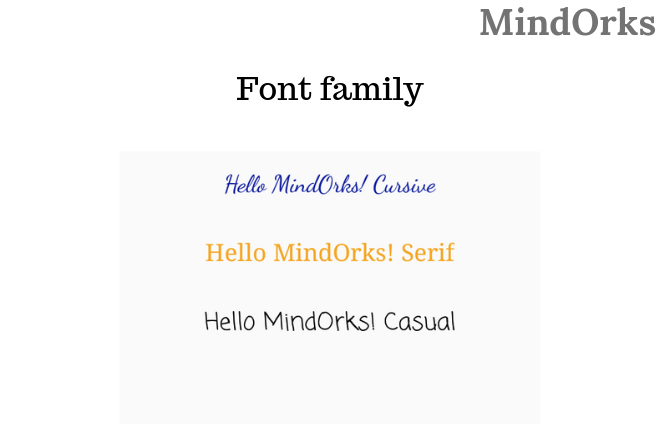
Font famil y
You can change the font family of a TextView by using the android:fontFamily attribute. By default, we have 14 font families that can be used in TextView. Some of these are serif, monospace, casual, cursive, sans-serif, sans-monospace, etc.
<TextView
        android:id="@+id/tv1"
        android:layout_width="wrap_content"
        android:layout_height="wrap_content"
        android:text="Hello MindOrks! Cursive"
        android:textSize="24sp"
        android:fontFamily="cursive"
        android:textColor="#11209F"
        app:layout_constraintLeft_toLeftOf="parent"
        app:layout_constraintRight_toRightOf="parent"
        app:layout_constraintTop_toTopOf="parent"
        android:layout_marginTop="32dp"/>
ImageIf you want to use your custom font then you can read our blog at MindOrks Blogs .
Text alignment
You can align your text with the help of android:textAlignment attribute. This attribute provides us a lot of options like center align, textStart, textEnd, viewStart, viewEnd, etc.
<TextView
        android:id="@+id/tv1"
        android:layout_width="match_parent"
        android:layout_height="wrap_content"
        android:text="Hello MindOrks! center align"
        android:textAlignment="center"
        android:textSize="24sp"
        android:textColor="#11209F"
        app:layout_constraintLeft_toLeftOf="parent"
        app:layout_constraintRight_toRightOf="parent"
        app:layout_constraintTop_toTopOf="parent"
        android:layout_marginTop="32dp"/>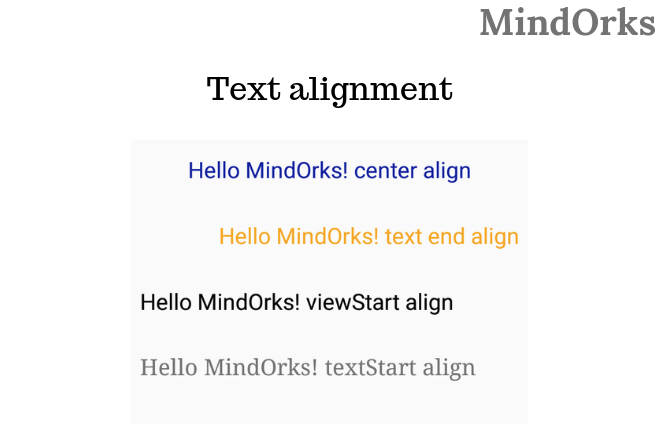
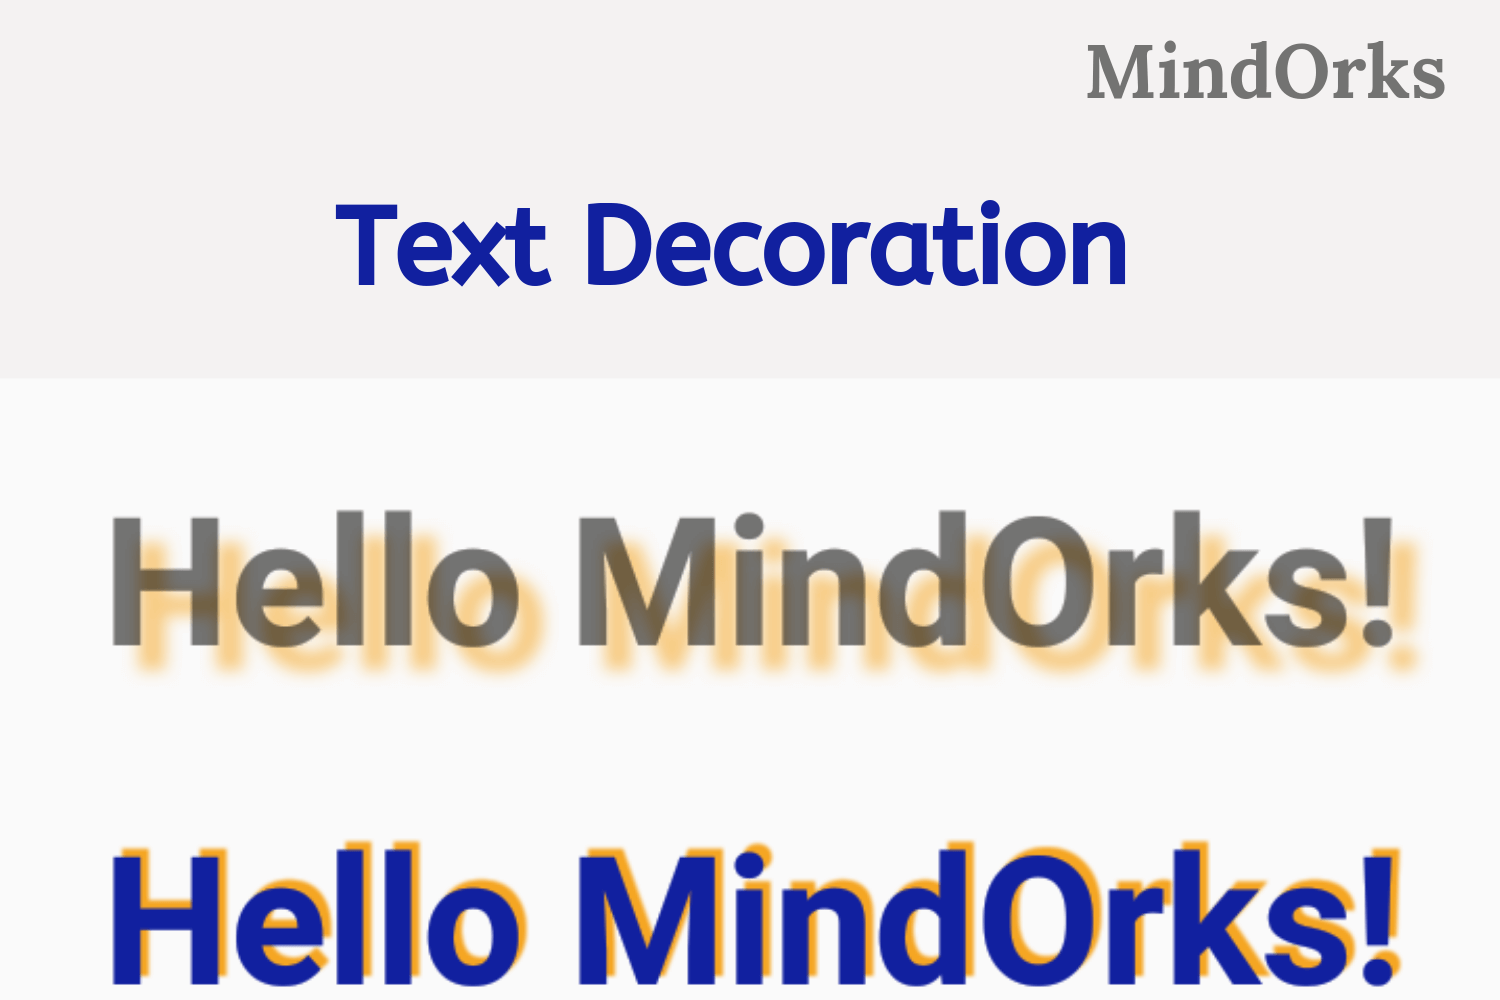
Text shadow
You can put shadow to your text and change the color of the shadow by using the android:shadowColor attribute. Also, you can use shadowDx and shadowDy to specify the offset of the shadow. For example, a -Dx draws a shadow on the left of the text and +Dx draws a shadow on the right of the text. shadowRadius can be used to specify how much the shadow should be blurred at the edges.
<TextView
        android:layout_width="wrap_content"
        android:layout_height="wrap_content"
        android:layout_gravity="center"
        android:text="Hello MindOrks!"
        android:textSize="50sp"
        android:padding="12dp"
        android:shadowColor="#F5A623"
        android:shadowDx="12"
        android:shadowDy="12"
        android:shadowRadius="8"
        android:textStyle="bold"/>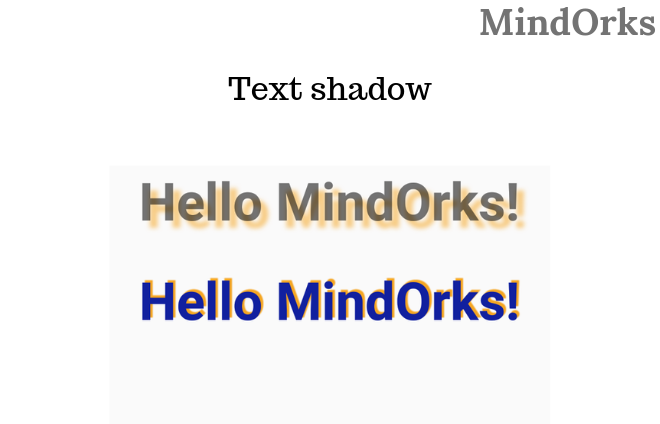
Non Breaking Sentence
You can put a sentence in more than one line. This is possible when the width of the TextView is not enough to hold the contents of the TextView i.e. you are having more texts but the space is not provided.
<TextView
        android:layout_width="140dp"
        android:layout_height="wrap_content"
        android:layout_gravity="center"
        android:text="Hello MindOrks!"
        android:textSize="50sp"
        android:textStyle="bold"/>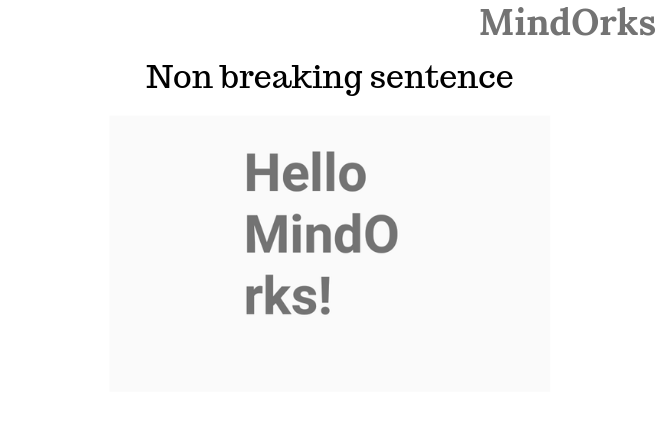
Gradient
To set the color of the TextView, you can also use Gradient color by using the LinearGradient.
<TextView
        android:id="@+id/text"
        android:layout_width="wrap_content"
        android:layout_height="wrap_content"
        android:gravity="center"
        android:text="MindOrks"
        android:textColor="@android:color/black"
        android:textSize="60sp"
        android:textStyle="bold"/>
Also, add the below code in you MainActivity.kt file to use LinearGradient :
class MainActivity : AppCompatActivity() {

    override fun onCreate(savedInstanceState: Bundle?) {
        super.onCreate(savedInstanceState)
        setContentView(R.layout.activity_main)
        val textView = findViewById<TextView>(R.id.text)
        val shader = LinearGradient(0f, 0f, 0f, textView.textSize, Color.RED, Color.BLUE, Shader.TileMode.CLAMP)
        textView.paint.shader = shader
    }
}
The parameters of the LinearGradient are:
- x0: x-coordinate for start of gradient line. It is of type float.
- y0: y-coordinate for start of gradient line. It is of type float.
- x1: x-coordinate for end of gradient line. It is of type float.
- y1: y-coordinate for end of gradient line. It is of type float.
- colors: The RGB color to be distributed along the gradient line. It is of type float.
- positions: It is the relative position of each corresponding color in the colors array. It is of type float.
- tile: It is the shader tiling mode. It is of type float.

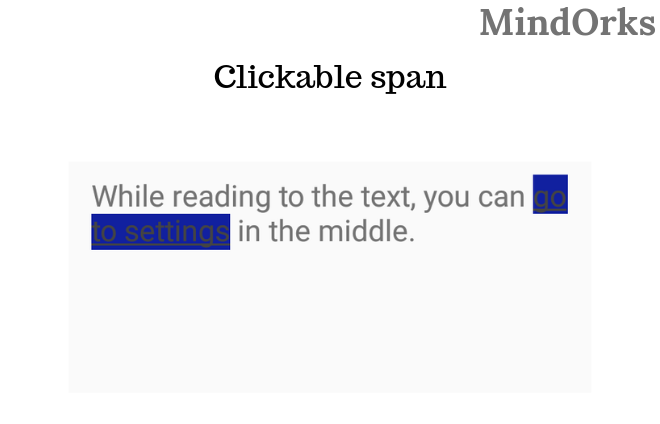
Clickable span
While reading a text, you can go to somewhere else by clicking on the text. This is the same way as used in websites, where we use hyperlinks to open new page from the existing one. Add the below code in your XML file:
<TextView
        xmlns:android="http://schemas.android.com/apk/res/android"
        android:id="@+id/text"
        android:layout_width="match_parent"
        android:layout_height="match_parent"
        android:paddingBottom="16dp"
        android:paddingLeft="16dp"
        android:paddingRight="16dp"
        android:paddingTop="16dp"
        android:textSize="24sp"
        android:text="While reading to the text, you can go to settings in the middle."
        android:textColorLink="#444"
        android:textColorHighlight="#11209F"/>
Here, textColorLink is the color of the clickable link and the textColorHighlight is the color used when you click the link.Add the below code in your MainActivity.kt file:
class MainActivity : AppCompatActivity() {

    override fun onCreate(savedInstanceState: Bundle?) {
        super.onCreate(savedInstanceState)
        setContentView(R.layout.activity_main)
        val textView = findViewById<TextView>(R.id.text)
        val text = textView.text.toString()
        val goToSettings = getString(R.string.go_to_settings)
        val start = text.indexOf(goToSettings)
        val end = start + goToSettings.length
        val spannableString = SpannableString(text)
        spannableString.setSpan(GoToSettingsSpan(), start, end, 0)
        textView.text = spannableString
        textView.movementMethod = LinkMovementMethod()
    }

    private class GoToSettingsSpan: ClickableSpan() {
        override fun onClick(view: View) {
            view.context.startActivity(Intent(Settings.ACTION_SETTINGS))
        }
    }
}
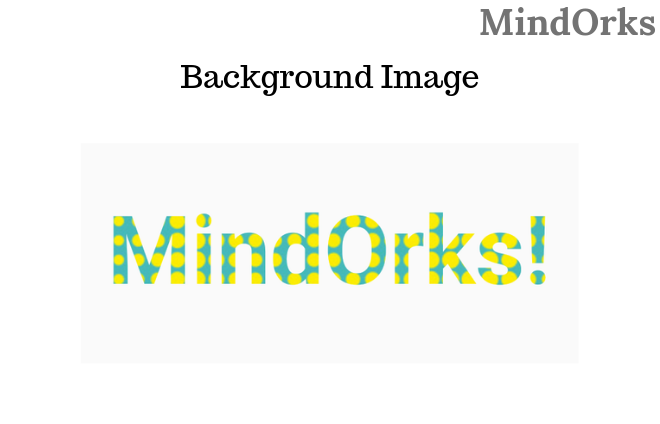
Background Image
You can use some background image in TextView i.e. it seems like the text is written on the image. Add the below code in your XML file:
<TextView
        xmlns:android="http://schemas.android.com/apk/res/android"
        android:id="@+id/text"
        android:layout_width="wrap_content"
        android:layout_height="wrap_content"
        android:layout_gravity="center"
        android:gravity="center"
        android:text="MindOrks!"
        android:textColor="#000000"
        android:textSize="80sp"
        android:textStyle="bold"/>
After that, add the below code in your MainActivity.kt file:
class MainActivity : AppCompatActivity() {

    override fun onCreate(savedInstanceState: Bundle?) {
        super.onCreate(savedInstanceState)
        setContentView(R.layout.activity_main)

        val textView = findViewById<TextView>(R.id.text)
        val bitmap = BitmapFactory.decodeResource(resources, R.drawable.bg)
        val shader = BitmapShader(bitmap, Shader.TileMode.REPEAT, Shader.TileMode.REPEAT)
        textView.paint.shader = shader
    }
}
Conclusion
In this blog, we learned how we can decorate TextViews in our application. We learned many ways of decorating the text used in our application. Hope you enjoyed this blog and will implement the learnings of this blog in your application.
Keep Learning :)
Team MindOrks!