
What is Lint? What is it used for?

As an Android Developer, we all use Android Studio for developing our applications. There are many other editors that can be used for Android app development but the best part that attracts me to use Android Studio is the support that it provides to the Android developers. The support can be in the form of auto-suggestion or it can be of the form of showing errors in our code(in all the files present in our project).
So, in this blog, we will see one of the best features of Android Studio that helps us to improve our way of writing errorless code and that feature is Lint. The topics that will be discussed in this blog are:
- What is Lint?
- Configuration of lint
- Helping Lint
- Using Baseline
- Manually run inspections
- Conclusion
So, Let’s get started.
What is Lint?
Lint is a code scanning tool provided by the Android Studio to identify, suggest and correct the wrong or the risky code present in the project.
Lint is like a full-fledged stack analysis framework
We all have been using the Lint since we started using the Android Studio because by default Android studio provides the support for Lint in our every project. The problems detected in your code by the Lint will be reported to you with some suggestions and a warning level. You can use the suggestion to correct your code. The best part of Lint is that you can use Lint as per your need. If you want to see a particular type of error in your project then the Lint will only show you that type of error. Lint is customizable in nature. By default Android Studio runs the inspection process whenever you build your project but apart from this, you can inspect your code with the help of Lint manually or from the command line.
The following image shows the working of Lint:
Picture courtesy: Android Developer website
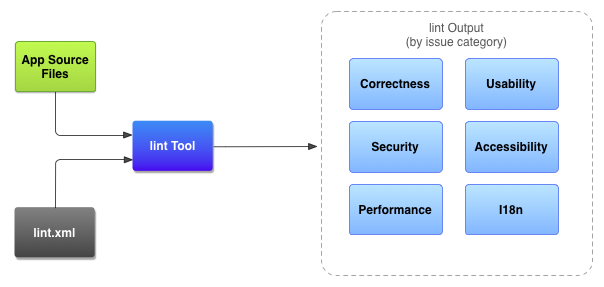
The whole process of lint can be summarized in three steps:
- Making lint.xml file: You can customize the Lint checks in the lint.xml file. In this file, you can write the checks that you want to include and ignore the checks that you don’t want to include. For example, if you want to check the issue of unused variable and don’t want to check for naming issues then you can do this is lint.xml file. Apart from this, you can customize the Lint checks manually also. We will see how to do manual Lint checks in the next part of this blog.
- Application source file: The next step is to select the source files on which you want to perform the Lint check. It can be your .java file or .kt file or any xml file of your project.
- The Lint tool: Finally, the lint tool takes the source and lint.xml files and checks for structural code problems and suggest some improvements in the code if any. It is suggested to use the lint suggestion before publishing our app.
When to use Lint?
If you want to publish your app on the play store or any app store then you would like to have an error free app. For this purpose, you have to perform so many testing on your app manually. But if you want to get rid of some of the manual testing, you can use Lint in your project. You can inspect each and every file of your code to find some error and Lint will identify the errors and suggest some answers. That errors or warnings can be of:
- Unused variables
- Unhanded exceptions
- Imports that are not used in the project, and many more
So, before publishing your app, you should use Lint to inspect your code fully.
Also, you can configure lint checking for different levels of your project:
- Globally (entire project)
- Project module
- Production module
- Test module
- Open files
- Class hierarchy
- Version Control System (VCS) scopes
Configuration of Lint
In order to use Lint or simply run inspections in your project, you can add Lint inspection in the lint.xml file or you can manually select the list of issues to be configured by the lint in your project by using Android Studio.
- Configure the lint file: In order to specify manual checks in your app, add the list of issues to be configured in the lint.xml file. If you are making a new lint.xml file then make sure to put it into the root directory of your Android project.
Following is an example of lint.xml file:
<?xml version="1.0" encoding="UTF-8"?>
<lint>
    <!-- Disable the given check in this project -->
    <issue id="IconMissingDensityFolder" severity="ignore" />

    <!-- Ignore the ObsoleteLayoutParam issue in the specified files -->
    <issue id="ObsoleteLayoutParam">
        <ignore path="res/layout/activation.xml" />
        <ignore path="res/layout-xlarge/activation.xml" />
    </issue>

    <!-- Ignore the UselessLeaf issue in the specified file -->
    <issue id="UselessLeaf">
        <ignore path="res/layout/main.xml" />
    </issue>

    <!-- Change the severity of hardcoded strings to "error" -->
    <issue id="HardcodedText" severity="error" />
</lint>- Configure the lint manually: By default, lint checks for a number of issues but not all the issues. This is not done because if you will run all the issue check that lint can check for, then the performance of the Android Studio will be slowed down. So, only a limited number of lint checks are used in Android Studio by default. But you can add more checks and remove checks from the lint by following the steps below:
Go to Files > Settings > Editor > Inspections and then check the issue checks that you want to be performed by the lint
Helping Lint
There are many times when you are writing a risky or error full code but the lint is not showing any error or warning to your code. For example, write the below code in Android Studio:
fun updateUi() {
    // code goes here
    networkRequest()
}

fun networkRequest() {
    // code goes here
}
The above lines of code will not show you some error, but logically it should show some error because, during the update of UI, network request should not be called. So, what you can do here is to help the lint.
Help Lint helps you
Yes, if you will help the lint then lint will also help you. So, in order to help the lint understand the code in a more precise way, always try to use annotations in your project. Now write the same some that you have written previously and then check for error:
@UiThread
fun updateUi() {
    // code goes here
    networkRequest()
}

@WorkerThread
fun networkRequest() {
    // code goes here
}
So, help Lint by using Annotations in your code.
Using Baseline
If you are working on a very big project and interested in finding the future errors that might come while adding some more codes to your project then you can add a baseline to your project and by doing so the lint will generate the errors that have occurred after that baseline. So, lint will ignore the previous code issues and will warn you only about the new lines of code added after the baseline.
To add a baseline in your project, add the below line in your project’s build.gradle file:
android {
  lintOptions {
    baseline file("lint-baseline.xml")
  }
}
This will create a lint-baseline.xml that will establish a baseline of your project. To add another baseline, delete the file and the lint again.
Another thing that you can do here is, you can enable any type of issue check here only. For example, in order to enable the Kotlin Interoperability check, write the below code:
android {
  lintOptions {
    baseline file("lint-baseline.xml")
  }
}
enable "Interoperability"Manually run inspections
In order to manually inspect a file in Android Studio, follow the below steps:
Step 1: Go to the file you want to inspect.
Step 2: Right click and then go to Analyze > Inspect Code. Below window will be opened:
Picture courtesy: Android Developer website
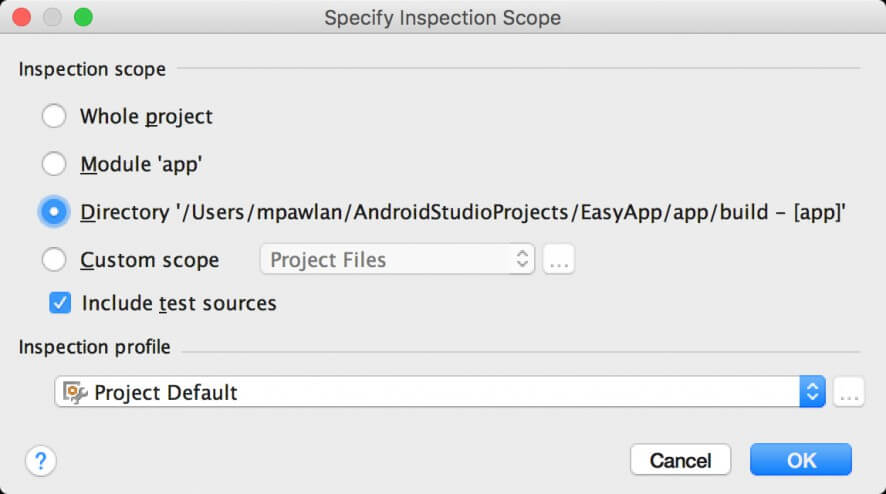
Here you can select your inspection scope i.e. whole project or module or simply a file. After selecting the scope click on OK.
The following window will be opened:
Picture courtesy: Android Developer website
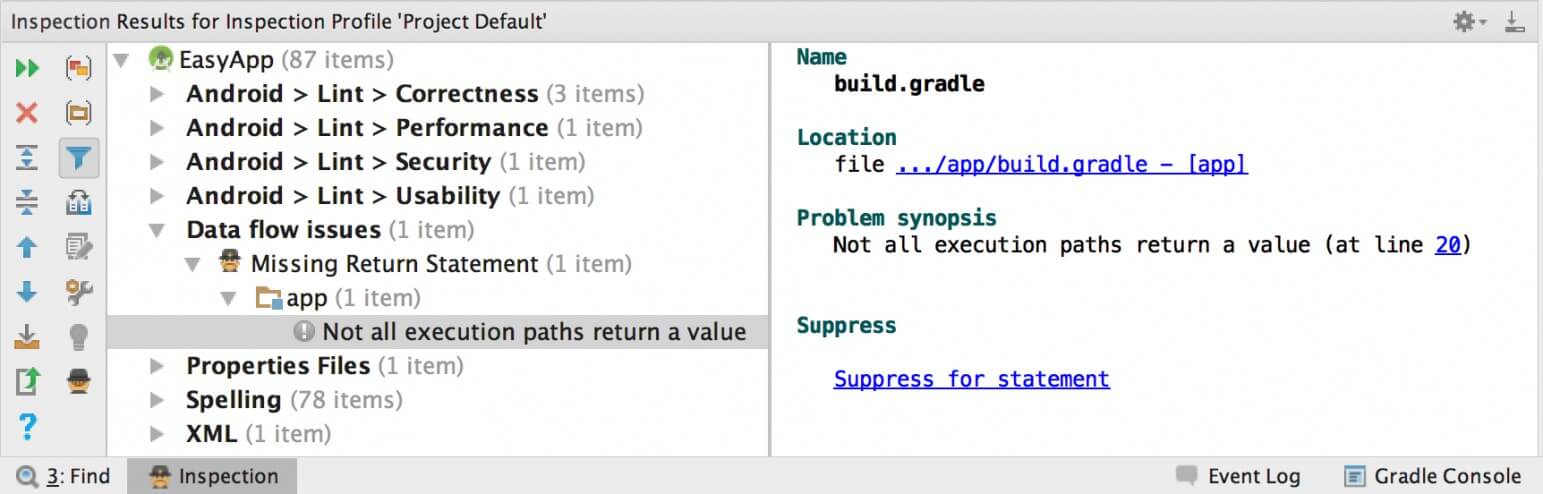
A list of error categories, types and issues will be there. You can view the inspection result by expanding the error in the left pane tree view.
In the other pane i.e. the right pane displays the inspection report for the selected error.
Conclusion
In this blog, we learned how to use the Lint in Android Studio. We saw that if we want to analyze our code then we need not do it manually. Android Studio provides a code checking tool Lint, that helps us to clean our code and use the necessary and right code for Application development.
So, use Lint for the removal of various types of error in your project and also help the lint to help you.
Keep Learning :)
Team MindOrks.