Using Swipe-to-refresh in Android Application
In our day to day life, you may have come across various mobile applications that are dealing with some real-time database. By the tern real-time database I mean to say that the data of the application is changing at every instant of time or after a particular instant of time. Some of these applications are Facebook, Instagram, Crickbuz, etc.
If you look upon the Cricbuzz mobile app, then you will find that when you start the app then the data of various live matches come to the main screen but the problem is that if you are watching the scores of a live match then on each ball, the data should be changed. For example, if the score of India is 40/0 in 8.0 overs and 44/0 in 8.1 overs, then this change in data should be reflected on the application.
So, what they do is, they set a counter or simple you can say a timer. For example, if they set a set timer of 2 seconds, then after every 2 seconds the data of the match will be refreshed and you will get the live score. But what if you want to get the scores refreshed in 1 sec or even before? Yeah, these things happen, especially when you are watching the match of INDIA or your favorite team.
So, in order to achieve the same goal, cricbuzz, and many other applications has the property of swipe-to-refresh . That is whenever you want to refresh the application, just swipe down. Same is with the Instagram and Facebook app.
In this blog, we will be learning about SwipeRefreshLayout and will try to use it with the help of one example.
What is SwipeRefreshLayout?
SwipeRefreshLayout is a ViewGroup that can hold only one scrollable child. It can be either a ScrollView , ListView or RecyclerView . If the usr wants to refresh the screen manually, then your app must have SwipeRefreshLayout
If the user wants to refresh the screen at a certain point of time, then with the help of SwipeRefeshLayout, he/she can achieve his/her goal i.e refresh the page, just by dragging the screen toward the bottom of the screen.
Just like the setOnClickListener() , SwipeRefreshLayout consists of OnRefreshListener. On swiping down, OnRefresh() method is called and we can change or override the OnRefresh() method as per need.
Commonly used methods in SwipeRefreshLayout
- onRefresh(): used to handle the event to be done after refreshing.
- isRefreshing(): returns whether the SwipeRefreshWidget is actively showing refresh progress.
- setColorSchemeColos(): used to set the colors used in the progress animation.
- setProgressBackgroundColorSchemeColor(): used to set the background color of the spinner.
-
                     setOnRefreshListener(SwipeRefreshLayout.OnRefreshListener listener):

                    it
notifies the listener when a refresh is triggered. - setRefreshing(boolean refreshing): it notifies the widget when the refresh state is changed.
NOTE: SwipeRefreshLayout can hold only one scrollable view as a child.
Let's have an example
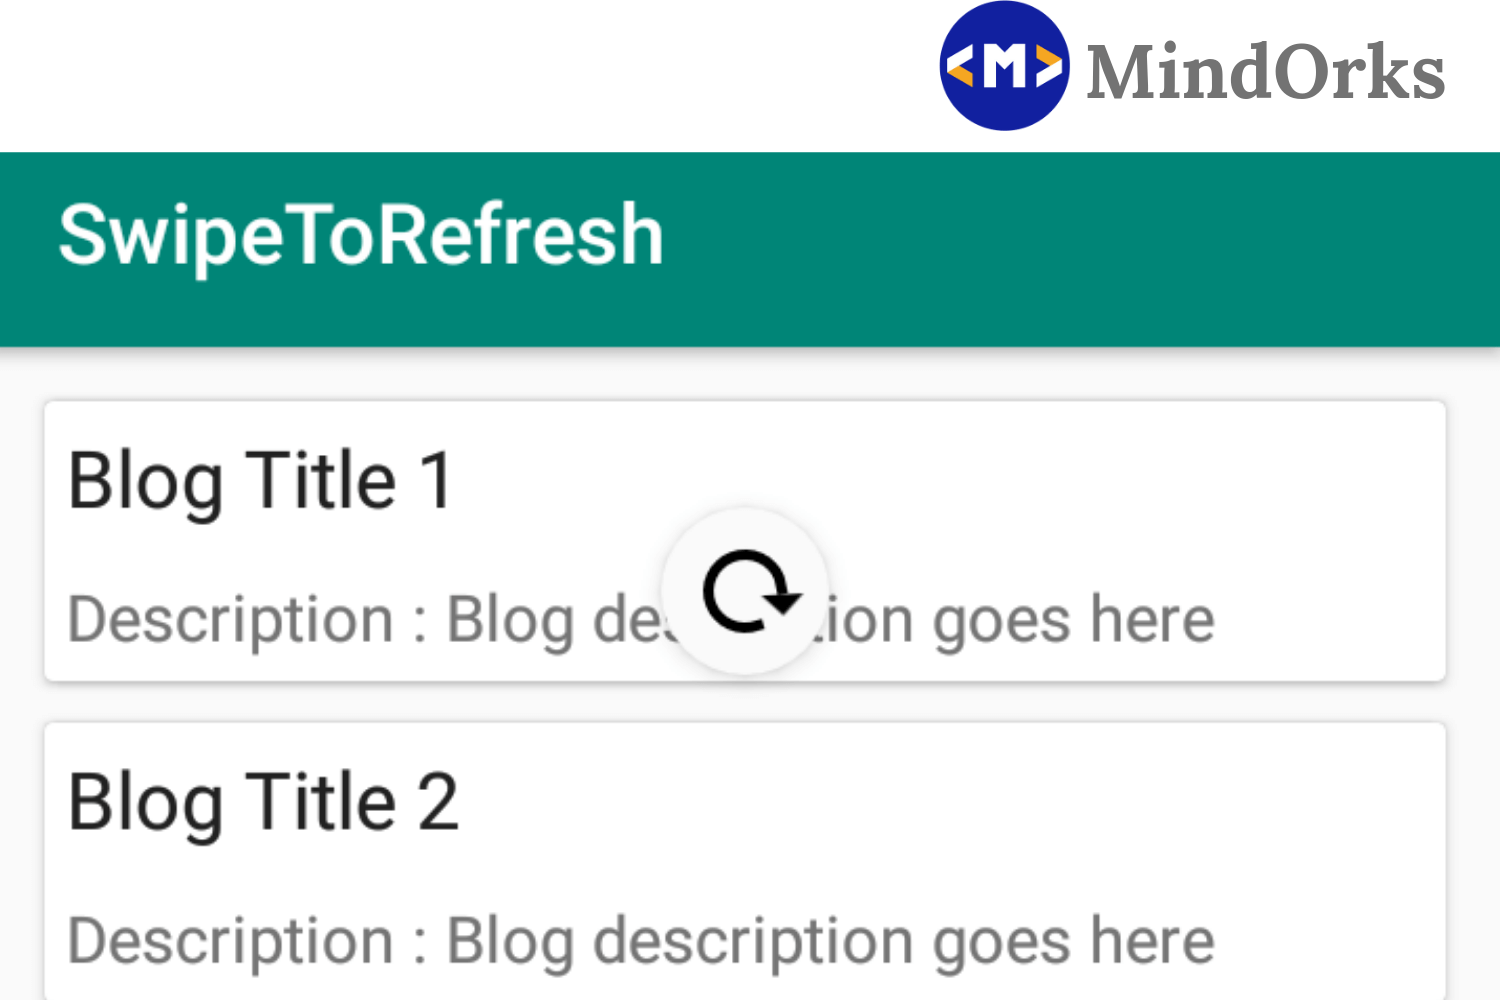
Here, we will be implementing the swipe-to-refresh feature using a RecyclerView . In the RecyclerView , there is a CardView having some texts written on it and when you swipe down then two CardView will be added to the screen and after that a toast will be displayed if you will swipe again.
Following is the code of my activity_main.xml:
<?xml version="1.0" encoding="utf-8"?>
<android.support.constraint.ConstraintLayout
        xmlns:android="http://schemas.android.com/apk/res/android"
        xmlns:tools="http://schemas.android.com/tools"
        xmlns:app="http://schemas.android.com/apk/res-auto"
        android:layout_width="match_parent"
        android:layout_height="match_parent"
        tools:context=".MainActivity">

    <android.support.v4.widget.SwipeRefreshLayout
            android:id="@+id/swipe_refresh_layout"
            android:layout_width="match_parent"
            android:layout_height="match_parent">

        <ScrollView
                android:layout_width="match_parent"
                android:layout_height="match_parent">

            <android.support.v7.widget.RecyclerView
                    android:id="@+id/recyclerView"
                    android:layout_width="match_parent"
                    android:layout_height="match_parent"
                    tools:layout_editor_absoluteX="8dp"
                    tools:layout_editor_absoluteY="8dp"
                    android:layout_marginTop="8dp"
                    android:layout_marginBottom="8dp"
                    app:layout_constraintEnd_toEndOf="parent"
                    app:layout_constraintTop_toTopOf="parent"
                    app:layout_constraintStart_toStartOf="parent"
                    app:layout_constraintBottom_toBottomOf="parent"
                    android:layout_marginStart="8dp"
                    android:layout_marginEnd="8dp" />
        </ScrollView>

    </android.support.v4.widget.SwipeRefreshLayout>
</android.support.constraint.ConstraintLayout>
After adding the above code in your main activity, make an XML file in res/layout and name it as list_layout.xml. This file will contain the UI of each list item. Following is the code:
<?xml version="1.0" encoding="utf-8"?>
<LinearLayout xmlns:android="http://schemas.android.com/apk/res/android"
              android:orientation="vertical"
              android:layout_width="match_parent"
              android:layout_height="wrap_content">

    <android.support.v7.widget.CardView
            android:layout_width="match_parent"
            android:layout_height="wrap_content"
            android:layout_margin="5dp">

        <LinearLayout
                android:layout_width="match_parent"
                android:layout_height="wrap_content"
                android:orientation="vertical">

            <TextView
                    android:id="@+id/textViewTitle"
                    android:layout_width="match_parent"
                    android:layout_height="wrap_content"
                    android:padding="5dp"
                    android:text="Blog Tile 1"
                    android:textAppearance="@style/Base.TextAppearance.AppCompat.Large"/>

            <TextView
                    android:id="@+id/textViewDesc"
                    android:layout_width="match_parent"
                    android:layout_height="wrap_content"
                    android:padding="5dp"
                    android:text="Blog description - description about blog"
                    android:textAppearance="@style/Base.TextAppearance.AppCompat.Medium"/>
        </LinearLayout>
    </android.support.v7.widget.CardView>

</LinearLayout>
Now we are done with the UI part. Add the data class named as Blog in your package:
package com.sumit.swipetorefresh

data class Blog(val title: String, val desc: String)
After that, in order to add some items in the RecyclerView, we have created a CustomAdapter class in our package. This class will add the title and description of blog on the CardView present in RecyclerView .
package com.sumit.swipetorefresh

import android.support.v7.widget.RecyclerView
import android.view.LayoutInflater
import android.view.View
import android.view.ViewGroup
import android.widget.TextView

class CustomAdapter(val blogList: ArrayList<Blog>) : RecyclerView.Adapter<CustomAdapter.ViewHolder>() {

    //this method is returning the view for each item in the list
    override fun onCreateViewHolder(parent: ViewGroup, viewType: Int): CustomAdapter.ViewHolder {
        val v = LayoutInflater.from(parent.context).inflate(R.layout.list_layout, parent, false)
        return ViewHolder(v)
    }

    //this method is binding the data on the list
    override fun onBindViewHolder(holder: CustomAdapter.ViewHolder, position: Int) {
        holder.bindItems(blogList[position])
    }

    //this method is giving the size of the list
    override fun getItemCount(): Int {
        return blogList.size
    }

    //the class is hodling the list view
    class ViewHolder(itemView: View) : RecyclerView.ViewHolder(itemView) {

        fun bindItems(blog: Blog) {
            val textViewTitle = itemView.findViewById(R.id.textViewTitle) as TextView
            val textViewDesc  = itemView.findViewById(R.id.textViewDesc) as TextView
            textViewTitle.text = blog.title
            textViewDesc.text = blog.desc
        }
    }
}
Then in the MainActivity.kt file add the below code:
package com.sumit.swipetorefresh

import android.support.v7.app.AppCompatActivity
import android.os.Bundle
import android.support.v4.widget.SwipeRefreshLayout
import android.support.v7.widget.LinearLayoutManager
import android.support.v7.widget.RecyclerView
import android.widget.LinearLayout
import android.widget.Toast

class MainActivity : AppCompatActivity() {

    //counting the number of swipes
    var swipeCount = 0

    override fun onCreate(savedInstanceState: Bundle?) {
        super.onCreate(savedInstanceState)
        setContentView(R.layout.activity_main)

        //getting recyclerview from xml
        val recyclerView = findViewById<RecyclerView>(R.id.recyclerView)

        //getting swipeRefreshLayput from xml
        val swipeRefreshLayout = findViewById<SwipeRefreshLayout>(R.id.swipe_refresh_layout)

        //adding a layoutmanager
        recyclerView.layoutManager = LinearLayoutManager(this, LinearLayout.VERTICAL, false)

        val blogs = ArrayList<Blog>()
        val adapter = CustomAdapter(blogs)

        recyclerView.adapter = adapter;
        swipeRefreshLayout.setOnRefreshListener {

            swipeCount += 1;
            if (swipeCount > 0) {
                blogs.add(Blog("Blog Title $swipeCount", "Description : Blog description goes here"))
                Toast.makeText(this, "Swipe called", Toast.LENGTH_SHORT).show()
            }
            adapter.notifyDataSetChanged()

            swipeRefreshLayout.isRefreshing = false
        }

    }
}
In the above code, once you swipe down, then the OnRefreshListener() will be called and the execution of program goes into the block of the OnRefreshListener() . In this block you can write the code that you want to be executed when you swipe the application. That code may be of fetching the data from a remote server or updating your UI or displaying something or anything else you want to perform. In my example, I am adding items to the RecyclerView and a toast is used to display a message. You can use the above code and replace my action with your own. So, put your code in the OnRefreshListener().
Conclusion
We have learned how to use SwipeRefreshLayout in our activity. So, in future, if you want your app to be refreshed when your user wants to refresh then you can use this widget. So, that's all for this blog. Will meet you in some other cool Android Blog.
Till then, Keep Learning :)
Team MindOrks.