Understanding Image compression in Android
Images play an important role in any application. It helps in conveying our message in a better way. But it comes with some cons also. It increases the APK size. You might have noticed that the applications dealing with images(either the local image or downloaded from the internet) are bigger in size and also we know that lesser the application size more the number of downloads. So, if we reduce the size of the images used in the application then eventually the APK size will be reduced.
This is the topic for today's blog. Today, we will understand image compression so that in future if you are planning to use some images in your app then you can just follow this blog and use the most suitable image format to reduce the APK size.
We will be covering the below points in this blog:
- Why Image Compression?
- PNG image
- Vector image
- JPEG image
- WebP
- Important tip
- Closing notes
So, let's get started.
Why Image Compression?
Images are the best way to convey our message to our users. We can convey the information through images in a much much better way as compared to texts.
Images are cool.
But the problem with images is that images can be easily bloated. Images can be too big or can have too many pixels or resolutions and this, in turn, reduce your application's performance. For example, if your app is loading an image of 5MB over a 2G network, and it is taking time, then you might end up losing one user of your application. Not only that it will take more data to download the image and also it will drain the battery. So, it is always very important to make sure that the images used in your application are compressed to give a better experience to your users.
In Android, we generally deal with the below four image types:
- PNG
- Vector Drawable
- JPG
- WebP
Let's have a look at these image formats and how it works internally.
PNG
PNG or Portable Network Graphics is the most commonly used image file in Android these days. They provide a nice and high-resolution image format. But due to this, we need to apply some image compression techniques also. PNG compressions are lossless i.e. you can get back your original image from the compressed one i.e. no loss of color is there. Each row of pixels in a PNG image is taken and processed one at a time. The whole PNG compression process can be divided into two processes:
- Filtering: Here in this process, we will keep the value at each pixel and find the difference of value at one pixel with the value of the next or previous or up or down of a pixel. So, the main idea is to get the minimum difference possible. Less the difference, similar will be the color and larger will be the compression. For example, if an image contains only red color then the compression will be easier because only one color is there. All the pixels have the same color.
- Deflate: The output of the filtering process is put into an encoding system called deflate . Here, we use two algorithms named LZ77 and Huffman encoder . LZ77 is a dictionary algorithm that finds the duplicate characters multiple times in a stream of data. The output of this LZ77 is then fed into the Huffman encoder which is almost identical to compressors like PKWARE, GZip, etc. The output of the deflate is then sent to the disk.
To summarize the above two process, we can say that if the image is having lesser color combinations then more compression can be done because the pixel difference will be around 0. But if the image is having a number of color combinations then compression is difficult.
In Android, the AAPT tool does the above thing on PNG images for us. But there are demerits of using it also. So, lets first learn what AAPT does for us:
- It analyses the PNG file to check if the image is having only white and black color i.e. greyscale or the image is having combination of different colors .
- It checks if the image is having some transparency channel or the image is opaque. If your image is opaque then it will remove that channel and as a result of that, your image size will be reduced.
- It finds the total number of colors used in the image. If it is less than or equal to 256, then it decreases the size of image.
The demerits of AAPT lies in the above three points. Let's have one example:
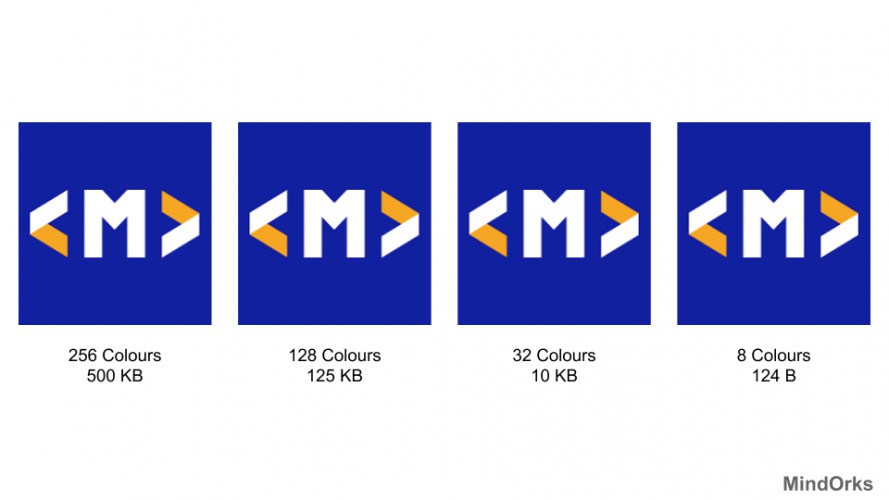
In the image above, three colors are present(blue, yellow, and white). But the AAPT is trying to get values for the 256 unique colors and after doing so, the final size of the image is 500KB. But if we reduce the colors then there is no effect on the image quality but there is a drastic change in the image size. For example, having 128 colors result in 125KB image and 8 colors result in 124B image.
So, what you need to do is first optimize your PNG(you can use PNGQuant, TinyPNG, PNGOut, etc for this) and then use it in your application. But in order to do so, you must disable the AAPT tools for your application because AAPT is unaware of the fact that you have done the compression already. So, to disable AAPT, you can use the below code in Gradle:
aaptOptions {
    cruncherEnabled = False
}
After that, you have to make sure that all the images that you are using are fully compressed because now there is no AAPT for image compression.
Vector Drawable
As we all know that PNG files are raster files in nature. So, if you are making an application for different device sizes then you have to use different resolution size images for different devices(for mdpi, hdpi, xhdpi, etc we need different images) and this, in turn, increases your application size. So, we are having many copies of the same image which is not a good thing.
What if one image can be used in all the devices with different resolutions? Yeah, we can do this with the help of Vector Drawables.
Vector Drawable is a concept of drawing images with code. The benefit of using this is we can use the same drawable image for different resolution devices and this, in turn, reduces the APK size because we are using only one image for all the devices. What we do here is we write the code for the image, execute that or rasterize those to a bitmap in CPU memory and then we upload that in the GPU and finally the image is drawn on the screen of the device. By doing so, you will get a much smaller image file but it takes time in the rasterization process.
To convert your PNG image into vector drawable, you can either write the whole code for it or can use a tool named POTrace . But be very careful before using images that are generated from POTrace because it is just an automated tool. So, you will not get the desired image all the time. But if possible, then code the vector image and you will get the desired results every time.
JPG
Till now we have seen PNGs and Vector Drawables and now its time for the JPEGs i.e. the big images. So, whenever we want to use a good quality image, we tend to use JPEGs and this is the reason why we are concerned about the compression of the JPEGs.
In JPG compression, we convert our source RGB image to some separate colorspace. As human eyes tend to see more differences in RGBs, than in the YCbCr colorspace, so we create different colorspace. Then we reduce the size of CB and CR channels and apply the discrete Cosine Transform. So, what it does is it converts or represents any signals as a sum of cosine. The output of this cosine transform is run into a quantization phase which quantize the output of cosine transform to integers and after that the statistical encoding is done which may be Huffman or arithmetic or any other encoding and finally, you get the JPG file. Phew, so many steps :(
There is one another option that is available with JPEG images i.e. you can choose how much to compress an image. For that, you can use Butteraugli .
Butteraugli is a project that estimates the psychovisual similarity of two images. It gives a score for the images that is reliable in the domain of barely noticeable differences. Butteraugli not only gives a scalar score, but also computes a spatial map of the level of differences.
It is just a way to take a source image and compress the image to find how the human eye sees the difference between various qualities of the image. So, if you want to compress your image and at the same time you want to know how much you can compress an image so that the human eye can't notice a change, then you can use Butteraugli for this. Want to use a high-resolution image? Cool, use Butteraugli to find the percentage up to which you can compress your image and then compress that image. That's it. At the same time, if the quality of the image is not a concern for you then you can further compress your image to get a smaller image file.
Like the PNG image compression, for JPEG images there are many tools available for compression like JPEGMini, MozJPEG, cJPEG, packJPG, etc.
WebP
In WebP image format, we can do both lossless and lossy compression. The lossless images of WebP are almost 26% smaller than that of PNGs. While the lossy images are 25-34% smaller than that of JPEGs file.
The lossy WebP uses predictive coding to encode an image. So, to predict the value in a pixel, WebP uses the values present in the neighbouring blocks and then encodes the difference only.
While the lossless WebP compression uses image fragments that are already seen to reconstruct new pixel. If no match is found, then it uses a local palette.
Important tip
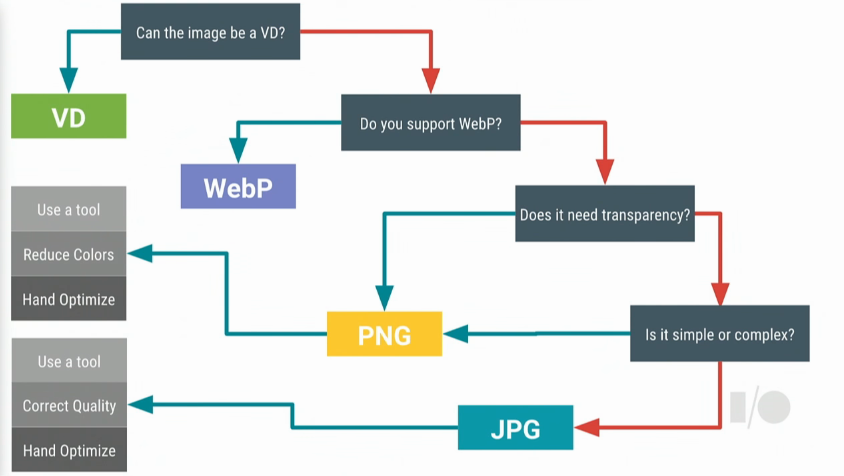
So, we have seen all the image compression that we come across daily. If you are going to use some image in your application then you should first go for the Vector drawable. If vector drawable is there with you, then use it. If you are not having vector drawable and if you have the support of WebP then go for WebP. If you can't support WebP and if you need transparency support, use PNG. If you do not need transparency support, then try to find if the image is simple or complex. If it is simple then stick with PNG otherwise if it is complex then go with JPG.
Image Source: Google I/O
Closing notes
In this blog, we learned various techniques used for image compressions like PNG, JPEG, Vector Drawable and WebP. We also saw how to decide which image format should we use in our application. But remember one thing, before using any type of image compression, do research to find who are your users, what do they want? Perform good research on that because in some cases JPEGs can be better than PNGs and vice-versa.
Reference: Google I/O 2016
Hope you learned something new today.
Do share this blog with your fellow developers to spread the knowledge. You can read more blogs on Android on our blogging website .
Happy Learning :)
Team MindOrks!
Also, Let’s connect on Twitter , Linkedin , Github , and Facebook