Navigate between pages in a React Native App

In this blog, we are going to talk about how we can navigate to and fro in React Native Applications. We will be learning about navigation by building a project and see how navigation works in react native.
We are going to learn,
- Setting up a project.
- Installing Package.
- How navigation works in react native.
- Working with navigation.
- Passing data from one screen to another while navigating.
Setting up a project
1. To start off with first let's create a project. To create a project first run,
expo init2. Then we will choose a template from the following,
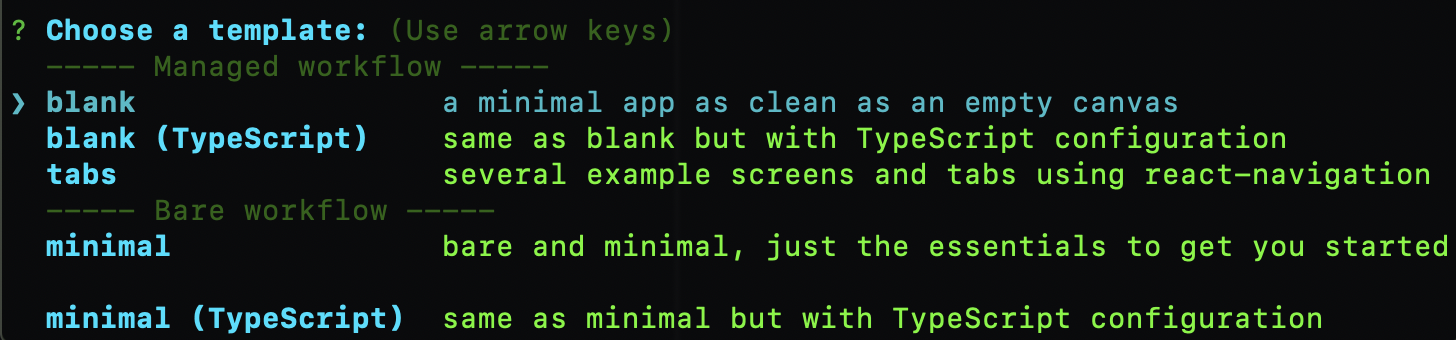
we will select, blank as an option.
3. Then we will setup the name and slug,
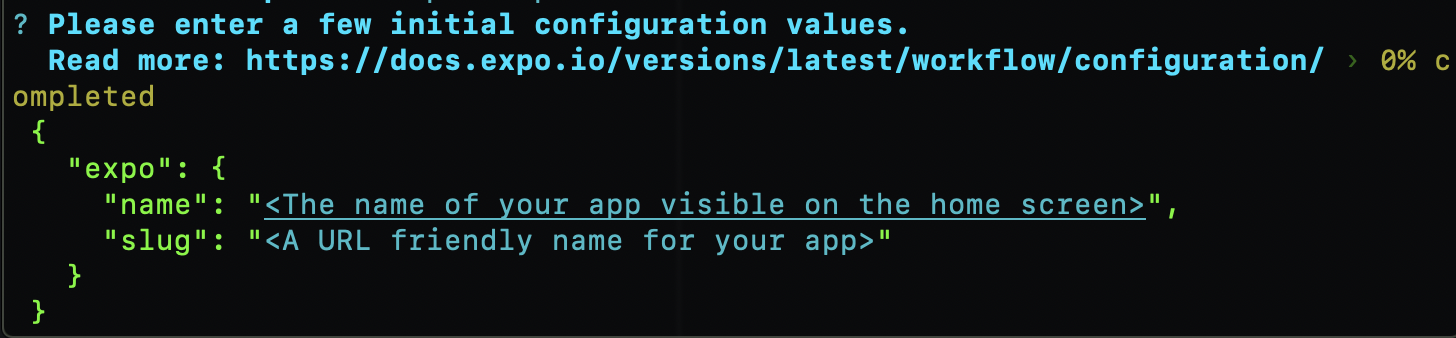
and finally, we will add Yarn Dependency and will complete the setup.
4. Now, let's navigate to the folder using and run the app in emulator or real device using,
yarn start
5. It will open the browser and there we can select
Run on Android Device/Emulator
to run the app. After running the app will look like this,
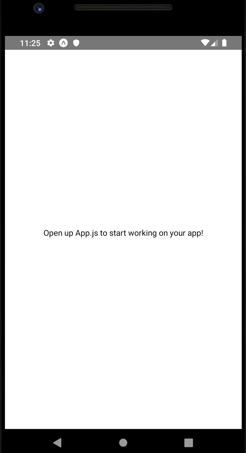
Now, our App is up and running.
Note: Some of you might encounter a screen like,
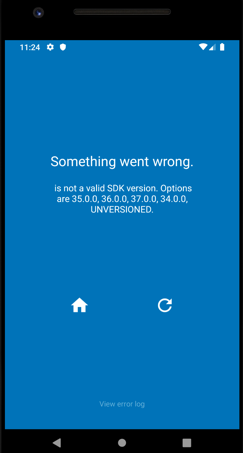
This means we don't have an SDK version specified in the app.json file. To fix this, let's navigate to
app.json
file of the project and add,
"sdkVersion": "36.0.0",And now save the file and run the app, we would have solved the error.
Installing Package
Now, we will install the required package for navigation. For this project, we are going to use React Navigation. You can find it here .
To install the package we will use,
yarn add @react-navigation/nativeand since we have a project managed by the expo, we will be needing to install a few extra packages as well. To install them we will run,
expo install react-native-gesture-handler react-native-reanimated react-native-screens react-native-safe-area-context @react-native-community/masked-viewNow, we are done installing the packages. Let us now write some code.
How navigation works in React Native
In React Native, let' see we have three screens. Home, List and Dashboard screen and the sequence is,
Home -> List -> Dashboard.And when we press the back button, the sequence is reversed like,
Dashboard -> List -> HomeBut, how does navigation works?
In React Native the navigation in the app works on a concept of a stack. Imaging the use case, where we need to go from Home to Dashboard screen then and Home screen is the first screen user sees when they come to the app. Then,
We have a stack with only one screen and it will look like,

Now, let's say we navigated to List Screen and then to Dashboard. Then both the screen will be added to the stack like,
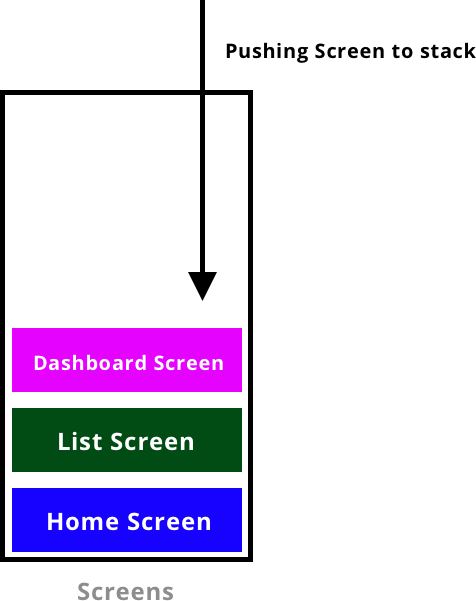
This is how screens get added to the stack when we keep navigating to different screens.
Now, let's say we press the back button from Dashboard Screen then the Dashboard Screen gets popped out of the stack and then the list screen is displayed.
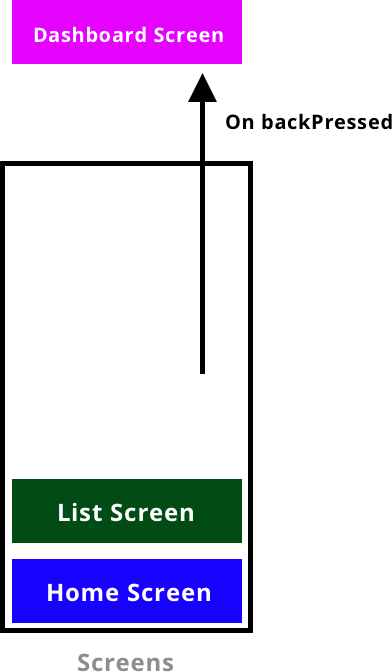
This is how navigation works. When we open a new screen the screens get added to the stack and when we navigate back the screen pops out of the stack.
Working with Navigation
Now, in the project let's create a folder
src
, and inside that create two more folders
screens
and
routes
.
src
 --screens
 --routes
Inside, routes we will first create a navigator.js file. We will also install a new package to manage the navigation stack. To install it we will use,
yarn add @react-navigation/stackIn the navigator.js file, we will add,
import React from 'react';
import { NavigationContainer } from '@react-navigation/native';
import { createStackNavigator } from '@react-navigation/stack';
import  Home from '../screen/home'
import  List from '../screen/list'
import  Dashboard from '../screen/dashboard'


const AppStack = createStackNavigator();
export default function Navigator(){

    return (
    <NavigationContainer>
    <AppStack.Navigator screenOptions={{ headerShown: true }} >
    <AppStack.Screen name="Home" component={Home} />
    <AppStack.Screen name="List" component={List} />
    <AppStack.Screen name="Dashboard" component={Dashboard} />
    </AppStack.Navigator>

    </NavigationContainer>
    );
}
In the above code, we first created a
createStackNavigator
which is responsible for creating the routes and it contains the Screen and Navigator as property.
Then we added, NavigationConstainer component which is responsible for holding the navigation state for the app and inside it we added the AppStack.Navigator and AppStack.Screen components.
AppStack.Navigator takes Screen component with a name and component property. We will access the navigation tree in the app using this name property.
Now, in the screens package let's create three files.
home.js, list.js and dashboard.jsInside home.js, we will add the following
import React from 'react';
import { Text, View, Button } from 'react-native';
import { useNavigation } from '@react-navigation/native';


export default function Home() {

    const navigation = useNavigation();

    function navigateToList() {
        navigation.navigate("List");
    }

    return (

    <View style={{ flex: 1, alignItems: 'center', justifyContent: 'center' }}>
    <Text> Home Screen </Text>
    <Button title="Open List Screen"
    onPress= {()=>navigateToList()}
    />

    </View>
    );
}
In this, we added a text and button in the view and onPress of the button I call a function
navigateToList()
. Inside the function, we use the navigation to navigate to the name "List" which we created in Navigator.js.
useNavigation() gives us access to the navigation object which returns the navigation props
Similarly, we will modify the other two screens.list.js will look like,
import React from 'react';
import { Text, View, Button } from 'react-native';
import { useNavigation } from '@react-navigation/native';


export default function List() {

    const navigation = useNavigation();

    function navigateToDashboard() {
        navigation.navigate("Dashboard");
    }

    return (

    <View style={{ flex: 1, alignItems: 'center', justifyContent: 'center' }}>
    <Text>List Screen</Text>
    <Button title="Open Dashboard"
    onPress= {()=>navigateToDashboard()}
    />

    </View>

    );
}
and lastly, in dashboardScreen.js,
import React from 'react';
import { Text, View,Button } from 'react-native';
import { useNavigation } from '@react-navigation/native';


export default function Dashboard() {
    const navigation = useNavigation();

    function onBackPressed(){
        navigation.goBack()
    }
    return (

    <View style={{ flex: 1, alignItems: 'center', justifyContent: 'center' }}>
    <Text>Dashboard Screen</Text>
    <Button title="Click to go Back"
    onPress= {()=>onBackPressed()}
    />
    </View>

    );
}
Here, in dashboard.js you can see I have added navigation.goBack() in the press of the button. When goBack() gets called its pops out the dashboard screen from the stack and goes to the previous screen in the dashboard.
So, now when I run the app we will see the following flow being executed,
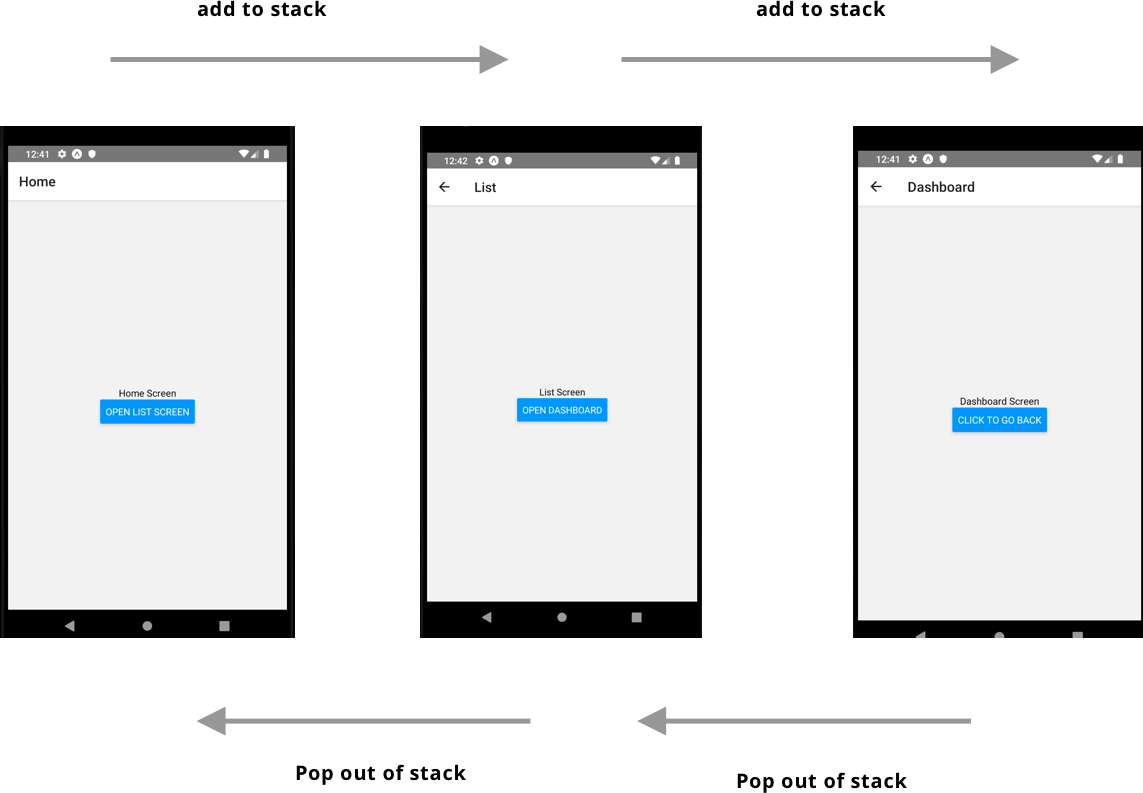
Here, in the above picture, you can see that on the second and third screen you can see the back arrow button is added by default and on click of the screen is popped out of the stack to navigate to the previous screen.
This is how we can navigate between different screens in the app.
Passing data from one screen to another while navigating.
How can we pass data from home.js to list.js?
In home.js, first, we will pass some data to the navigation object like,
function navigateToList() {

    navigation.navigate("List",{"name":"Himanshu"});

}
Here, I am passing a parameter with a key "name" and value as "Himanshu" which will be passed to the list.js file.
And in list.js file, to access the data, we will first create route like,
const route = useRoute();
Here,
useRoute()
returns the
route
prop of the screen it's inside which we will use to access the data which we passed from home.js
And now to access the key name we will use,
route.params.name
Here, in the
route.params
return the data for this route and we get the value
Himanshu
by added the key. If you see the code in home.js file, we pass a value
with the key "
name
". So, that is why we are getting the value using the name key.
The complete code looks like,
import React from 'react';
import { Text, View, Button } from 'react-native';
import { useRoute,useNavigation } from '@react-navigation/native';


export default function List() {
    const navigation = useNavigation();
    const route = useRoute();

    function navigateToDashboard() {
        navigation.navigate("Dashboard");
    }
    return (
    <View style={{ flex: 1, alignItems: 'center', justifyContent: 'center' }}>
    <Text>{route.params.name}</Text>
    <Button title="Open Dashboard"
    onPress= {()=>navigateToDashboard()}
    />
    </View>
    );
}
where,
useRoute()
is part of @react-navigation/native package.
This is how we can navigate to and fro in a React Native app.
Happy learning.
Team MindOrks :)