MVI Architecture - Android Tutorial for Beginners - Step By Step Guide
Android architectural patterns are evolving day by day. As we develop apps, we start facing new challenges and issues. New patterns will be discovered as we keep solving similar challenges. As Android Developers, we have MVC, MVP, and MVVM as the most commonly used patterns. All of them use an imperative programming approach. With this approach even though most of our challenges will be resolved, we still face some challenges regarding the thread safety, maintaining states of the application. With this let’s see what MVI architectural pattern is, how it resolves these challenges, and how to get started on MVI.
In this blog, I will walk you through,
- What is MVI architecture?
- How does the MVI work?
- Advantages and Disadvantages of MVI
- Creating a Project with MVI architecture
- Project Source Code and What Next?
What is MVI architecture?
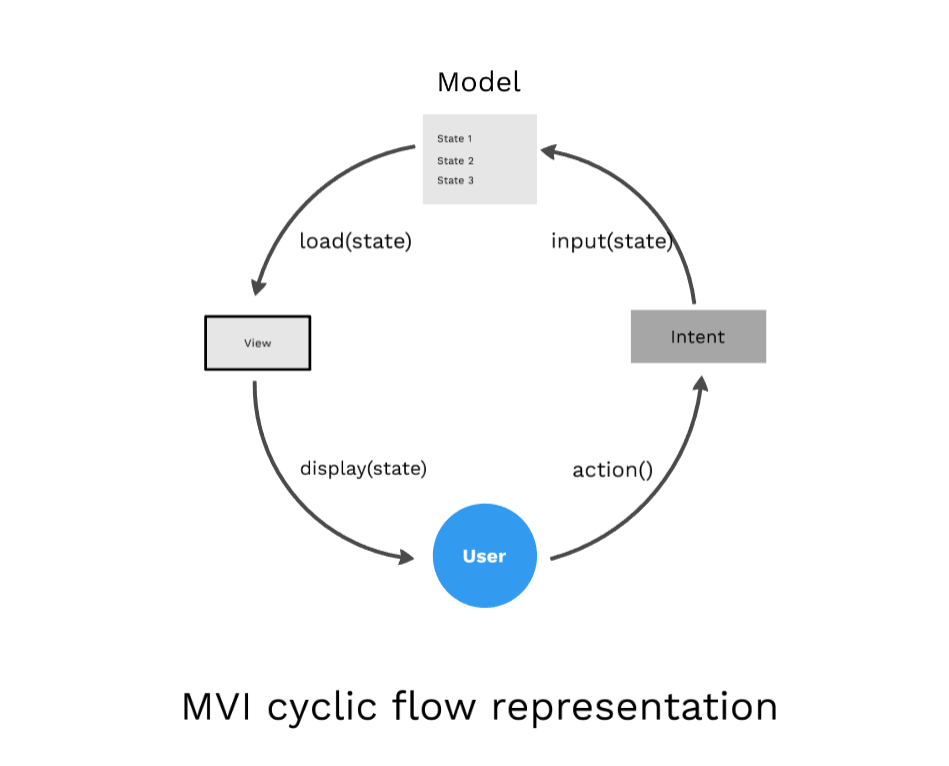
MVI stands for Model-View-Intent . This pattern has been introduced recently in Android. It works based on the principle of unidirectional and cylindrical flow inspired by the Cycle.js framework.
Let’s see what is the role of each component of MVI.
- Model: Unlike other patterns, In MVI Model represents the state of the UI. i.e for example UI might have different states like Data Loading, Loaded, Change in UI with user Actions, Errors, User current screen position states. Each state is stored as similar to the object in the model.
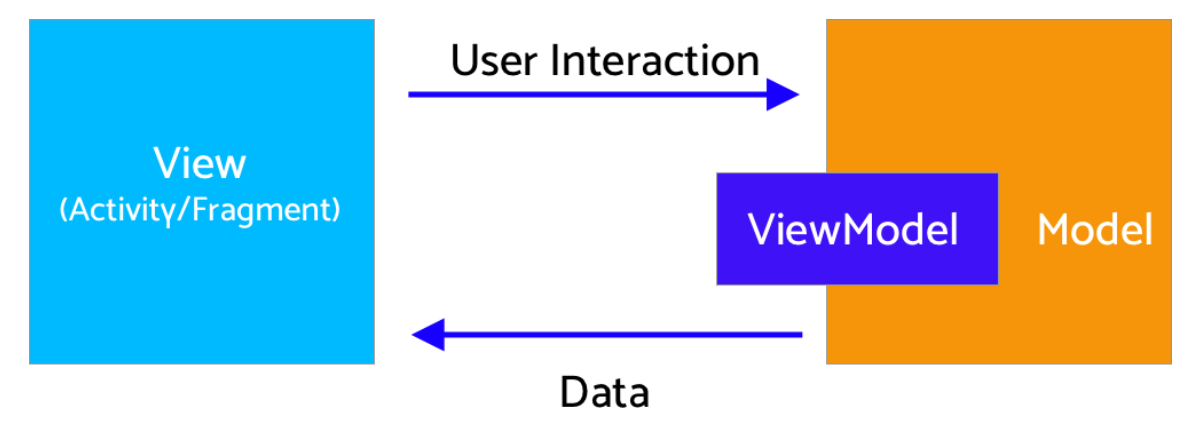
- View: The View in the MVI is our Interfaces which can be implemented in Activities and fragments. It means to have a container which can accept the different model states and display it as a UI. They use observable intents(Note: This doesn't represent the Android traditional Intents) to respond to user actions.
- Intent: Even though this is not an Intent as termed by Android from before. The result of the user actions is passed as an input value to Intents. In turn, we can say we will be sending models as inputs to the Intents which can load it through Views.
How does the MVI work?
User does an action which will be an Intent → Intent is a state which is an input to model → Model stores state and send the requested state to the View → View Loads the state from Model → Displays to the user. If we observe, the data will always flow from the user and end with the user through intent. It cannot be the other way, Hence its called Unidirectional architecture. If the user does one more action the same cycle is repeated, hence it is Cyclic.
Advantages and Disadvantages of MVI
Let’s see what are the advantages and disadvantages of MVI
Advantages of MVI
- Maintaining state is no more a challenge with this architecture, As it focuses mainly on states.
- As it is unidirectional, Data flow can be tracked and predicted easily.
- It ensures thread safety as the state objects are immutable.
- Easy to debug, As we know the state of the object when the error occurred.
- It's more decoupled as each component fulfills its own responsibility.
- Testing the app also will be easier as we can map the business logic for each state.
Disadvantages of MVI
- It leads to lots of boilerplate code as we have to maintain a state for each user action.
- As we know it has to create lots of objects for all the states. This makes it too costly for app memory management.
- Handling alert states might be challenging while we handle configuration changes. For example, if there is no internet we will show the snackbar, On configuration change, it shows the snackbar again as its the state of the intent. In terms of usability, this has to be handled.
With this background, let’s create a small app with MVI
Creating a Project with MVI architecture
Let's start by setting up the Android project.
We are trying to achieve this in our Android project
Create a Project
- Start a new Android project
- Select Empty Activity and Next
- Name: MVI-Architecture-Android-Beginners
- Package name: com.mindorks.framework.mvi
- Language: Kotlin
- Finish
- Your starting project is ready now
Add dependencies
// Added Dependencies
implementation "androidx.recyclerview:recyclerview:1.1.0"
implementation 'android.arch.lifecycle:extensions:1.1.1'
implementation 'androidx.lifecycle:lifecycle-viewmodel-ktx:2.2.0'
implementation 'androidx.lifecycle:lifecycle-runtime-ktx:2.2.0'
implementation 'com.github.bumptech.glide:glide:4.11.0'

//retrofit
implementation 'com.squareup.retrofit2:retrofit:2.8.1'
implementation "com.squareup.retrofit2:converter-moshi:2.6.2"

//Coroutine
implementation "org.jetbrains.kotlinx:kotlinx-coroutines-android:1.3.6"
implementation "org.jetbrains.kotlinx:kotlinx-coroutines-core:1.3.6"
Project Structure
For the project, We are going to follow a beginner version of MVI. Our package in the project will look like below.
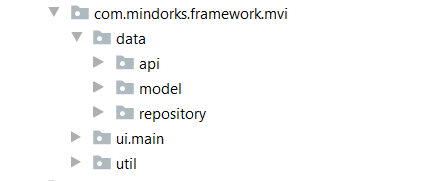
Setup Data Layer
Now, in this section, we will set up the data layer.
Under the data package, we will have api, model, and repository packages. We will create these packages and let’s concentrate on adding classes to each package one by one.
Let’s add classes supporting API.
We need a model to which the response will be transformed. Create User.kt data class as shown below.
package com.mindorks.framework.mvi.data.model

import com.squareup.moshi.Json

data class User(
    @Json(name = "id")
    val id: Int = 0,
    @Json(name = "name")
    val name: String = "",
    @Json(name = "email")
    val email: String = "",
    @Json(name = "avatar")
    val avatar: String = ""
)
Create ApiHelper.kt interface
package com.mindorks.framework.mvi.data.api

import com.mindorks.framework.mvi.data.model.User

interface ApiHelper {

    suspend fun getUsers(): List<User>

}
Note: We have used suspend keyword to support Coroutines so that we can call it from a Coroutine or another suspend function.
Kotlin-Coroutines and Flow API are used in this project. You can learn from the following:
Create a class ApiService.kt where we will specify HTTP methods to communicate to the API.
package com.mindorks.framework.mvi.data.api

import com.mindorks.framework.mvi.data.model.User
import retrofit2.http.GET

interface ApiService {

   @GET("users")
   suspend fun getUsers(): List<User>
}
Now add retrofit builder which will build endpoint URL and consume REST services.
package com.mindorks.framework.mvi.data.api

import retrofit2.Retrofit
import retrofit2.converter.moshi.MoshiConverterFactory

object RetrofitBuilder {

    private const val BASE_URL = "https://5e510330f2c0d300147c034c.mockapi.io/"

    private fun getRetrofit() = Retrofit.Builder()
        .baseUrl(BASE_URL)
        .addConverterFactory(MoshiConverterFactory.create())
        .build()


    val apiService: ApiService = getRetrofit().create(ApiService::class.java)

}
Now we need to implement this interface to fetch the List<Users>, create ApiHelperImpl.kt
package com.mindorks.framework.mvi.data.api

import com.mindorks.framework.mvi.data.model.User

class ApiHelperImpl(private val apiService: ApiService) : ApiHelper {

    override suspend fun getUsers(): List<User> {
        return apiService.getUsers()
    }
}
Now we are ready to communicate with restful services in our data layer.
We will need a repository to requests data. In our case, we are calling the
getUsers
method from activity through ViewModel to get the user list. Create
MainRepository.kt
package com.mindorks.framework.mvi.data.repository

import com.mindorks.framework.mvi.data.api.ApiHelper


class MainRepository(private val apiHelper: ApiHelper) {

    suspend fun getUsers() = apiHelper.getUsers()

}
So our data layer is ready. Coming to UI part now, we need an adapter to recyclerview, Intent for storing user actions, our main activity under view, MainViewModel under viewModel, View state where we have defined different states for which we need to load data to views.
Create MainAdapter in adapter package
package com.mindorks.framework.mvi.ui.main.adapter

import android.view.LayoutInflater
import android.view.View
import android.view.ViewGroup
import androidx.recyclerview.widget.RecyclerView
import com.bumptech.glide.Glide
import com.mindorks.framework.mvi.R
import com.mindorks.framework.mvi.data.model.User
import kotlinx.android.synthetic.main.item_layout.view.*

class MainAdapter(
    private val users: ArrayList<User>
) : RecyclerView.Adapter<MainAdapter.DataViewHolder>() {

    class DataViewHolder(itemView: View) : RecyclerView.ViewHolder(itemView) {
        fun bind(user: User) {
            itemView.textViewUserName.text = user.name
            itemView.textViewUserEmail.text = user.email
            Glide.with(itemView.imageViewAvatar.context)
                .load(user.avatar)
                .into(itemView.imageViewAvatar)
        }
    }

    override fun onCreateViewHolder(parent: ViewGroup, viewType: Int) =
        DataViewHolder(
            LayoutInflater.from(parent.context).inflate(
                R.layout.item_layout, parent,
                false
            )
        )

    override fun getItemCount(): Int = users.size

    override fun onBindViewHolder(holder: DataViewHolder, position: Int) =
        holder.bind(users[position])

    fun addData(list: List<User>) {
        users.addAll(list)
    }

}
Create MainIntent.kt under the intent package
package com.mindorks.framework.mvi.ui.main.intent

sealed class MainIntent {

    object FetchUser : MainIntent()

}
Now adding the MainState.kt under viewstate package. This is the most important part of MVI. In this class, we are defining the states Idle, loading, users, error. Each state can be loaded on to the view by the user intents.
package com.mindorks.framework.mvi.ui.main.viewstate

import com.mindorks.framework.mvi.data.model.User

sealed class MainState {

    object Idle : MainState()
    object Loading : MainState()
    data class Users(val user: List<User>) : MainState()
    data class Error(val error: String?) : MainState()

}
Create a ViewModel class - MainViewModel
package com.mindorks.framework.mvi.ui.main.viewmodel

import androidx.lifecycle.ViewModel
import androidx.lifecycle.viewModelScope
import com.mindorks.framework.mvi.data.repository.MainRepository
import com.mindorks.framework.mvi.ui.main.intent.MainIntent
import com.mindorks.framework.mvi.ui.main.viewstate.MainState
import kotlinx.coroutines.ExperimentalCoroutinesApi
import kotlinx.coroutines.channels.Channel
import kotlinx.coroutines.flow.MutableStateFlow
import kotlinx.coroutines.flow.StateFlow
import kotlinx.coroutines.flow.collect
import kotlinx.coroutines.flow.consumeAsFlow
import kotlinx.coroutines.launch

@ExperimentalCoroutinesApi
class MainViewModel(
    private val repository: MainRepository
) : ViewModel() {

    val userIntent = Channel<MainIntent>(Channel.UNLIMITED)
    private val _state = MutableStateFlow<MainState>(MainState.Idle)
    val state: StateFlow<MainState>
        get() = _state

    init {
        handleIntent()
    }

    private fun handleIntent() {
        viewModelScope.launch {
            userIntent.consumeAsFlow().collect {
                when (it) {
                    is MainIntent.FetchUser -> fetchUser()
                }
            }
        }
    }

    private fun fetchUser() {
        viewModelScope.launch {
            _state.value = MainState.Loading
            _state.value = try {
                MainState.Users(repository.getUsers())
            } catch (e: Exception) {
                MainState.Error(e.localizedMessage)
            }
        }
    }
}
Here in the ViewModel, we are observing on the
userIntent
to perform the action on it.
And based on the response from the data layer, we change the state inside the
fetchUser
method. And that state is being observed in the MainActivity.
Let us set up ViewModelFactory under the util package.
We are instantiating our viewModel in this class and we will return the instance of the ViewModel.
package com.mindorks.framework.mvi.util

import androidx.lifecycle.ViewModel
import androidx.lifecycle.ViewModelProvider
import com.mindorks.framework.mvi.data.api.ApiHelper
import com.mindorks.framework.mvi.data.repository.MainRepository
import com.mindorks.framework.mvi.ui.main.viewmodel.MainViewModel

class ViewModelFactory(private val apiHelper: ApiHelper) : ViewModelProvider.Factory {

    override fun <T : ViewModel?> create(modelClass: Class<T>): T {
        if (modelClass.isAssignableFrom(MainViewModel::class.java)) {
            return MainViewModel(MainRepository(apiHelper)) as T
        }
        throw IllegalArgumentException("Unknown class name")
    }

}
Now, let's set up the XML layout.
In the layout folder, update the activity_main.xml with the following code:
<?xml version="1.0" encoding="utf-8"?>
<androidx.constraintlayout.widget.ConstraintLayout xmlns:android="http://schemas.android.com/apk/res/android"
    xmlns:app="http://schemas.android.com/apk/res-auto"
    xmlns:tools="http://schemas.android.com/tools"
    android:layout_width="match_parent"
    android:layout_height="match_parent"
    tools:context=".ui.main.view.MainActivity">

    <androidx.recyclerview.widget.RecyclerView
        android:id="@+id/recyclerView"
        android:layout_width="match_parent"
        android:layout_height="match_parent"
        android:visibility="gone" />

    <ProgressBar
        android:id="@+id/progressBar"
        android:layout_width="wrap_content"
        android:layout_height="wrap_content"
        app:layout_constraintBottom_toBottomOf="parent"
        app:layout_constraintEnd_toEndOf="parent"
        android:visibility="gone"
        app:layout_constraintStart_toStartOf="parent"
        app:layout_constraintTop_toTopOf="parent" />

    <Button
        android:id="@+id/buttonFetchUser"
        android:layout_width="wrap_content"
        android:layout_height="wrap_content"
        android:text="@string/fetch_user"
        app:layout_constraintBottom_toBottomOf="parent"
        app:layout_constraintEnd_toEndOf="parent"
        app:layout_constraintStart_toStartOf="parent"
        app:layout_constraintTop_toTopOf="parent" />

</androidx.constraintlayout.widget.ConstraintLayout>
Add item_layout.xml in the layout folder and add the following code:
<?xml version="1.0" encoding="utf-8"?>
<androidx.constraintlayout.widget.ConstraintLayout xmlns:android="http://schemas.android.com/apk/res/android"
    xmlns:app="http://schemas.android.com/apk/res-auto"
    xmlns:tools="http://schemas.android.com/tools"
    android:id="@+id/container"
    android:layout_width="match_parent"
    android:layout_height="60dp">

    <ImageView
        android:id="@+id/imageViewAvatar"
        android:layout_width="60dp"
        android:layout_height="0dp"
        android:padding="4dp"
        app:layout_constraintBottom_toBottomOf="parent"
        app:layout_constraintStart_toStartOf="parent"
        app:layout_constraintTop_toTopOf="parent" />

    <androidx.appcompat.widget.AppCompatTextView
        android:id="@+id/textViewUserName"
        style="@style/TextAppearance.AppCompat.Large"
        android:layout_width="0dp"
        android:layout_height="wrap_content"
        android:layout_marginStart="8dp"
        android:layout_marginTop="4dp"
        app:layout_constraintEnd_toEndOf="parent"
        app:layout_constraintStart_toEndOf="@+id/imageViewAvatar"
        app:layout_constraintTop_toTopOf="parent"
        tools:text="MindOrks" />

    <androidx.appcompat.widget.AppCompatTextView
        android:id="@+id/textViewUserEmail"
        android:layout_width="0dp"
        android:layout_height="wrap_content"
        app:layout_constraintEnd_toEndOf="parent"
        app:layout_constraintStart_toStartOf="@+id/textViewUserName"
        app:layout_constraintTop_toBottomOf="@+id/textViewUserName"
        tools:text="MindOrks" />

</androidx.constraintlayout.widget.ConstraintLayout>
Add the following in strings.xml.
<string name="fetch_user">Fetch User</string>Coming to our MainAcitvity.kt class, We will be adding this under view package. This is the user-facing activity that takes input from the user, based on this MVI checks for the states mentioned in viewModel and loads the particular state in the view.
Let's see how MainActivity takes care of requesting data, handling states
package com.mindorks.framework.mvi.ui.main.view

import android.os.Bundle
import android.view.View
import android.widget.Toast
import androidx.appcompat.app.AppCompatActivity
import androidx.lifecycle.ViewModelProviders
import androidx.lifecycle.lifecycleScope
import androidx.recyclerview.widget.DividerItemDecoration
import androidx.recyclerview.widget.LinearLayoutManager
import com.mindorks.framework.mvi.R
import com.mindorks.framework.mvi.data.api.ApiHelperImpl
import com.mindorks.framework.mvi.data.api.RetrofitBuilder
import com.mindorks.framework.mvi.data.model.User
import com.mindorks.framework.mvi.util.ViewModelFactory
import com.mindorks.framework.mvi.ui.main.adapter.MainAdapter
import com.mindorks.framework.mvi.ui.main.intent.MainIntent
import com.mindorks.framework.mvi.ui.main.viewmodel.MainViewModel
import com.mindorks.framework.mvi.ui.main.viewstate.MainState
import kotlinx.android.synthetic.main.activity_main.*
import kotlinx.coroutines.ExperimentalCoroutinesApi
import kotlinx.coroutines.flow.collect
import kotlinx.coroutines.launch

@ExperimentalCoroutinesApi
class MainActivity : AppCompatActivity() {

    private lateinit var mainViewModel: MainViewModel
    private var adapter = MainAdapter(arrayListOf())

    override fun onCreate(savedInstanceState: Bundle?) {
        super.onCreate(savedInstanceState)
        setContentView(R.layout.activity_main)
        setupUI()
        setupViewModel()
        observeViewModel()
        setupClicks()
    }

    private fun setupClicks() {
        buttonFetchUser.setOnClickListener {
            lifecycleScope.launch {
                mainViewModel.userIntent.send(MainIntent.FetchUser)
            }
        }
    }


    private fun setupUI() {
        recyclerView.layoutManager = LinearLayoutManager(this)
        recyclerView.run {
            addItemDecoration(
                DividerItemDecoration(
                    recyclerView.context,
                    (recyclerView.layoutManager as LinearLayoutManager).orientation
                )
            )
        }
        recyclerView.adapter = adapter
    }


    private fun setupViewModel() {
        mainViewModel = ViewModelProviders.of(
            this,
            ViewModelFactory(
                ApiHelperImpl(
                    RetrofitBuilder.apiService
                )
            )
        ).get(MainViewModel::class.java)
    }

    private fun observeViewModel() {
        lifecycleScope.launch {
            mainViewModel.state.collect {
                when (it) {
                    is MainState.Idle -> {

                    }
                    is MainState.Loading -> {
                        buttonFetchUser.visibility = View.GONE
                        progressBar.visibility = View.VISIBLE
                    }

                    is MainState.Users -> {
                        progressBar.visibility = View.GONE
                        buttonFetchUser.visibility = View.GONE
                        renderList(it.user)
                    }
                    is MainState.Error -> {
                        progressBar.visibility = View.GONE
                        buttonFetchUser.visibility = View.VISIBLE
                        Toast.makeText(this@MainActivity, it.error, Toast.LENGTH_LONG).show()
                    }
                }
            }
        }
    }

    private fun renderList(users: List<User>) {
        recyclerView.visibility = View.VISIBLE
        users.let { listOfUsers -> listOfUsers.let { adapter.addData(it) } }
        adapter.notifyDataSetChanged()
    }
}
Here, we are sending the intent to fetch the data on button click(User Action).
Also, we are observing on the ViewModel State for the state changes. And, using "when" condition we are comparing the response intent state and loading the respective states.
Finally, add the Internet Permission in your project. Add the following in the AndroidManifest.xml:
<uses-permission android:name="android.permission.INTERNET"/>Now, build the project and run the app on the device. It should load the data into the UI.
Project Source Code and What Next?
For the project source code, check here .
As we have done some simplifications in this project for the Beginners level, so, we can improve this project to go to the Advanced level, a few of the things which we can improve are as follows:
- Implement Dependency Inject Framework - Dagger in the project.
- Make ApiService Singleton and reuse the same instance for all the features.
- Create base classes such as BaseActivity.
- Handle all the API errors at a single place in a better way.
- Create Interfaces for the classes wherever required.
- Take advantage of Android KTX - Kotlin Extensions .
- Write Unit-Test
- and so on.
I hope you have learned the MVI architecture in Android.
Keep Learning, Keep Exploring, Keep Growing
Thank you