Kotlin Koin - Android Tutorial for Beginners - Step By Step Guide

We have been using the Dependency Injection framework quite a few times like Dagger in our project.
In this blog, we are going to learn about Koin, a new dependency injection framework for Android Developers. If you are not familiar with why we need a dependency injection framework in our project, click here .
We are going to discuss,
- What is Koin?
- Understanding terminologies in Koin
- Setting up your project
- Project Structure
- Integrating Koin
What is Koin?
Koin is a DI framework for Kotlin developers, completely written in Kotin.
It is very light weighted. It supports the Kotlin DSL feature. It is one of the easy DI frameworks which doesn't require a steep learning curve to get hold of it.
Understanding Terminologies in Koin
While working with Koin, there are few terminologies we need to understand before getting started.
- module - it creates a module in Koin which would be used by Koin to provide all the dependencies.
- single - it creates a singleton that can be used across the app as a singular instance.
- factory - it provides a bean definition, which will create a new instance each time it is injected.
- get() - it is used in the constructor of a class to provide the required dependency.
Setting up your project
Here, we are going to set up the Android Project.
Create a Project
- Start a new Android Studio Project
- Select Empty Activity and Next
- Name: Koin-Tutorial
- Package name: com.mindorks.framework.mvvm
- Language: Kotlin
- Finish
- Your starting project is ready now
Add dependencies
Add the following dependencies in the app's build.gradle file,
implementation "androidx.recyclerview:recyclerview:{latest-version}"
implementation 'android.arch.lifecycle:extensions:{latest-version}'
implementation 'com.github.bumptech.glide:glide:{latest-version}'
implementation 'androidx.activity:activity-ktx:{latest-version}'
Now our project is ready with dependencies.
You can find the complete project here.
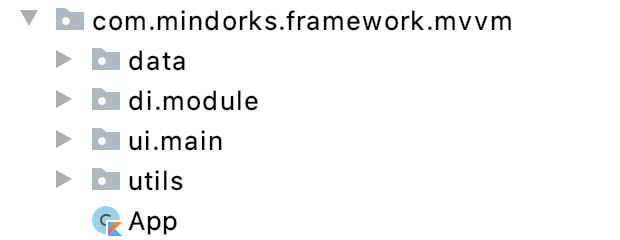
Project Structure
For the project, we are going to follow a basic version of MVVM. Our package in the project will look like below:
We need the enum to represent the UI State. We will create that in the utils package.
enum class Status {
    SUCCESS,
    ERROR,
    LOADING
}
We need a utility class that will be responsible to communicate the current state of Network Call to the UI Layer. We are naming that as Resource. So, create a Kotlin data class Resource inside the same utils package and add the following code.
data class Resource<out T>(val status: Status, val data: T?, val message: String?) {

    companion object {

        fun <T> success(data: T?): Resource<T> {
            return Resource(Status.SUCCESS, data, null)
        }

        fun <T> error(msg: String, data: T?): Resource<T> {
            return Resource(Status.ERROR, data, msg)
        }

        fun <T> loading(data: T?): Resource<T> {
            return Resource(Status.LOADING, data, null)
        }

    }

}
Our utils package is ready now.
Integrating Koin
To setup Koin in your project, we would add the following in your app's build.gradle,
//koin
implementation "org.koin:koin-android-viewmodel:{latest-version}"
implementation "org.koin:koin-android:{latest-version}"
This is the only required setup we need to do to get started with Koin.
Now, let's break the further tasks in steps.
Step 01.
We will first create our Application class App like,
class App : Application()and we will update the Manifest file like,
android:name=".App"Step 02.
Now, we will add the dependencies for Retrofit and Kotlin-Coroutines in the app's build.gradle like,
// Networking
implementation "com.squareup.retrofit2:retrofit:{latest-version}"
implementation "com.squareup.retrofit2:converter-moshi:{latest-version}"
implementation "com.squareup.okhttp3:okhttp:{latest-version}"
implementation "com.squareup.okhttp3:logging-interceptor:{latest-version}"

// Coroutine
implementation "org.jetbrains.kotlinx:kotlinx-coroutines-android:{latest-version}"
implementation "org.jetbrains.kotlinx:kotlinx-coroutines-core:{latest-version}"
Now, in the project what we will do is, we will do an API call and show a list of users.
We will also use Kotlin-Coroutine for multithreading. Now, we will create api , model , repository packages inside the data layer. It will have files like,
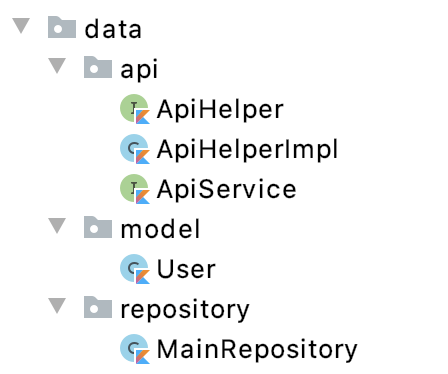
Then, ApiService looks like,
interface ApiService {

    @GET("users")
    suspend fun getUsers(): Response<List<User>>

}
ApiHelper looks like,
interface ApiHelper {

    suspend fun getUsers(): Response<List<User>>
}
And finally, the ApiHelperImpl looks like,
class ApiHelperImpl(private val apiService: ApiService) : ApiHelper {

    override suspend fun getUsers(): Response<List<User>> = apiService.getUsers()

}
Also, for
BASE_URL
, we will add the following in the
defaultConfig
block in the app's build.gradle file,
buildConfigField 'String', 'BASE_URL', "\"https://5e510330f2c0d300147c034c.mockapi.io/\""The User data class looks like,
data class User(
    @Json(name = "id")
    val id: Int = 0,
    @Json(name = "name")
    val name: String = "",
    @Json(name = "email")
    val email: String = "",
    @Json(name = "avatar")
    val avatar: String = ""
)
Now, inside the MainRepository, we will update the code like,
class MainRepository (private val apiHelper: ApiHelper) {

    suspend fun getUsers() =  apiHelper.getUsers()

}
Now, we are done setting up the data layer, and let's move to the DI part of the project.
Step 03.
Now, we will create a package di -> module and inside it, we will create AppModule, ViewModelModule, and RepositoryModule.
Inside AppModule first, we will create the functions we want to provide as dependencies. We will update the file like,
private fun provideNetworkHelper(context: Context) = NetworkHelper(context)

private fun provideOkHttpClient() = if (BuildConfig.DEBUG) {
    val loggingInterceptor = HttpLoggingInterceptor()
    loggingInterceptor.setLevel(HttpLoggingInterceptor.Level.BODY)
    OkHttpClient.Builder()
        .addInterceptor(loggingInterceptor)
        .build()
} else OkHttpClient
    .Builder()
    .build()

private fun provideRetrofit(
    okHttpClient: OkHttpClient,
    BASE_URL: String
): Retrofit =
    Retrofit.Builder()
        .addConverterFactory(MoshiConverterFactory.create())
        .baseUrl(BASE_URL)
        .client(okHttpClient)
        .build()

private fun provideApiService(retrofit: Retrofit): ApiService = retrofit.create(ApiService::class.java)

private fun provideApiHelper(apiHelper: ApiHelperImpl): ApiHelper = apiHelper
Now, to create the file as a supported module for Koin, we will pass the functions as singleton instance to the module. The module is a collection of dependencies we are going to provide to the application. We will create a variable like,
val appModule = module {

}
and inside the module, we will pass the single instance of all the functions we created like,
val appModule = module {
    single { provideOkHttpClient() }
    single { provideRetrofit(get(), BuildConfig.BASE_URL) }
    single { provideApiService(get()) }
    single { provideNetworkHelper(androidContext()) }
}
Here, to provide the dependency as a singleton instance we use single{} and inside it, we will pass the function which will return the dependency as an instance to be used across the app.
We are using get() here to pass the dependency to the constructor. Using get it will only provide the constructor whose instance is already been provided by Koin.
Step 04.
Now, let's update the RepositoryModule. Here, we will provide the MainRepository instance by,
val repoModule = module {
    single {
        MainRepository(get())
    }
}
Here, MainRepository requires ApiHelper in the constructor which will be provided by the Koin here.
And for ApiHelper, we would need the ApiHelperImpl part to be provided which is the extension for ApiHelper. Now, to pass the ApiHelper as a param, we need to provide it as well from the module.
To provide the ApiHelperImpl in the module, we will update the code and create a single instance like,
single<ApiHelper> {
    return@single ApiHelperImpl(get())
}
Here, we are providing a type if ApiHelper, and returning ApiHelperImpl and in ApiHelperImpl it takes ApiService as a constructor parameter which we are already providing from provideApiService function.
Step 05.
Now, we are going to use a MainViewModel for updating the UI. To provide dependencies in ViewModel we will update the ViewModelModule like,
val viewModelModule = module {
    viewModel {
        MainViewModel(get(),get())
    }
}
Here, you can see we are not using single, and in place of that we are using viewModel and inside it, we resolve the dependencies which we are providing from appModule.
Now, we are done providing the dependencies. Let us start now by injecting the dependencies.
Step 06.
Now, let's start designing our ViewModel. We will update the ViewModel like,
class MainViewModel(
    private val mainRepository: MainRepository,
    private val networkHelper: NetworkHelper
) : ViewModel() {

    private val _users = MutableLiveData<Resource<List<User>>>()
    val users: LiveData<Resource<List<User>>>
        get() = _users

    init {
        fetchUsers()
    }

    private fun fetchUsers() {
        viewModelScope.launch {
            _users.postValue(Resource.loading(null))
            if (networkHelper.isNetworkConnected()) {
                mainRepository.getUsers().let {
                    if (it.isSuccessful) {
                        _users.postValue(Resource.success(it.body()))
                    } else _users.postValue(Resource.error(it.errorBody().toString(), null))
                }
            } else _users.postValue(Resource.error("No internet connection", null))
        }
    }
}
Here, we are passing MainRepository and NetworkHelper in the constructor of the ViewModel.
Here, we are fetching the users in the init block and inside the viewModelScope, we will check for internet connectivity and if the connectivity is ok then we go through the API call or else we set the value to LiveData with an error. This user LiveData is then observed in the MainActivity to display the items in the recyclerView.
NetworkHelper looks like,
class NetworkHelper constructor(private val context: Context) {

    fun isNetworkConnected(): Boolean {
        var result = false
        val connectivityManager =
            context.getSystemService(Context.CONNECTIVITY_SERVICE) as ConnectivityManager
        if (Build.VERSION.SDK_INT >= Build.VERSION_CODES.M) {
            val networkCapabilities = connectivityManager.activeNetwork ?: return false
            val activeNetwork =
                connectivityManager.getNetworkCapabilities(networkCapabilities) ?: return false
            result = when {
                activeNetwork.hasTransport(NetworkCapabilities.TRANSPORT_WIFI) -> true
                activeNetwork.hasTransport(NetworkCapabilities.TRANSPORT_CELLULAR) -> true
                activeNetwork.hasTransport(NetworkCapabilities.TRANSPORT_ETHERNET) -> true
                else -> false
            }
        } else {
            connectivityManager.run {
                connectivityManager.activeNetworkInfo?.run {
                    result = when (type) {
                        ConnectivityManager.TYPE_WIFI -> true
                        ConnectivityManager.TYPE_MOBILE -> true
                        ConnectivityManager.TYPE_ETHERNET -> true
                        else -> false
                    }

                }
            }
        }

        return result
    }
}
Step 07.
Now, we need to create the instance of ViewModel in the MainActivity so the values passed in the constructor of the ViewModel are passed to it.
To pass the instance of ViewModel we will create a variable called mainViewModel like,
private val mainViewModel : MainViewModel by viewModel()Here, by viewModel() creates the instance for the ViewModel and it will also resolve the dependency required by it.
If we want to pass any dependency required by any class like Activity we use by inject() also known as field injection.
Now, the MainActivity looks like,
class MainActivity : AppCompatActivity() {

    private val mainViewModel : MainViewModel by viewModel()
    private lateinit var adapter: MainAdapter

    override fun onCreate(savedInstanceState: Bundle?) {
        super.onCreate(savedInstanceState)
        setContentView(R.layout.activity_main)
        setupUI()
        setupObserver()

    }

    private fun setupUI() {
        recyclerView.layoutManager = LinearLayoutManager(this)
        adapter = MainAdapter(arrayListOf())
        recyclerView.addItemDecoration(
            DividerItemDecoration(
                recyclerView.context,
                (recyclerView.layoutManager as LinearLayoutManager).orientation
            )
        )
        recyclerView.adapter = adapter
    }

    private fun setupObserver() {
        mainViewModel.users.observe(this, Observer {
            when (it.status) {
                Status.SUCCESS -> {
                    progressBar.visibility = View.GONE
                    it.data?.let { users -> renderList(users) }
                    recyclerView.visibility = View.VISIBLE
                }
                Status.LOADING -> {
                    progressBar.visibility = View.VISIBLE
                    recyclerView.visibility = View.GONE
                }
                Status.ERROR -> {
                    //Handle Error
                    progressBar.visibility = View.GONE
                    Toast.makeText(this, it.message, Toast.LENGTH_LONG).show()
                }
            }
        })
    }

    private fun renderList(users: List<User>) {
        adapter.addData(users)
        adapter.notifyDataSetChanged()
    }
}
and the MainAdapter looks like,
class MainAdapter(
    private val users: ArrayList<User>
) : RecyclerView.Adapter<MainAdapter.DataViewHolder>() {

    class DataViewHolder(itemView: View) : RecyclerView.ViewHolder(itemView) {
        fun bind(user: User) {
            itemView.textViewUserName.text = user.name
            itemView.textViewUserEmail.text = user.email
            Glide.with(itemView.imageViewAvatar.context)
                .load(user.avatar)
                .into(itemView.imageViewAvatar)
        }
    }

    override fun onCreateViewHolder(parent: ViewGroup, viewType: Int) =
        DataViewHolder(
            LayoutInflater.from(parent.context).inflate(
                R.layout.item_layout, parent,
                false
            )
        )

    override fun getItemCount(): Int = users.size

    override fun onBindViewHolder(holder: DataViewHolder, position: Int) =
        holder.bind(users[position])

    fun addData(list: List<User>) {
        users.addAll(list)
    }
}
Now, we are almost done with setting up the project.
Step 08.
To run the app successfully, we will add the required permissions like,
<uses-permission android:name="android.permission.ACCESS_NETWORK_STATE" />
<uses-permission android:name="android.permission.INTERNET" />
and to initialize Koin in the project we will update the onCreate() of the application like,
override fun onCreate() {
    super.onCreate()
    startKoin {
        androidContext(this@App)
        modules(listOf(appModule, repoModule, viewModelModule))
    }
}
Here, we are passing the androidContext to the Koin container which you can see we are using it in the appModule while providing the NetworkHelper class.
We are also passing all the modules which we created in the di/modules package.
Now, we are done with the project and if you run the project, you would see the list of users being populated in the recyclerView.
You can find the complete project here.
That's all about the implementation of Koin in the Android Project.
Happy learning.
Team MindOrks :)