Implementing DialogFragment in Android
Dialogs are one of the most common and easiest ways of interactions with users. Almost every application has some dialogs present in it. It may be an alert dialog that is shown whenever you are logging out from some application or it can be any custom dialog that is used to take input from users or display some information to the user. We use dialogs to have a quick implementation of some feature in our application without creating an Activity.
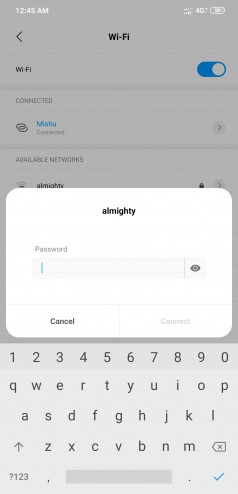
For example, whenever you are connecting to a new wifi network then after selecting the wifi network, a Dialog will be opened and you can enter that password in the opened dialog and submit the details.
One of the popular implementations of Dialogs is AlertDialog . Alert Dialogs are used to alert the user before performing a particular task. For example, if you want to delete some images from the Gallery, then the Gallery app will alert you about the fact that by pressing the OK button which is the positive button, in this case, the image will be deleted permanently.
Dialogs are Awesome :)
So, in this blog, we will learn how to make Custom Dialogs using the DialogFragment in Android. So, let’s get started.
Here is the timeline for this blog:
- What is DialogFragment?
- Three steps of creating custom Dialog
- Methods of DialogFragment
- Project Setup
- Creating Simple Dialog - Example
- Creating an Alert Dialog - Example
- Creating Dialog containing data(shared with Activity/Fragment) - Example
- Conclusion
If you want to view the source code, then you can visit here .
What is DialogFragment?
In a very simple sentence, a Dialog Fragment is a fragment that is used to make Dialogs that floats on some Activity.
DialogFragment is a utility class which extends the Fragment class. All the information regarding the Dialog or the data associated with the Dialog will be stored or managed in the Fragment only. You can use the DialogFragment in API level 11 or higher.
Since DialogFragment is associated with Fragment, so it has it’s own LifeCycle and now the Activity need not manage the lifecycle of Dialogs. Due to this reason, DialogFragments are recommended to be used while implementing Alert Dialog or any other type of Dialogs in Android and it is very easy to create a dialog fragment of our own because it requires only 3 steps. Let's see those steps:
Three steps of creating custom Dialog
-
First of all, you need to create a Kotlin/Java file for your Dialog Fragment. For example,
CustomDialog.ktand this class will extend theDialogFragment(). Here in this class, all the methods related to dialogs will be there. - After creating the class, you need to make the layout file of the dialog. According to your use-case, make the layout of your Dialog Fragment.
- And finally, you need to call your custom dialog from your Activity.
Methods of DialogFragment
There are certain methods that are associated with DialogFragment and we can use then in our Dialog Fragment class. Some of the most commonly used methods are:
- onAttach(): This is called when a fragment is first attached with its context.
- onCreate(): The initial creation of a fragment is done in onCreate and it is called after the onAttach.
- onCreateDialog(): This is used to build your custom dialog. It is mostly used for showing some AlertDialog(provided by Android).
- onCreateView(): This is used to supply the contents of the Dialog and this is entirely responsible for drawing the Dialog. It is generally used for creating custom dialogs. If you are creating an AlertDialog, then this method is not needed, only onCreateDialog is sufficient in that case.
- onViewCreated(): This is called when the Dialog is created. This is used to ensure that the view is created.
- onDestroy(): This is used to destroy the DialogFragement .
The order of execution of the above methods will be: onAttach -> onCreate -> onCreateDialog -> onCreateView -> onViewCreated -> onDestroy .
Project Setup
- Project Name: DialogFrament-Example
- Language Used: Kotlin
We will be sharing the data between the DialogFragment and the Activity and for this, we will be using Shared ViewModel. So, add the dependency of
LiveData
and
ViewModel
in you app level
build.gradle
file
dependencies {
    implementation "androidx.lifecycle:lifecycle-viewmodel-ktx:2.2.0"
    implementation "androidx.lifecycle:lifecycle-livedata-ktx:2.2.0"

}
Creating Simple Dialog - Example
In this example, we will be having a Dialog Fragment that will contain 2 text views(one for the title and other for subtitle) and 2 buttons (one for positive button and other for negative button). So, it is going to be a mock of AlertDialog.
Here, we will pass the title and subtitle text from the Activity. If you want to hardcode the title and subtitle then it is totally upon you.
So, First of all, add one button on the MainActivty so that whenever we click on that button the dialog will be opened.
Here is the code for
activity_main.xml
:
<?xml version="1.0" encoding="utf-8"?>
<androidx.constraintlayout.widget.ConstraintLayout xmlns:android="http://schemas.android.com/apk/res/android"
    xmlns:app="http://schemas.android.com/apk/res-auto"
    xmlns:tools="http://schemas.android.com/tools"
    android:layout_width="match_parent"
    android:layout_height="match_parent"
    tools:context=".MainActivity">

    <androidx.appcompat.widget.AppCompatButton
        android:id="@+id/btnSimpleDialog"
        android:layout_width="@dimen/wrap_constraints"
        android:layout_height="@dimen/dimen_48"
        android:layout_margin="@dimen/dimen_12"
        android:text="@string/label_simple_dialog"
        app:layout_constraintBottom_toBottomOf="parent"
        app:layout_constraintEnd_toEndOf="parent"
        app:layout_constraintStart_toStartOf="parent"
        app:layout_constraintTop_toTopOf="parent" />

</androidx.constraintlayout.widget.ConstraintLayout>
Now create a
SimpleDialog
class (under the root directory, right-click > New > Kotlin File/Class) and also, create a layout file named
fragment_simple_dialog.xml
.
The following is the code for
fragment_simple_dialog.xml
:
<?xml version="1.0" encoding="utf-8"?>
<androidx.constraintlayout.widget.ConstraintLayout xmlns:android="http://schemas.android.com/apk/res/android"
    xmlns:app="http://schemas.android.com/apk/res-auto"
    android:layout_width="match_parent"
    android:layout_height="wrap_content"
    android:padding="@dimen/dimen_12">

    <androidx.appcompat.widget.AppCompatTextView
        android:id="@+id/tvTitle"
        android:layout_width="@dimen/wrap_constraints"
        android:layout_height="wrap_content"
        android:text="@string/label_logout"
        android:textSize="@dimen/font_size_24"
        app:layout_constraintEnd_toEndOf="parent"
        app:layout_constraintStart_toStartOf="parent"
        app:layout_constraintTop_toTopOf="parent" />

    <androidx.appcompat.widget.AppCompatTextView
        android:id="@+id/tvSubTitle"
        android:layout_width="@dimen/wrap_constraints"
        android:layout_height="wrap_content"
        android:layout_marginTop="@dimen/dimen_12"
        android:text="@string/msg_logout"
        android:textSize="@dimen/font_size_16"
        app:layout_constraintEnd_toEndOf="parent"
        app:layout_constraintStart_toStartOf="parent"
        app:layout_constraintTop_toBottomOf="@id/tvTitle" />

    <androidx.appcompat.widget.AppCompatButton
        android:id="@+id/btnPositive"
        android:layout_width="@dimen/dimen_100"
        android:layout_height="@dimen/dimen_48"
        android:layout_marginTop="@dimen/dimen_16"
        android:text="@string/label_ok"
        app:layout_constraintBottom_toBottomOf="parent"
        app:layout_constraintEnd_toEndOf="parent"
        app:layout_constraintTop_toBottomOf="@+id/tvSubTitle" />

    <androidx.appcompat.widget.AppCompatButton
        android:id="@+id/btnNegative"
        android:layout_width="@dimen/dimen_100"
        android:layout_height="@dimen/dimen_48"
        android:layout_marginTop="@dimen/dimen_16"
        android:text="@string/label_cancel"
        app:layout_constraintBottom_toBottomOf="parent"
        app:layout_constraintEnd_toStartOf="@id/btnPositive"
        app:layout_constraintTop_toBottomOf="@+id/tvSubTitle" />

</androidx.constraintlayout.widget.ConstraintLayout>
Here, we are having a title, a subtitle, and two buttons(for positive and negative response).
Add the below code in you
SimpleDialog.kt
file:
class SimpleDialog : DialogFragment() {

    companion object {

        const val TAG = "SimpleDialog"

        private const val KEY_TITLE = "KEY_TITLE"
        private const val KEY_SUBTITLE = "KEY_SUBTITLE"

        fun newInstance(title: String, subTitle: String): SimpleDialog {
            val args = Bundle()
            args.putString(KEY_TITLE, title)
            args.putString(KEY_SUBTITLE, subTitle)
            val fragment = SimpleDialog()
            fragment.arguments = args
            return fragment
        }

    }

    override fun onCreateView(
        inflater: LayoutInflater,
        container: ViewGroup?,
        savedInstanceState: Bundle?
    ): View? {
        return inflater.inflate(R.layout.fragment_simple_dialog, container, false)
    }

    override fun onViewCreated(view: View, savedInstanceState: Bundle?) {
        super.onViewCreated(view, savedInstanceState)
        setupView(view)
        setupClickListeners(view)
    }

    override fun onStart() {
        super.onStart()
        dialog?.window?.setLayout(
            WindowManager.LayoutParams.MATCH_PARENT,
            WindowManager.LayoutParams.WRAP_CONTENT
        )
    }

    private fun setupView(view: View) {
        view.tvTitle.text = arguments?.getString(KEY_TITLE)
        view.tvSubTitle.text = arguments?.getString(KEY_SUBTITLE)
    }

    private fun setupClickListeners(view: View) {
        view.btnPositive.setOnClickListener {
            // TODO: Do some task here
            dismiss()
        }
        view.btnNegative.setOnClickListener {
            // TODO: Do some task here
            dismiss()
        }
    }

}
Here is the description of the above code:
-
The
newInstance()method is used to take the title and subtitle form the Activity. -
The
onCreateView()method is responsible for creating the Dialog Fragment. -
In the
onViewCreated()we are performing the tasks that need to be done after the creation of Dialog. For example, taking out the title and subtitle and setting it in the text view of the SimpleDialog. -
The
setupView()is a user-defined function that is helping in setting the text in SimpleDialog. -
The
setupClickListener()is an another user-defined function that is helping in setting all the click listeners of the SimpleDialog.
On clicking the positive/negative button, the dialog will be closed with the help of
dismiss()
method. You can change it according to your use-case.
Now, from the MainActivtiy, you need to open the Dialog on button click. So, following is the code for the same:
btnSimpleDialog.setOnClickListener {
    SimpleDialog.newInstance(getString(R.string.label_logout), getString(R.string.msg_logout)).show(supportFragmentManager, SimpleDialog.TAG)
}
Here, I am passing the title and subtitle from the Activity.
Now, run your app and click on the button to see the dialog.
Creating an Alert Dialog - Example
If you want to use the AlertDialog provided by Android instead of your own custom dialog, then all you need to do is override the
onCreateDialog
method and create your AlertDialog there. In this case, you need not override the
onCreateView
method.
So, in the
SimpleDialog.kt
file, the following code will be there:
override fun onCreateDialog(savedInstanceState: Bundle?): Dialog {
    val builder = AlertDialog.Builder(activity)
    builder.setTitle("Alert Dialog")
    builder.setMessage("Hello! I am Alert Dialog")
    builder.setPositiveButton("Cool", object: DialogInterface.OnClickListener {
        override fun onClick(dialog:DialogInterface, which:Int) {
            dismiss()
        }
    })
    builder.setNegativeButton("Cancel", object: DialogInterface.OnClickListener {
        override fun onClick(dialog:DialogInterface, which:Int) {
            dismiss()
        }
    })
    return builder.create()
}
Creating Dialog containing data(shared with Activity/Fragment)
In this example, we will be having one EditText in the DialogFragment and a button. On clicking the button, the text in the EditText will be displayed on the
MainActivtiy
.
For this, we will use the concept of SharedViewModel. If you are not familiar with SharedViewModel, then you can read our blog on that topic from here .
NOTE: Don't forget to add the dependency of LiveData and ViewModel.
Let's first start with the MainActivity. In the
activity_main.xml
file, we need to add one button and one text view for displaying the name. So, the final code of the
activity_main.xml
will be:
<?xml version="1.0" encoding="utf-8"?>
<androidx.constraintlayout.widget.ConstraintLayout xmlns:android="http://schemas.android.com/apk/res/android"
    xmlns:app="http://schemas.android.com/apk/res-auto"
    xmlns:tools="http://schemas.android.com/tools"
    android:layout_width="match_parent"
    android:layout_height="match_parent"
    tools:context=".MainActivity">

    <androidx.appcompat.widget.AppCompatButton
        android:id="@+id/btnSimpleDialog"
        android:layout_width="@dimen/wrap_constraints"
        android:layout_height="@dimen/dimen_48"
        android:layout_margin="@dimen/dimen_12"
        android:text="@string/label_simple_dialog"
        app:layout_constraintBottom_toTopOf="@+id/btnDataDialog"
        app:layout_constraintEnd_toEndOf="parent"
        app:layout_constraintStart_toStartOf="parent" />

    <androidx.appcompat.widget.AppCompatButton
        android:id="@+id/btnDataDialog"
        android:layout_width="@dimen/wrap_constraints"
        android:layout_height="@dimen/dimen_48"
        android:layout_margin="@dimen/dimen_12"
        android:text="@string/label_dialog_with_data"
        app:layout_constraintBottom_toBottomOf="parent"
        app:layout_constraintEnd_toEndOf="parent"
        app:layout_constraintStart_toStartOf="parent"
        app:layout_constraintTop_toTopOf="parent" />

    <androidx.appcompat.widget.AppCompatTextView
        android:id="@+id/tvName"
        android:layout_width="@dimen/wrap_constraints"
        android:layout_height="wrap_content"
        android:layout_margin="@dimen/dimen_12"
        android:textSize="@dimen/font_size_16"
        app:layout_constraintEnd_toEndOf="parent"
        app:layout_constraintStart_toStartOf="parent"
        app:layout_constraintTop_toBottomOf="@+id/btnDataDialog" />


</androidx.constraintlayout.widget.ConstraintLayout>
Now, create a class named
DialogWithData
and
SharedViewModel
.
The following is the code for
SharedViewModel.kt
:
class SharedViewModel : ViewModel() {
    val name = MutableLiveData<String>()

    fun sendName(text: String) {
        name.value = text
    }
}
On the button click of the Dialog, the
sendName()
method will be called with the text in EditText and the
name
will be observed in the MainActivity.
The following is the code of
DialogWithData.kt
file:
class DialogWithData : DialogFragment() {

    companion object {

        const val TAG = "DialogWithData"

    }

    private lateinit var viewModel: SharedViewModel

    override fun onCreateView(
        inflater: LayoutInflater,
        container: ViewGroup?,
        savedInstanceState: Bundle?
    ): View? {
        return inflater.inflate(R.layout.fragment_dialog_with_data, container, false)
    }

    override fun onViewCreated(view: View, savedInstanceState: Bundle?) {
        super.onViewCreated(view, savedInstanceState)
        viewModel = ViewModelProvider(requireActivity()).get(SharedViewModel::class.java)
        setupClickListeners(view)
    }

    override fun onStart() {
        super.onStart()
        dialog?.window?.setLayout(
            WindowManager.LayoutParams.MATCH_PARENT,
            WindowManager.LayoutParams.WRAP_CONTENT
        )
    }

    private fun setupClickListeners(view: View) {
        view.btnSubmit.setOnClickListener {
            viewModel.sendName(view.etName.text.toString())
            dismiss()
        }
    }

}
On the click of the submit button, the
sendName()
method of the
SharedViewModel
is called.
Now, the
name
need to be observed in the
MainActivity
and also we need to implement the click listener of the button to open the
DialogWithData
fragment. So, the final code of
MainActivtiy
will be:
class MainActivity : AppCompatActivity() {

    private lateinit var sharedViewModel: SharedViewModel

    override fun onCreate(savedInstanceState: Bundle?) {
        super.onCreate(savedInstanceState)
        setContentView(R.layout.activity_main)

        sharedViewModel = ViewModelProvider(this).get(SharedViewModel::class.java)
        sharedViewModel.name.observe(this, Observer {
            tvName.text = it
        })


        btnSimpleDialog.setOnClickListener {
            SimpleDialog.newInstance(getString(R.string.label_logout), getString(R.string.msg_logout)).show(supportFragmentManager, SimpleDialog.TAG)
        }
        btnDataDialog.setOnClickListener {
            DialogWithData().show(supportFragmentManager, DialogWithData.TAG)
        }
    }

}
Now, you can run the application and enter some data in the EditText and see the text in MainActivity.
This is how you can share the data of the DialogFragment with the Activity. For further improvements, you can check if the values in the EditText is null or not. If it is null then you can show some error Toast and if it is not null then you can simply update the TextView.
This is all about DialogFragments.
If you want to view the whole source code, then you can visit here .
Conclusion
In this blog, we learned how to implement DialogFragment in our Android Application. We saw that the traditional Alert Dialogs are no longer recommended. So, we need to use the DialogFragment to implement Dialogs. We did one example on DialogFragment to have a clear understanding of the same.
That’s it for this blog.
Keep Learning :)
Team MindOrks!