Understanding ImageView ScaleType in Android
Open your Android phone, look at the applications present in it and try to find if there is some application which doesn't have any image. Did you get any? The answer will be a big NO (how do I know? No I don't have the access to your phone :) ). This is because every application uses an image in some or the other form to have a better user experience.
So, we as an Android developer are very fond of adding images or we can say adding ImageView to our application. But many times, we face various issues related to the scaling of the image i.e. either your image will be cropped or you will get your image left aligned and many other problems arise while scaling an image.
So, welcome to MindOrks! In this blog, we are going to learn ImageView ScaleType. Let's get started.
Note: In this blog, I am going to use the MindOrks logo. You can download the below image and use this in your project.
Adding an image to the project
First of all, we need to add an image to our project. Copy the desired image and paste into the
res > drawable directory
. After that, add an
ImageView
to your XML file. Here is the code of my
activity_main.xml
file:
<?xml version="1.0" encoding="utf-8"?>
<androidx.constraintlayout.widget.ConstraintLayout xmlns:android="http://schemas.android.com/apk/res/android"
    xmlns:app="http://schemas.android.com/apk/res-auto"
    xmlns:tools="http://schemas.android.com/tools"
    android:layout_width="match_parent"
    android:layout_height="match_parent"
    tools:context=".MainActivity">

    <ImageView
        android:id="@+id/imageView"
        android:layout_width="wrap_content"
        android:layout_height="240dp"
        android:src="@drawable/mindorks_logo"
        app:layout_constraintBottom_toBottomOf="parent"
        app:layout_constraintEnd_toEndOf="parent"
        app:layout_constraintStart_toStartOf="parent"
        app:layout_constraintTop_toTopOf="parent" />

</androidx.constraintlayout.widget.ConstraintLayout>
The following is the output of the above XML code:
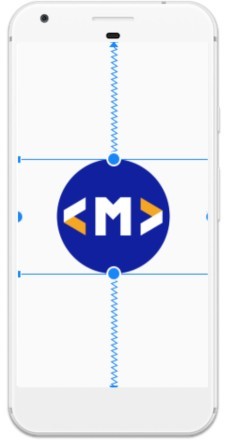
We will use the above image for our reference to compare with the output image after applying some
ScaleType
.
ImageView ScaleType in Android
In Android, we can scale the bounds of an
ImageView
by using various
ScaleType
s. By using
ScaleType
, the bounds of the image are scaled to the bounds of the
ImageView
. The following are the
ScaleType
s used in Android:
- CENTER
- CENTER_CROP
- CENTER_INSIDE
- FIT_CENTER
- FIT_START
- FIT_END
- FIT_XY
- MATRIX
Let's learn one by one.
CENTER
The CENTER ScaleType is used to place the image to the center of the ImageView in which that image is present by keeping the same aspect ratio. No scaling is done here and while centering the image, if the image is so big such that it is not fitting in the center, then some parts of the image will be cropped.
The below line of code is used to apply CENTER ScaleType:
android:scaleType="center"The output will look something like this:
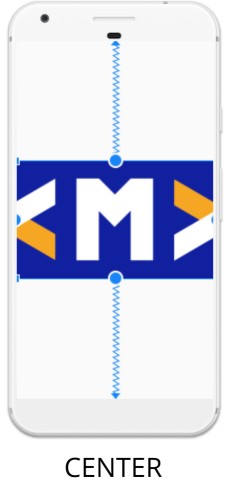
If you compare the above image with our original image then you will find that some parts of the image are cropped because the image is centered here.
CENTER_CROP
The CENTER_CROP ScaleType is used to place the image in the center of the ImageView and scale the image uniformly by maintaining the aspect ratio. So basically it scales in such a way that one of the width or height of the image becomes equal to the width and height of the ImageView. During scaling, if any of them becomes equal then the scaling will be stopped and the rest of the parts will be cropped. So, the dimensions of the image can be equal to or more than that of ImageView.
The below line of code is used to apply CENTER_CROP ScaleType:
android:scaleType="centerCrop"The output will look something like this:
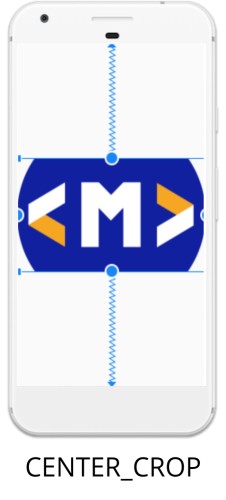
In the above image, while scaling when the width of the image becomes equal to the width of ImageView, then the scaling is stopped and the rest of the part is cropped.
CENTER_INSIDE
The CENTER_INSIDE ScaleType is used to place the image in the center of the ImageView and scale the image uniformly by maintaining the aspect ratio. So basically the scaling is done until both the width and height of the image become less than the width and height of the ImageView. So, the image will be put inside the ImageView irrespective of the size of the image and no cropping of the image will be performed.
The below line of code is used to apply CENTER_INSIDE ScaleType:
android:scaleType="centerInside"The output will look something like this:
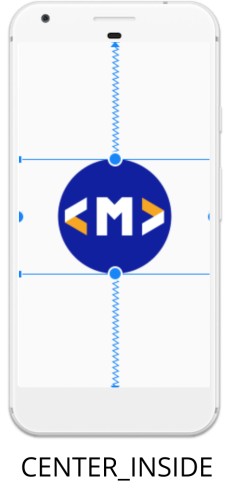
In the above image, the scaling is done until both the width and height of the image become equal to the width and height of ImageView.
FIT_CENTER
The FIT_CENTER ScaleType is used to place the image in the center of the ImageView and scale the image uniformly by maintaining the aspect ratio and no cropping of image will be performed. The width and height of the image are scaled down or up based on the size of the image. So basically the scaling is done until both the width and height of the image become less than the width and height of the ImageView. Anyone of width or height must be the same with the width or height of the ImageView.
The below line of code is used to apply FIT_CENTER ScaleType:
android:scaleType="fitCenter"The output will look something like this:
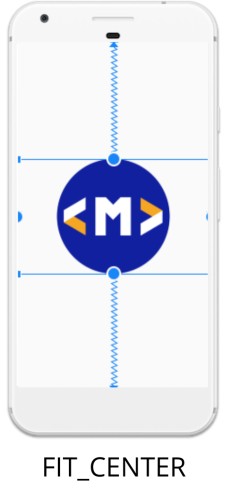
In the above image, the image is fitted in the center without any cropping.
FIT_START
The FIT_START ScaleType is used to place the image in the left-most and top part of the ImageView and scale the image uniformly by maintaining the aspect ratio and no cropping of image will be performed. The width and height of the image are scaled down or up based on the size of the image. So basically the scaling is done in the left part until both the width and height of the image become less than the width and height of the ImageView. Anyone of width or height must be the same with the width or height of the ImageView.
The below line of code is used to apply FIT_START ScaleType:
android:scaleType="fitStart"The output will look something like this:

In the above image, the image is scaled in the left-part of the ImageView.
FIT_END
The FIT_END ScaleType is used to place the image in the right-most bottom part of the ImageView and scale the image uniformly by maintaining the aspect ratio and no cropping of image will be performed. The width and height of the image are scaled down or up based on the size of the image. So basically the scaling is done until both the width and height of the image become less than the width and height of the ImageView. Anyone of width or height must be the same with the width or height of the ImageView.
The below line of code is used to apply FIT_START ScaleType:
android:scaleType="fitEnd"The output will look something like this:
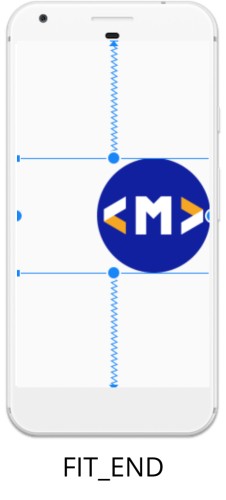
In the above image, the image is scaled to the right-part of ImageView.
FIT_XY
The FIT_XY ScaleType is used to scale the image throughout the ImageView. The aspect ratio of the image is not maintained here. The width and height of the image are the same as that of the width and height of the ImageView.
The below line of code is used to apply FIT_XY ScaleType:
android:scaleType="fitXY"The output will look something like this:
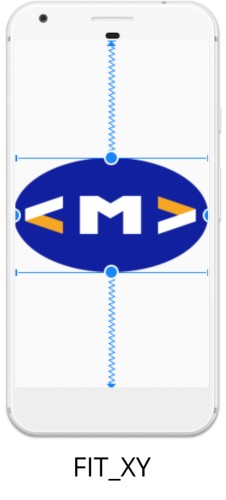
In the above image, the image is scaled to fit the width and height of the ImageView. So, the width and height of the image are the same as that of ImageView.
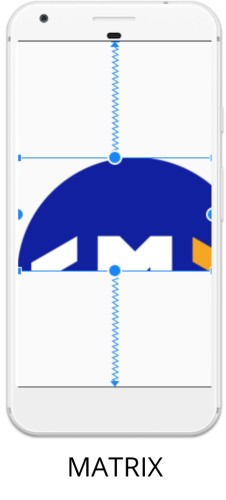
MATRIX
The MATRIX ScaleType is used to scale the image according to some user-defined MATRIX. Basically, we use a Matrix to manipulate the canvas while drawing some graphics. So, when using a Matrix with an ImageView, you can use it to flip, rotate, translate, etc with your image.
The below line of code is used to apply FIT_START ScaleType:
android:scaleType="matrix"The output will look something like this:
Conclusion
In this blog, we learned about all the ScaleTypes that can be used in an ImageView. You can experiment more by making use of images of different size and also using the ImageView of different sizes.
Hope you enjoyed this blog. Do share this blog with your fellow developers to spread Android learning.
Video for this blog: Check here .
Happy Learning :)
Team MindOrks!
Also, Let’s connect on Twitter , Linkedin , Github , and Facebook