Creating Different Build Variants in Android

While developing an Android application, we generally need various types of APKs or you can say different versions of APK during the development and release phase. For example, you may need one debug APK without having proguard or one debug APK with proguard or you may need one APK for your free users and one APK for your paid users or you may need one APK for Android version 6 and above and one APK for Android version below 6 and there are many other possibilities. But the question is, how you are going to create these many versions of your App. Are you going to have different projects for these versions or just one project is enough? Because the code is going to remain almost the same and just some APIs or some build configurations are going to change? So, how to achieve this? This can be achieved by using Build Variants i.e. the topic of this blog.
In this blog, we are going to learn what Build Variants are and how to create different build variants in Android. So, let's get started.
Build Types and Build Variants
While building any Android application, we create various build types such as "debug" and "release". At the same time, we can create various product flavors for the same app, for example, the free product flavor for free users and the paid product flavor for the paid users. So, Android Studio provides a feature of Build Variants which can be thought of as a cartesian product of all your build types and all your product flavors.
All you need to do is add various build types in your module-level
build.gradle
file and during development or production, you can simply choose the Build Variant you want to test or release.
NOTE: By default, the Android Studio will generate " debug " and " release " Build Types for your project.
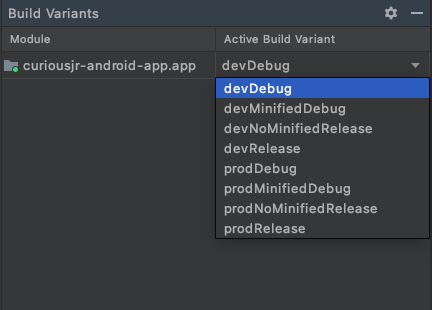
The Build Variant option can be found at the left part of the screen(mostly below Resource Manager)in Android Studio or go to Build > Select Build Variant or you can simply press cmd + shift + A and search for "Build Variant":
So, to change a Build Type, all you need to do is just select your Build Type from the Build Variant and after the project sync, you are good to go. But how to create a Build Type? Let's see.
Add Build Types
In this section, we are going to learn how to add various build types in Android.
By default, whenever you create any project, then Android Studio will create two build types for the project i.e. "
debug
" and "
release
". But in order to add more build types, you need to add them to your module-level
build.gradle
file and under the
buildTypes
block. The following is an example of the same:
android {

    defaultConfig {
        applicationId "com.mindorks"
        versionCode 3
        versionName "0.0.3"
        ...
    }

    buildTypes {
        debug {
            versionNameSuffix ".dev"
            debuggable true
            ...
        }
        release {
            debuggable false
            minifyEnabled true
            shrinkResources true
            proguardFiles getDefaultProguardFile('proguard-android.txt'), 'proguard-rules.pro'
            ...
        }
        minifiedDebug {
            versionNameSuffix ".dev"
            debuggable true
            minifyEnabled true
            shrinkResources true
            proguardFiles getDefaultProguardFile('proguard-android.txt'), 'proguard-rules.pro'
            ...
        }
     }
    ...
}
In the above code, there are three build types i.e. debug , release , and minifiedDebug . The debug and release are the same generated by Android Studio with some additional properties and minifiedDebug is the new build type that is a combination of debug + proguard.
If you closely look at the code, then you will find that in the defaultConfig block, the version name is "0.0.3" and in the debug and minifedDebug build type, we are adding a ".dev" suffix to the version name. This will differentiate the dev APK from the prod APK.
Similarly, you can create the build type named noMinifedRelease that will be a combination of release + without proguard.
There are certain cases where you want to use the same properties of some of your previous build types and add or modify some properties to create a new build type. So, to do so you can use
initWith
:
newBuildType {
    initWith debug
    versionNameSuffix ".newbuild"
    ...
}
The above is the code of a new build type name
newBuildType
. Since we are using
initWith debug
, so it will contain all the properties of
debug
and you can add more properties to it or you can also edit some of the properties of
debug
and keep other things as it is. In our case, we are editing the
versionNameSuffix
and setting it with "
.newbuild
" instead of "
.dev
" that is there in the debug.
Now, if you open the Build Variants option in the Android Studio, then you will find 4 build variants i.e. debug , release , minifiedDebug , and newBuildType . You can choose any of these for your build.
NOTE: If you are using Kotlin DSL in yourbuild.gradlefile, then to add a build type, you need to usecreate("yourBuildTypeName")method in buildTypes block.
Adding Product Flavors
You can think of Product Flavors as different variants of your app. i.e. if you are providing different content to different users but using the same code base, then you can add product flavors to your app.
For example, you can add product flavors such as " development " and " production ", Inside these flavors you can add different API keys for the same working flow. For example, you can add the development API in the development flavor and production API in the production flavor.
To add a product flavor you need to add the
productFlavors
block inside the
android
block and each product flavor must have some flavor dimension:
android {
    ...
    defaultConfig {...}
    buildTypes {
        debug{...}
        release{...}
    }

    flavorDimensions "version"
    productFlavors {
        development {
            dimension "version"
            versionNameSuffix ".dev"
        }
        production {
            dimension "version"
            versionNameSuffix ".prod"
        }
    }
}
The best part of product flavors is that they are associated with build types. For example, if you have two build types named "debug" and "release" and two product flavors named "development" and "production", then your build variants will be:
- developmentDebug
- developmentRelease
- productionDebug
- productionRelease
Now, you can select any of the build variants you want for your build.
You can create as many product flavor dimensions as you want by separating each dimension from others by using a comma(
,
) and use it by using
dimension "dimensionName"
. For example:
flavorDimension "dimensionOne", "dimensionTwo", "dimensionThree"So, this is how you can create a product flavor and use it in your app for making various versions.
That's it for this blog.
If you want to learn about build variants by watching from video, you can watch our video from MindOrks YouTube channel .
Keeps Learning!
Sumit Mishra